Savant Power & Light App - Adding and Configuring a GE Smart Thermostat
| Document Date: | July 2025 |
| Document Supports: | SP&L App 3.3 and higher |
| Savant App 11.1 and higher | |
| SST-W300 |
Overview
The Following guide assumes the GE Smart Thermostat is already physically installed. If not, follow the steps outlined in GE Smart Thermostat - Works with Savant [SST-W300] Quick Reference Guide.
Savant Power & Light app - Adding and Configuring a GE Smart Thermostat is one of several articles describing each of the functions within the SP&L app. Refer to the Savant Power & Light app (SP&L) – Initial Smart Panel Configuration for links to all available articles.
1. Provision Thermostat to Wi-Fi
- Log into the SP&L app.
- Select Provision to Wi-Fi from the Savant Power and Light screen.
- Locate the Thermostat SST-W300 from the list of Bluetooth found devices and select the Connect to Wi-Fi button for that device.
NOTE: Only 2.4 Ghz networks are supported. - Read the Preparing for Wi-Fi screen that appears (not shown in image). Make sure your mobile device is on the Wi-Fi network the thermostat will be added to, then select Next.
- Enter the password to the local Wi-Fi network and select Next.
- A Success dialog box will open when connected. Select the OK button.
- The SST-W300 thermostat will now display a solid Wi-Fi icon on the top right side of the screen. This icon indicates the thermostat is now connected to Wi-Fi.
- Follow steps 4 - 8 to provision any additional thermostats to the Wi-Fi network.
- When complete, exit out of the Provision Devices To Wi-Fi screen.
2. Program the HVAC system type into the Thermostat
Use the Savant Power & Light app to configure the type of HVAC system and upload it to the thermostat. The instructions below describe this process.
- From the Savant Power & Light select System Configuration > Home Name > Add/ Remove Devices, check Thermostat, then Save.
- Tap the Thermostat tile then tap the + button in the top right corner to add an SST-W300. The app will display all SST-W300's on the Wi-Fi network.
- Tap the SST-W300 in the list, then tap Add.
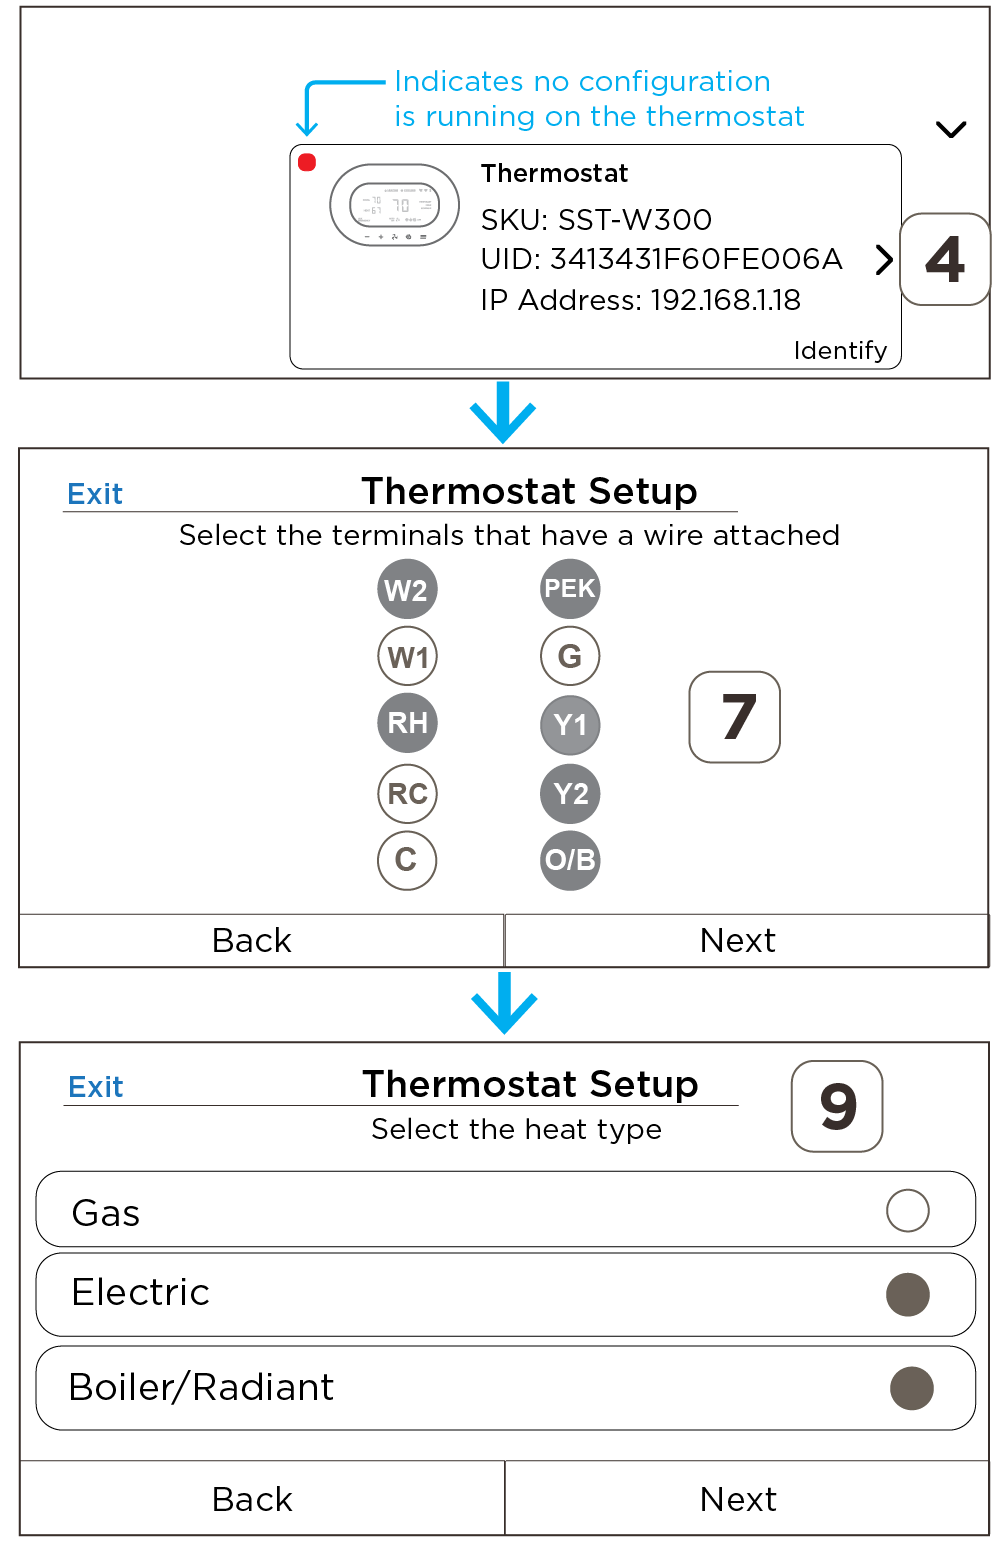
- Once added, the Thermostat tile will present a red dot in the upper left corner indicating it has not been configured yet. Tap the > button on the tile to begin configuration.
- Assign a room name matching where the thermostat is installed.
- Read the Thermostat Setup screen that opens and remove the thermostat from its mounting plate (not shown in image).
- Select the terminals that have a wire attached to the thermostat backplate in the app. Take a picture of the wiring for future reference. Then, select Next.
- Read the Caution! message and select Yes if the selections made in previous steps are correct (step not shown in diagram).
- Select the type of HVAC system installed. Select Next.
- Reattach the thermostat to the backplate and allow it to boot up and connect to Wi-Fi before selecting Next.
- Sync the configuration to the Host.
3. Thermostat Settings
With a configuration running on the thermostat, other information such as naming the thermostat, setting the temperature units, and calibrating the thermostat can be set. Use the information when setting the various fields in the Thermostat screen.
- From the Savant Power & Light select System Configuration > Home Name > Thermostat.
- Select the thermostat icon to open the Thermostat Settings screen.
- Use the descriptions below when making adjustments to these screens.
| Thermostat Settings | ||
| Name | Select the field and enter a name that identifies the thermostat. An example would be "1st floor tstat" | |
| Wi-Fi | The Wi-Fi network the thermostat is connected to is displayed. Note: Only 2.4 Ghz networks are supported. | |
| Thermostat Info | Select this field to open the Thermostat Info screen. In addition to the SKU and Firmware version, this screen offers information about how the thermostat is configured. Use the fields on this page when troubleshooting a problem or to simply see how the thermostat is configured. | |
| Temperature Unit | Select to open the Temperature Unit screen and update the temperature format to either Fahrenheit or Celsius. | |
| Screen Mode | ||
| Calibration |
When the temperature or humidity sensor is not reading the exact temperature, a correction offset of +/- 6 can be added to the reading displayed on the thermostat's front panel. To add or subtract an offset, do the following:
After a few seconds, the Calibration screen will close and the temperature or humidity displayed on the thermostat updates with the new offset value. | |
| Advanced | Use the Advanced screen to update the configuration running on the thermostat. HELPFUL! When making changes to any fields in the Advanced menu, the Done icon will change to Blue when a change to a field is made. Selecting the Done icon sends the updates to the thermostat. | |
| System Class | The System Class set on the thermostat is displayed. The two types are Conventional or Heat Pump. | |
| System Type |
Displays the System Type set on the thermostat. To update the type of HVAC system:
| |
| Power Wires |
Displays which terminal the power wires are connected to. This is set up during the initial setup. To update:
HELPFUL! The RC connection is needed to power the thermostat and supply 24V AC to relays Y1, Y2, G, and O/B. Connection RH supplies 24V AC to W1 and W2. However, if there is only an R wire, the user can connect the R wire to either RC and choose the right configuration in the Savant Power and Light App and RC will connect to RH internally. | |
| Furnace Type |
Displays the furnace type configured on the thermostat. To change the furnace type, do the following:
| |
| Thresholds |
Auto Mode Deadband - Sets the differential between the heat and cool set point. Thresholds or Stage Differentials - Programmable values that are extensions of the heating and cooling set points. Heat Stage 1 On - Sets the number of degrees below the heating set point that the stage 1 heating is engaged. Example:
Cool Stage 1 On - Sets the number of degrees above the cool set point that the stage 1 cooling is engaged. Example:
| |
| HVAC Modes | Used to select different HVAC Modes (Cool, Auto, and Heat) | |