Savant App User Guide - Settings
Documentation Date: August 2025
Overview
From the Savant app Home screen, tap Settings at the upper left corner or swipe right to access the Settings view. The specific list of options displayed are dependent on the permissions and available to the current user and the configurable services and devices within the Savant Home.
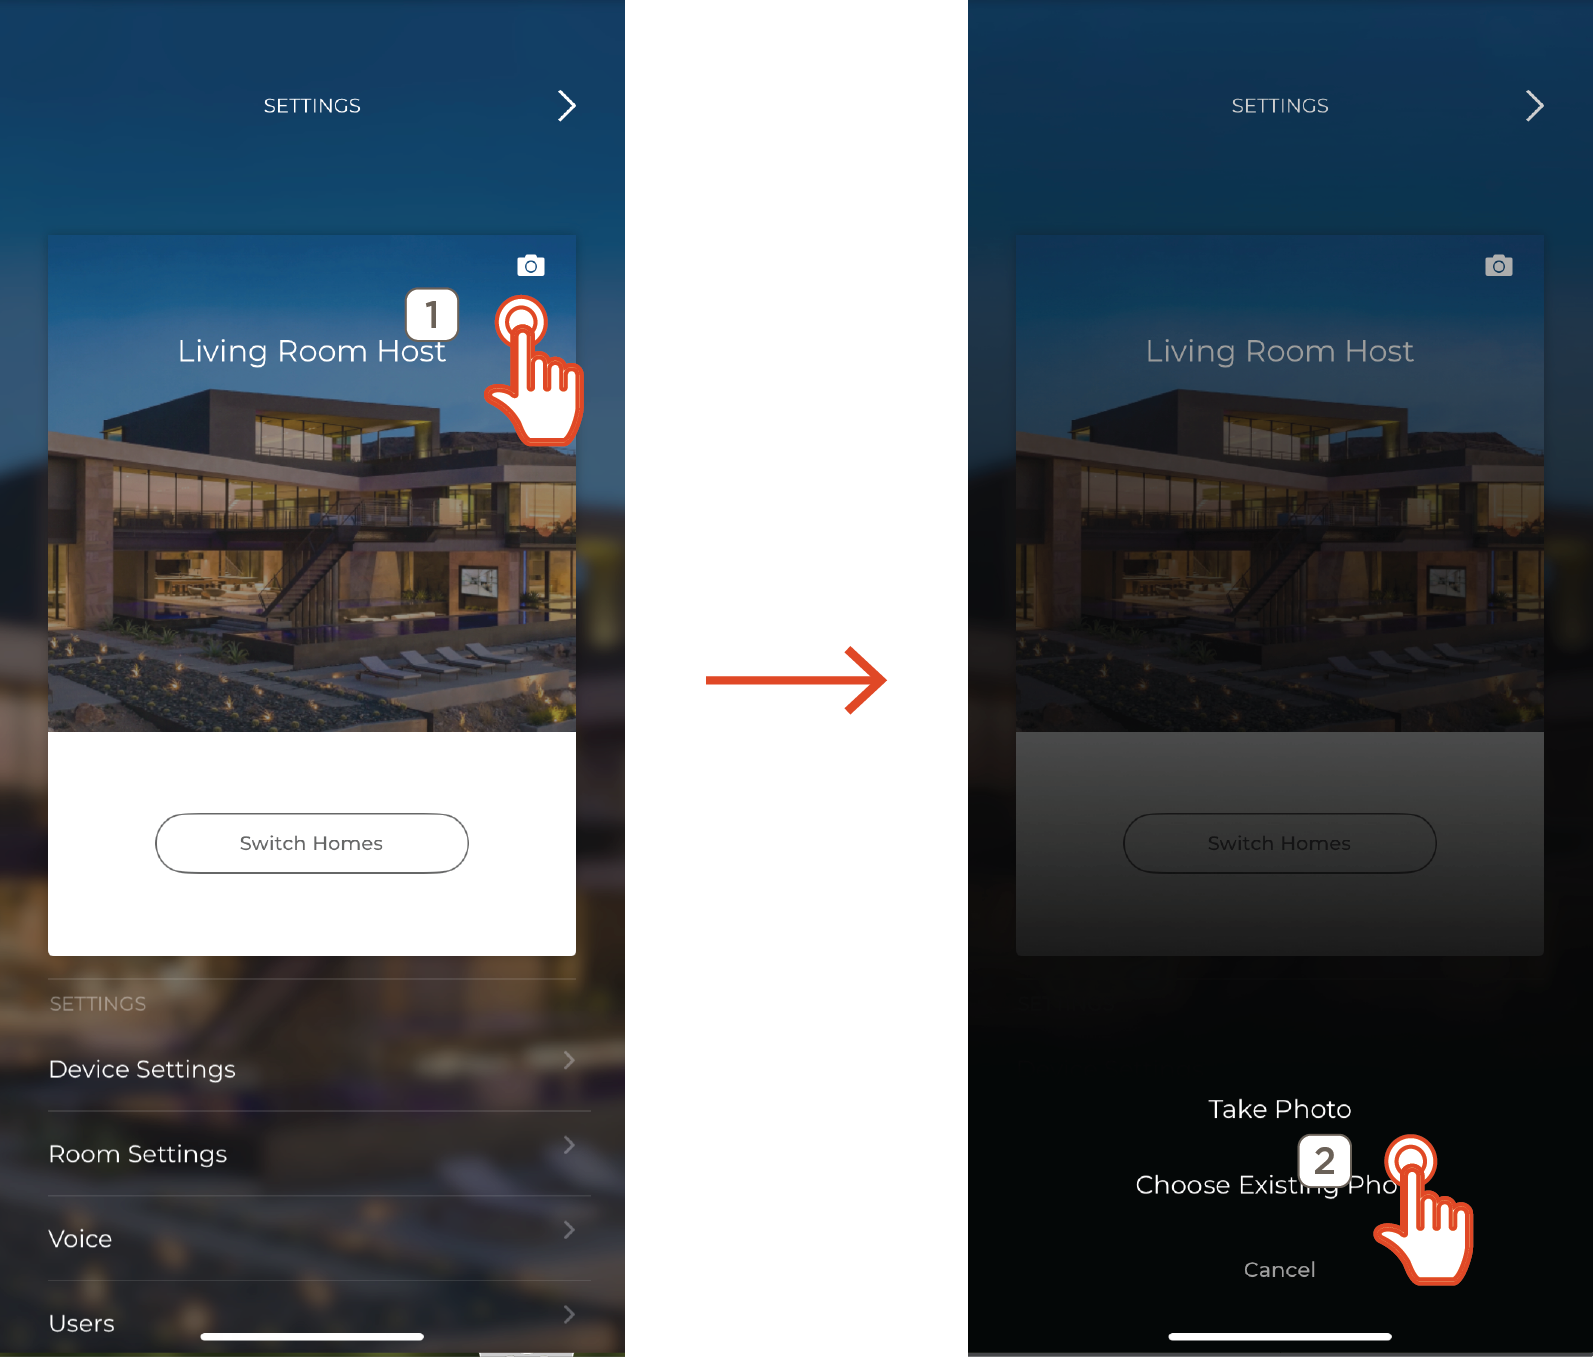
Change Home Photo
The Home photo is displayed as the background for the Savant app when accessing the selected Savant Home. The default photo can be replaced with a personalized image uploaded from a mobile device using a Savant User Account
- Swipe right or tap the Settings icon
- Tap the Camera icon on the Home image
- Select either Take Photo or Choose Existing Photo to replace the default Home image
- Take Photo - Use the iOS or Android device to take a photo of your home
- Choose Existing Photo - Opens the Photos directory on the iOS or Android device. Browse and select an existing photo to replace the current photo.
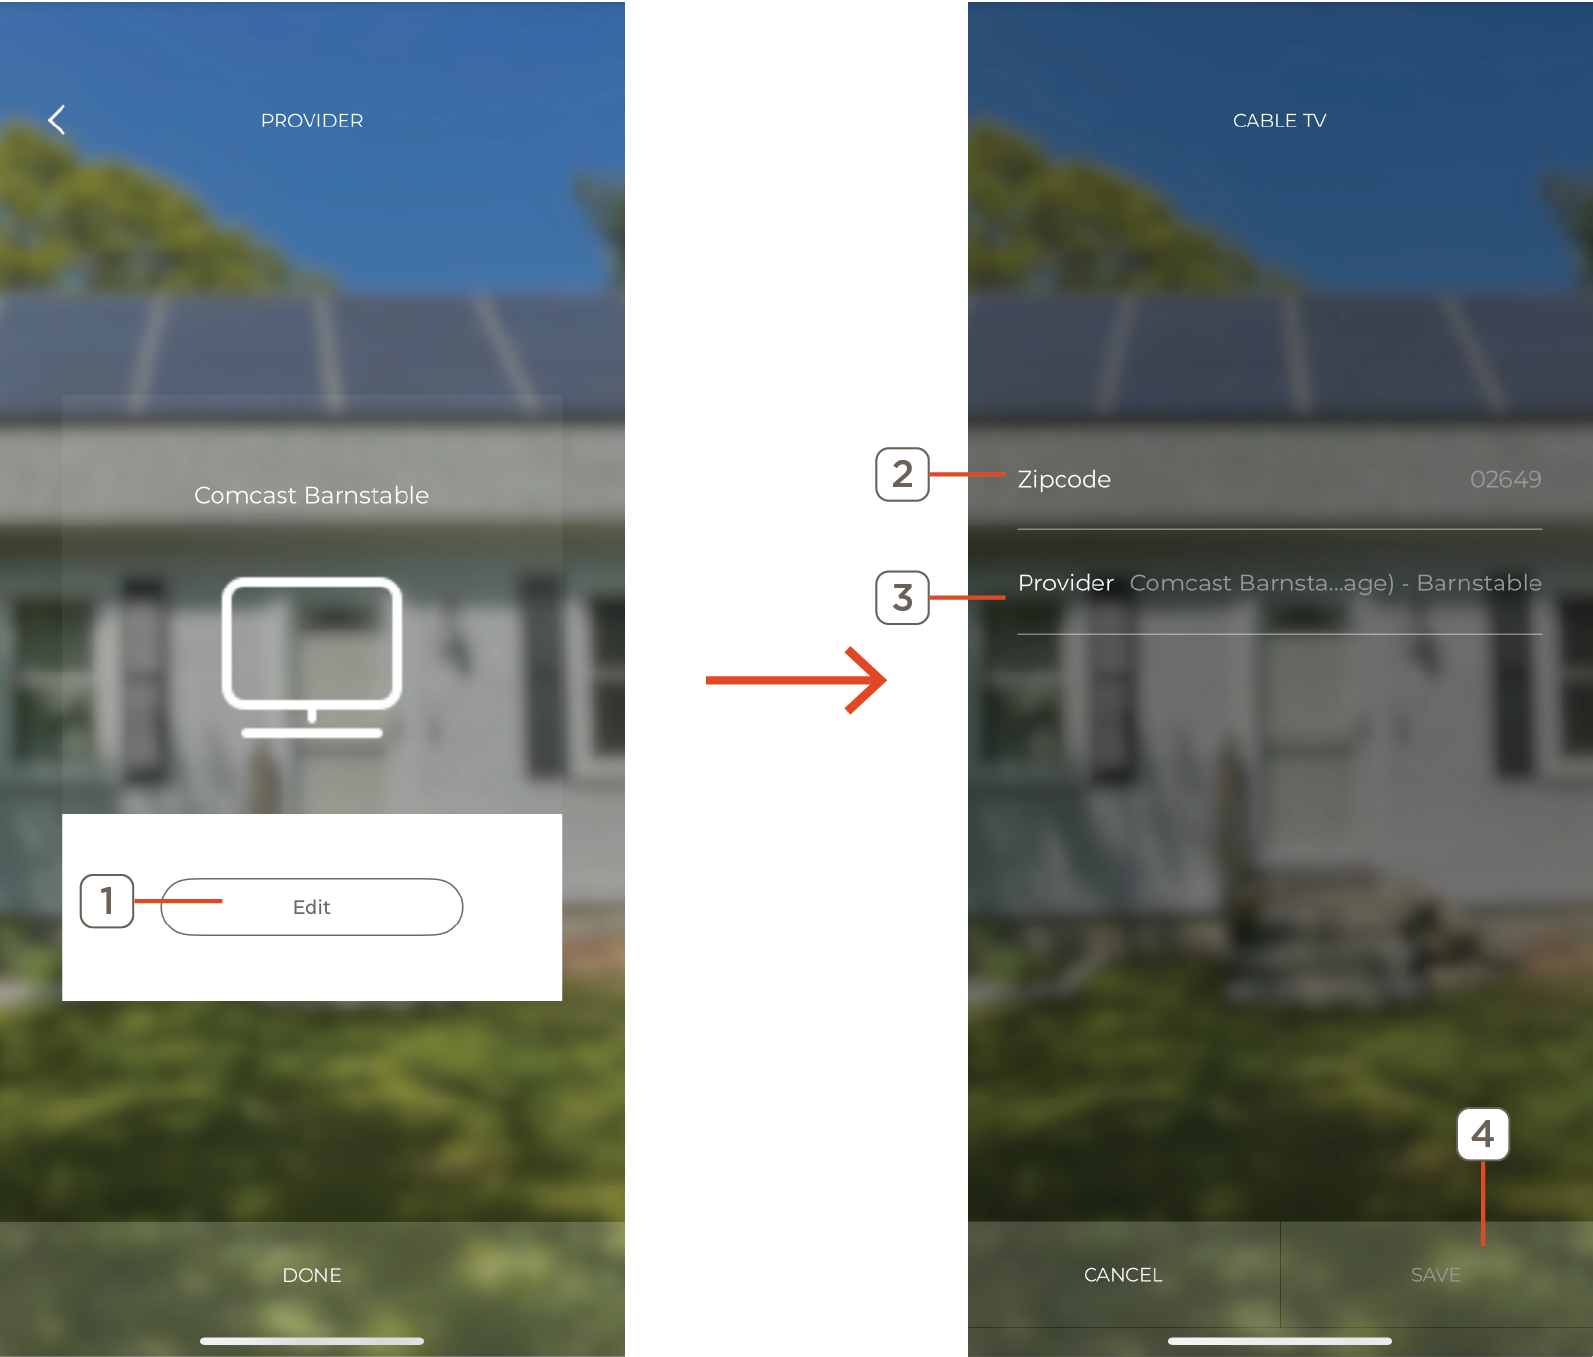
Provider
A provider must be configured before access to local package, provider-specific channel listings, and channel favorites becomes available. A service card is displayed for satellite and cable TV services.
- If both service types are available, swipe left or right to scroll between cards and tap Add Provider
- Tap the disclosure triangle to the right of the Zip Code field. Enter the local area zip code and select Save
- Select he correct package matching the TV service used in the home, then tap Next
- Tap Save
HELPFUL INFO!:
- A valid cable or satellite TV service with use of Cloud Based Channel Listings selected must be configured by the installer for the Provider menu to be available within the Savant app
- Providers can be added, removed, or edited only by admin users
- Only one provider of each service type (cable or satellite) per home is supported
- Configuring a provider in the Savant App requires that the user’s device is connected to the local Wi-Fi
- In some cases, the zip code and/or provider fields may be pre-populated based on installer configured options
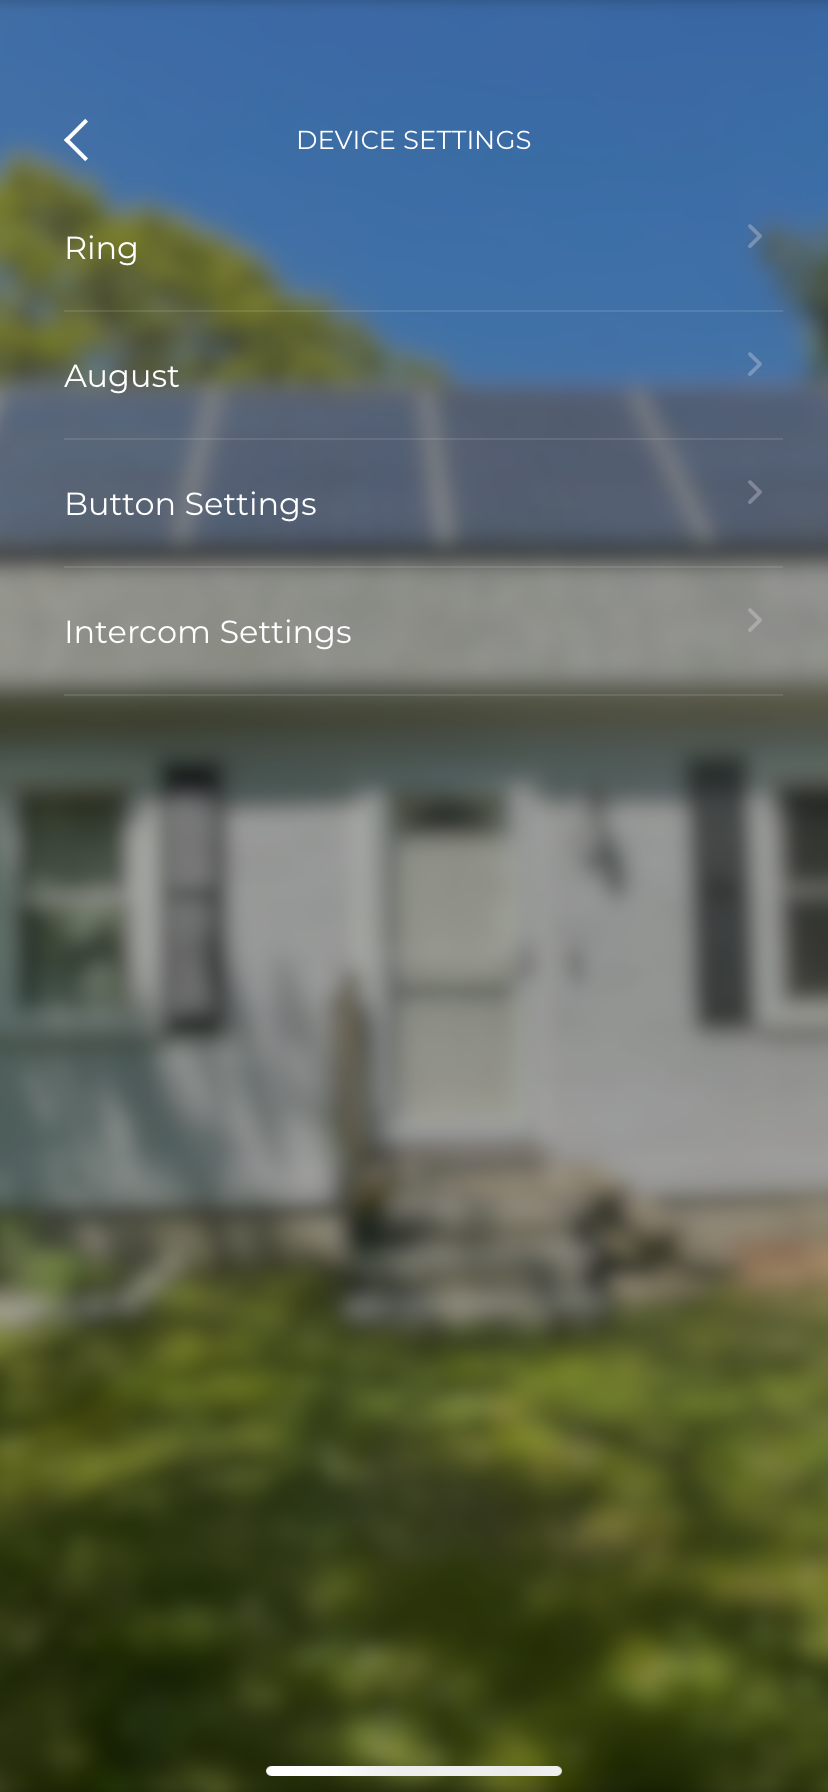
Device Settings
Options available within the Device Settings are dependent on the devices installed within the Savant Home. This guide covers several common device settings for Savant devices. For information on third party devices that can appear on this screen, contact a registered Savant Dealer near you or refer to information related available on the Savant Customer Community
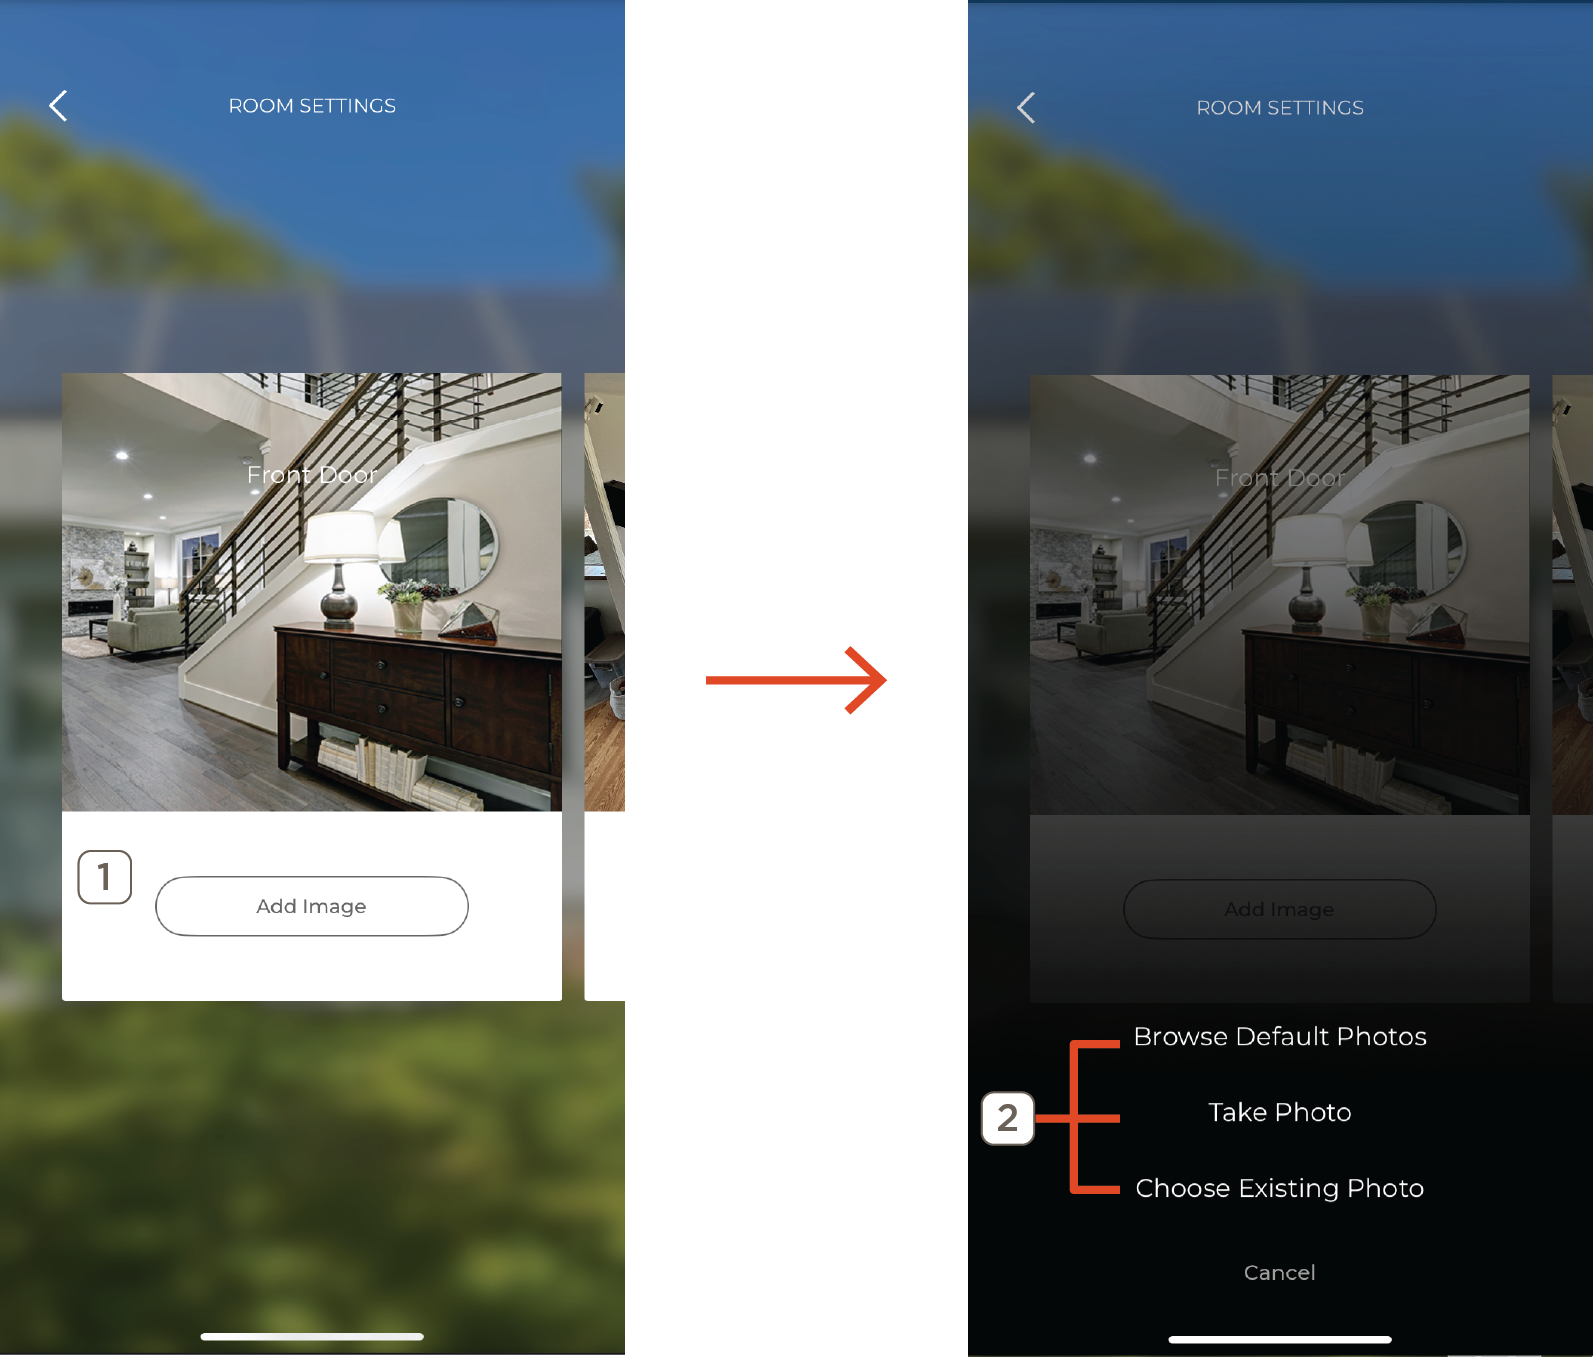
Room Settings
Room within the Savant Home are represented with the default home image, a photo selected from the images available within the Savant app, or uploading a custom photo. Follow the steps below to change a Room Photo:
- Swipe left or right to scroll through the list of rooms, then select the Add Image button next to the room to edit
- Select from the three options presented to choose a new image:
- Browse Default Photos to choose from existing default options
- Take Photo to snap a new image with the mobile device camera
- Choose Existing Photo to select an image from the mobile device file system
- Select Done when complete
NOTE: If a room image is being selected from a mobile device file system, or taken via the device’s camera, permissions or privacy settings may need to be enabled or altered to allow access for the Savant App
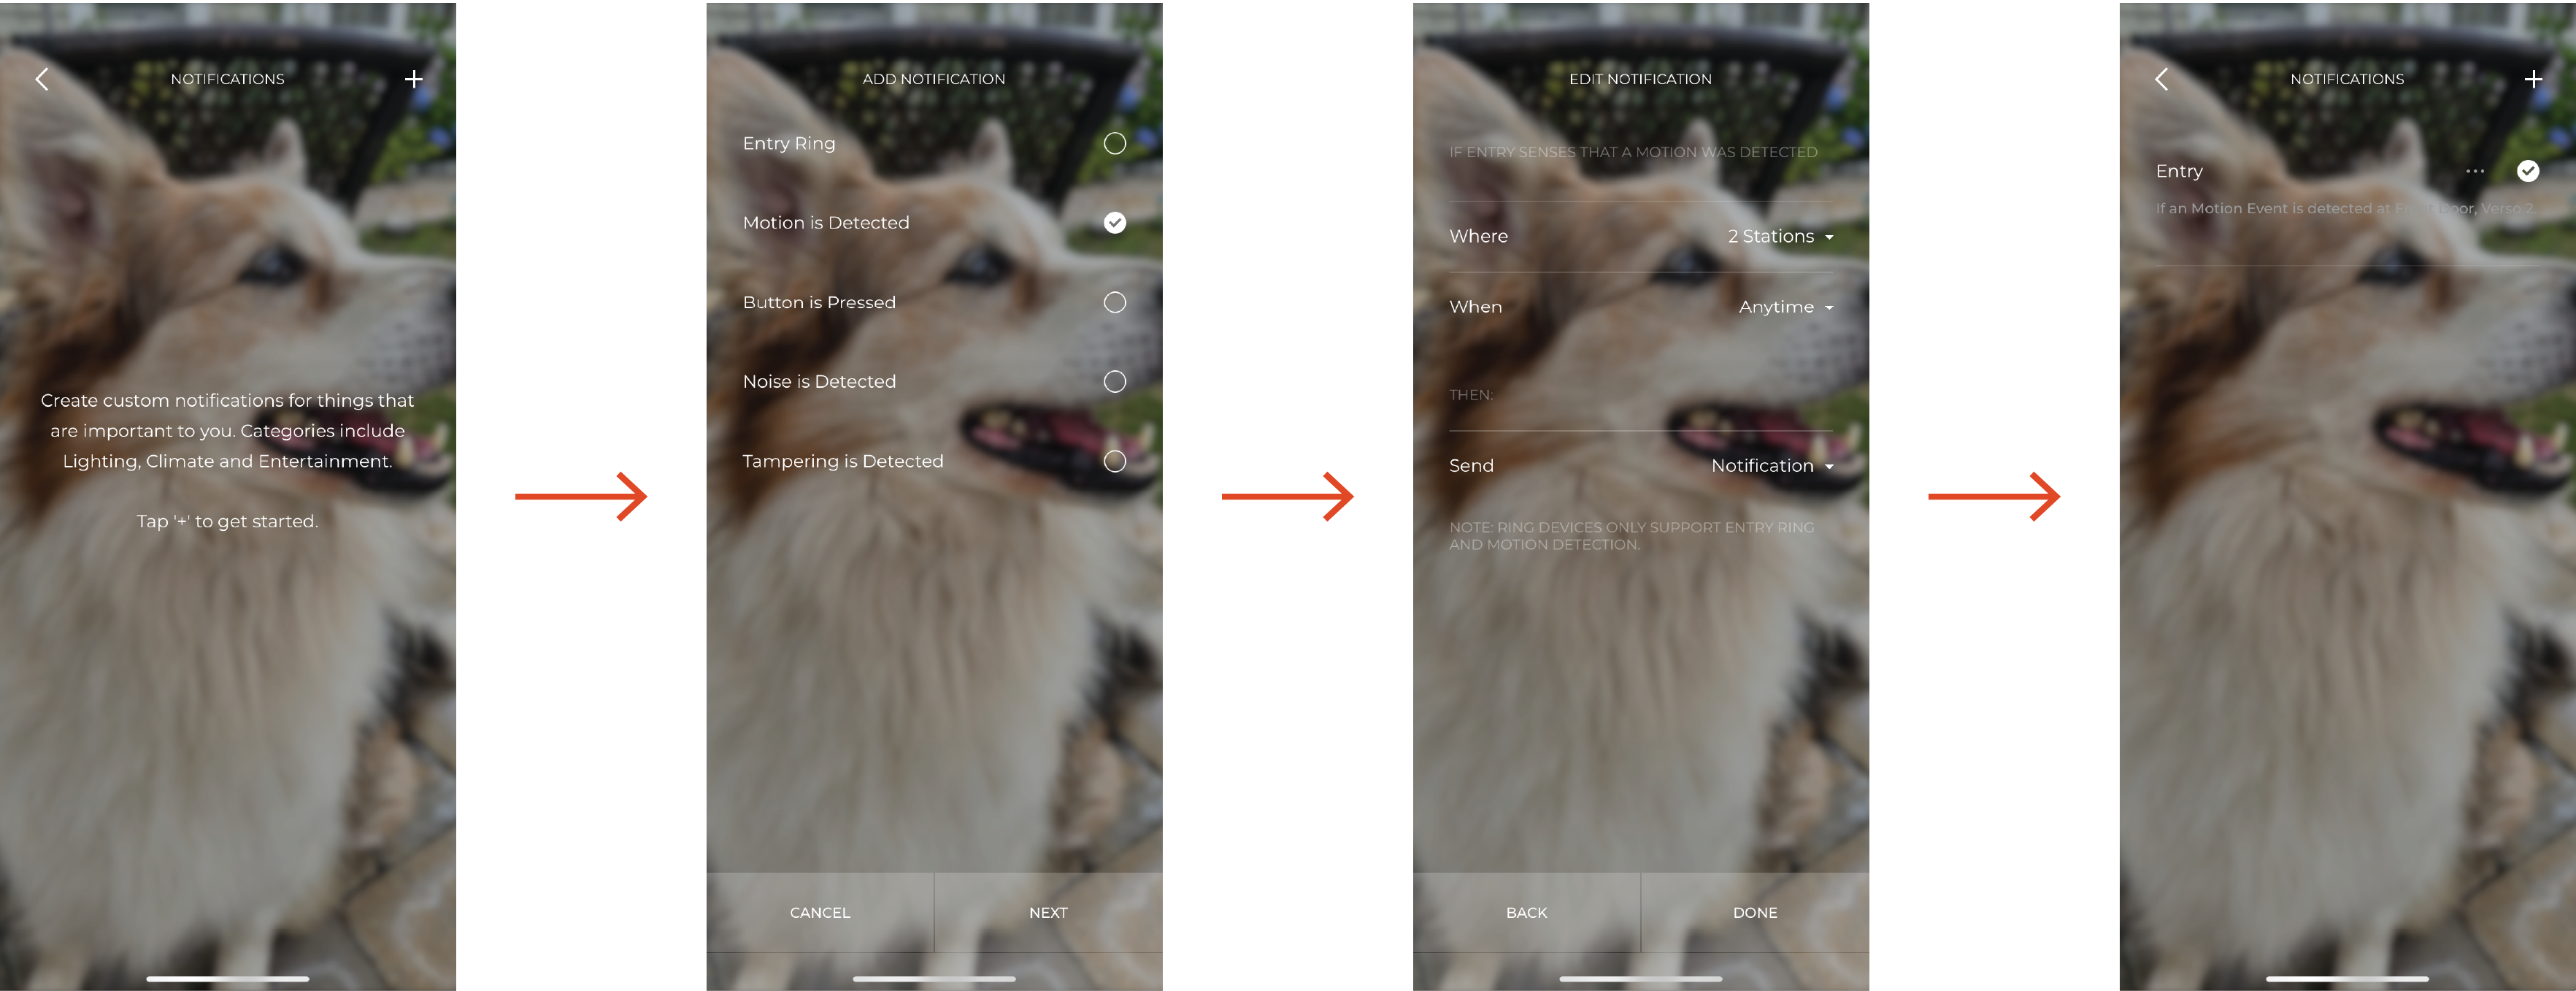
Notifications
Notification settings are configured per user and according to service states and conditions. Notifications can be sent in the form of an email to the address associated with the Savant user account, a push notification on the mobile device running the app, or both.
Create Notification
- Tap the + icon at the top left to add a new Notification
- Select the service type to trigger the notification from the list presented
- Select service-specific conditional options. Options vary depending on the service type. Tap Next to proceed
- Tap the disclosure triangle to the right of each field on the next screen to modify conditions
- Where - Choose the rooms to monitor for the selected service state. By default, all rooms are enabled. Tap to deselect any rooms that should not be monitored for notification conditions
- When - Select from a variety of time-based options. By default, Notifications will be sent any time the conditions are met. The list below describes options available for time based conditions
- Condition - Email or in-app notification
- From the main Notifications screen, tap the check-box for any entry to enable/disable, or select the icon to edit the notification’s configured settings
NOTE: To delete a notification, tap the ... next to the notification and select delete
Time Settings
Type
- Normal (At Time) - Uncheck the default All Day setting to select a Start Time and End Time based on standard 24 hour time. The notification will be sent only if conditions are met within the set time window. For example, between 9:00 AM and 5:00 PM.
- Celestial (Relative to Celestial Time) - Select start time and end time based on dawn, dusk, sunrise, or sunset with options to offset in minutes. The notification will be sent only if conditions are met within the set time window. For example, between Dusk and 30 minutes before sunrise
All Year
- Enabled - No date range restrictions. Notification will be sent if all conditions are met throughout the calendar year
- Disabled - Select a Start Date and End Date. Notification will be sent only when all conditions are met within the defined date range
Days
- Everyday - Set by default, notifications are sent if conditions are met regardless of the day of the week
- Specific Days - Tap to open a checklist to deselect any days of the week when conditions should be ignored. Notification are never sent on unchecked days
Audio Settings
The Audio Settings submenu presents options are dependent on the services available within the Savant Home and the associated installed, such as wireless speakers. However, all Savant Homes with an audio service will have access to the following settings:
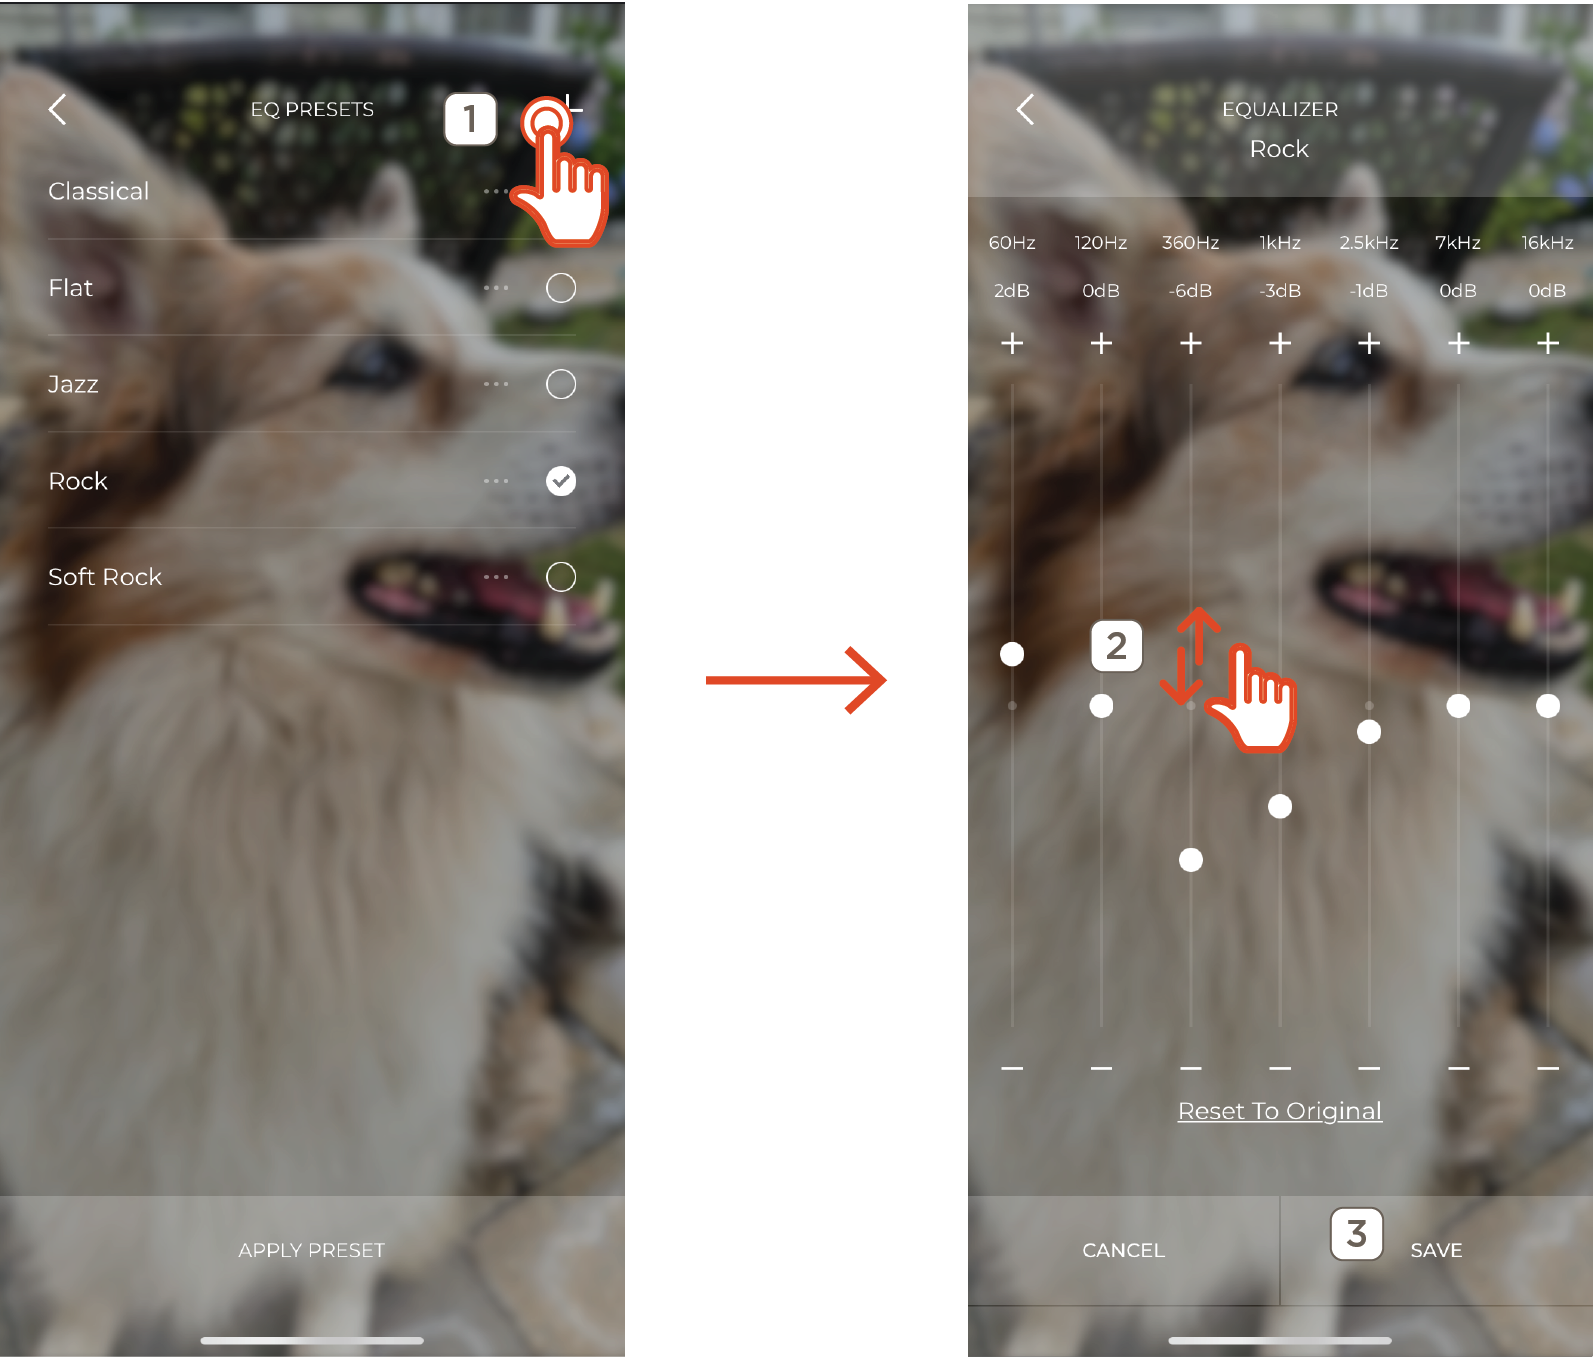
Equalizer
The Equalizer is accessed by selecting Audio Settings > Equalizer. The Savant app provides users with a 7- band graphical equalizer (EQ) for fine control of audio settings. The EQ uses a fixed bandwidth that allows for +/- 12dB attenuation for each of 7 audio frequency bands. 5 default presets are available to all users, with the option to add personalized presets as needed. Individualized EQ settings can be saved and applied for each service, room, room-specific service variant, or any combination thereof.
Create & Edit Presets
- Tap the + icon at the upper right corner of the EQ Presets screen OR Choose the ... icon for any preset in the list to open the Attenuation screen
- Drag the indicator or tap +/- icons to adjust slider position for each band
- Select Save to apply the new settings
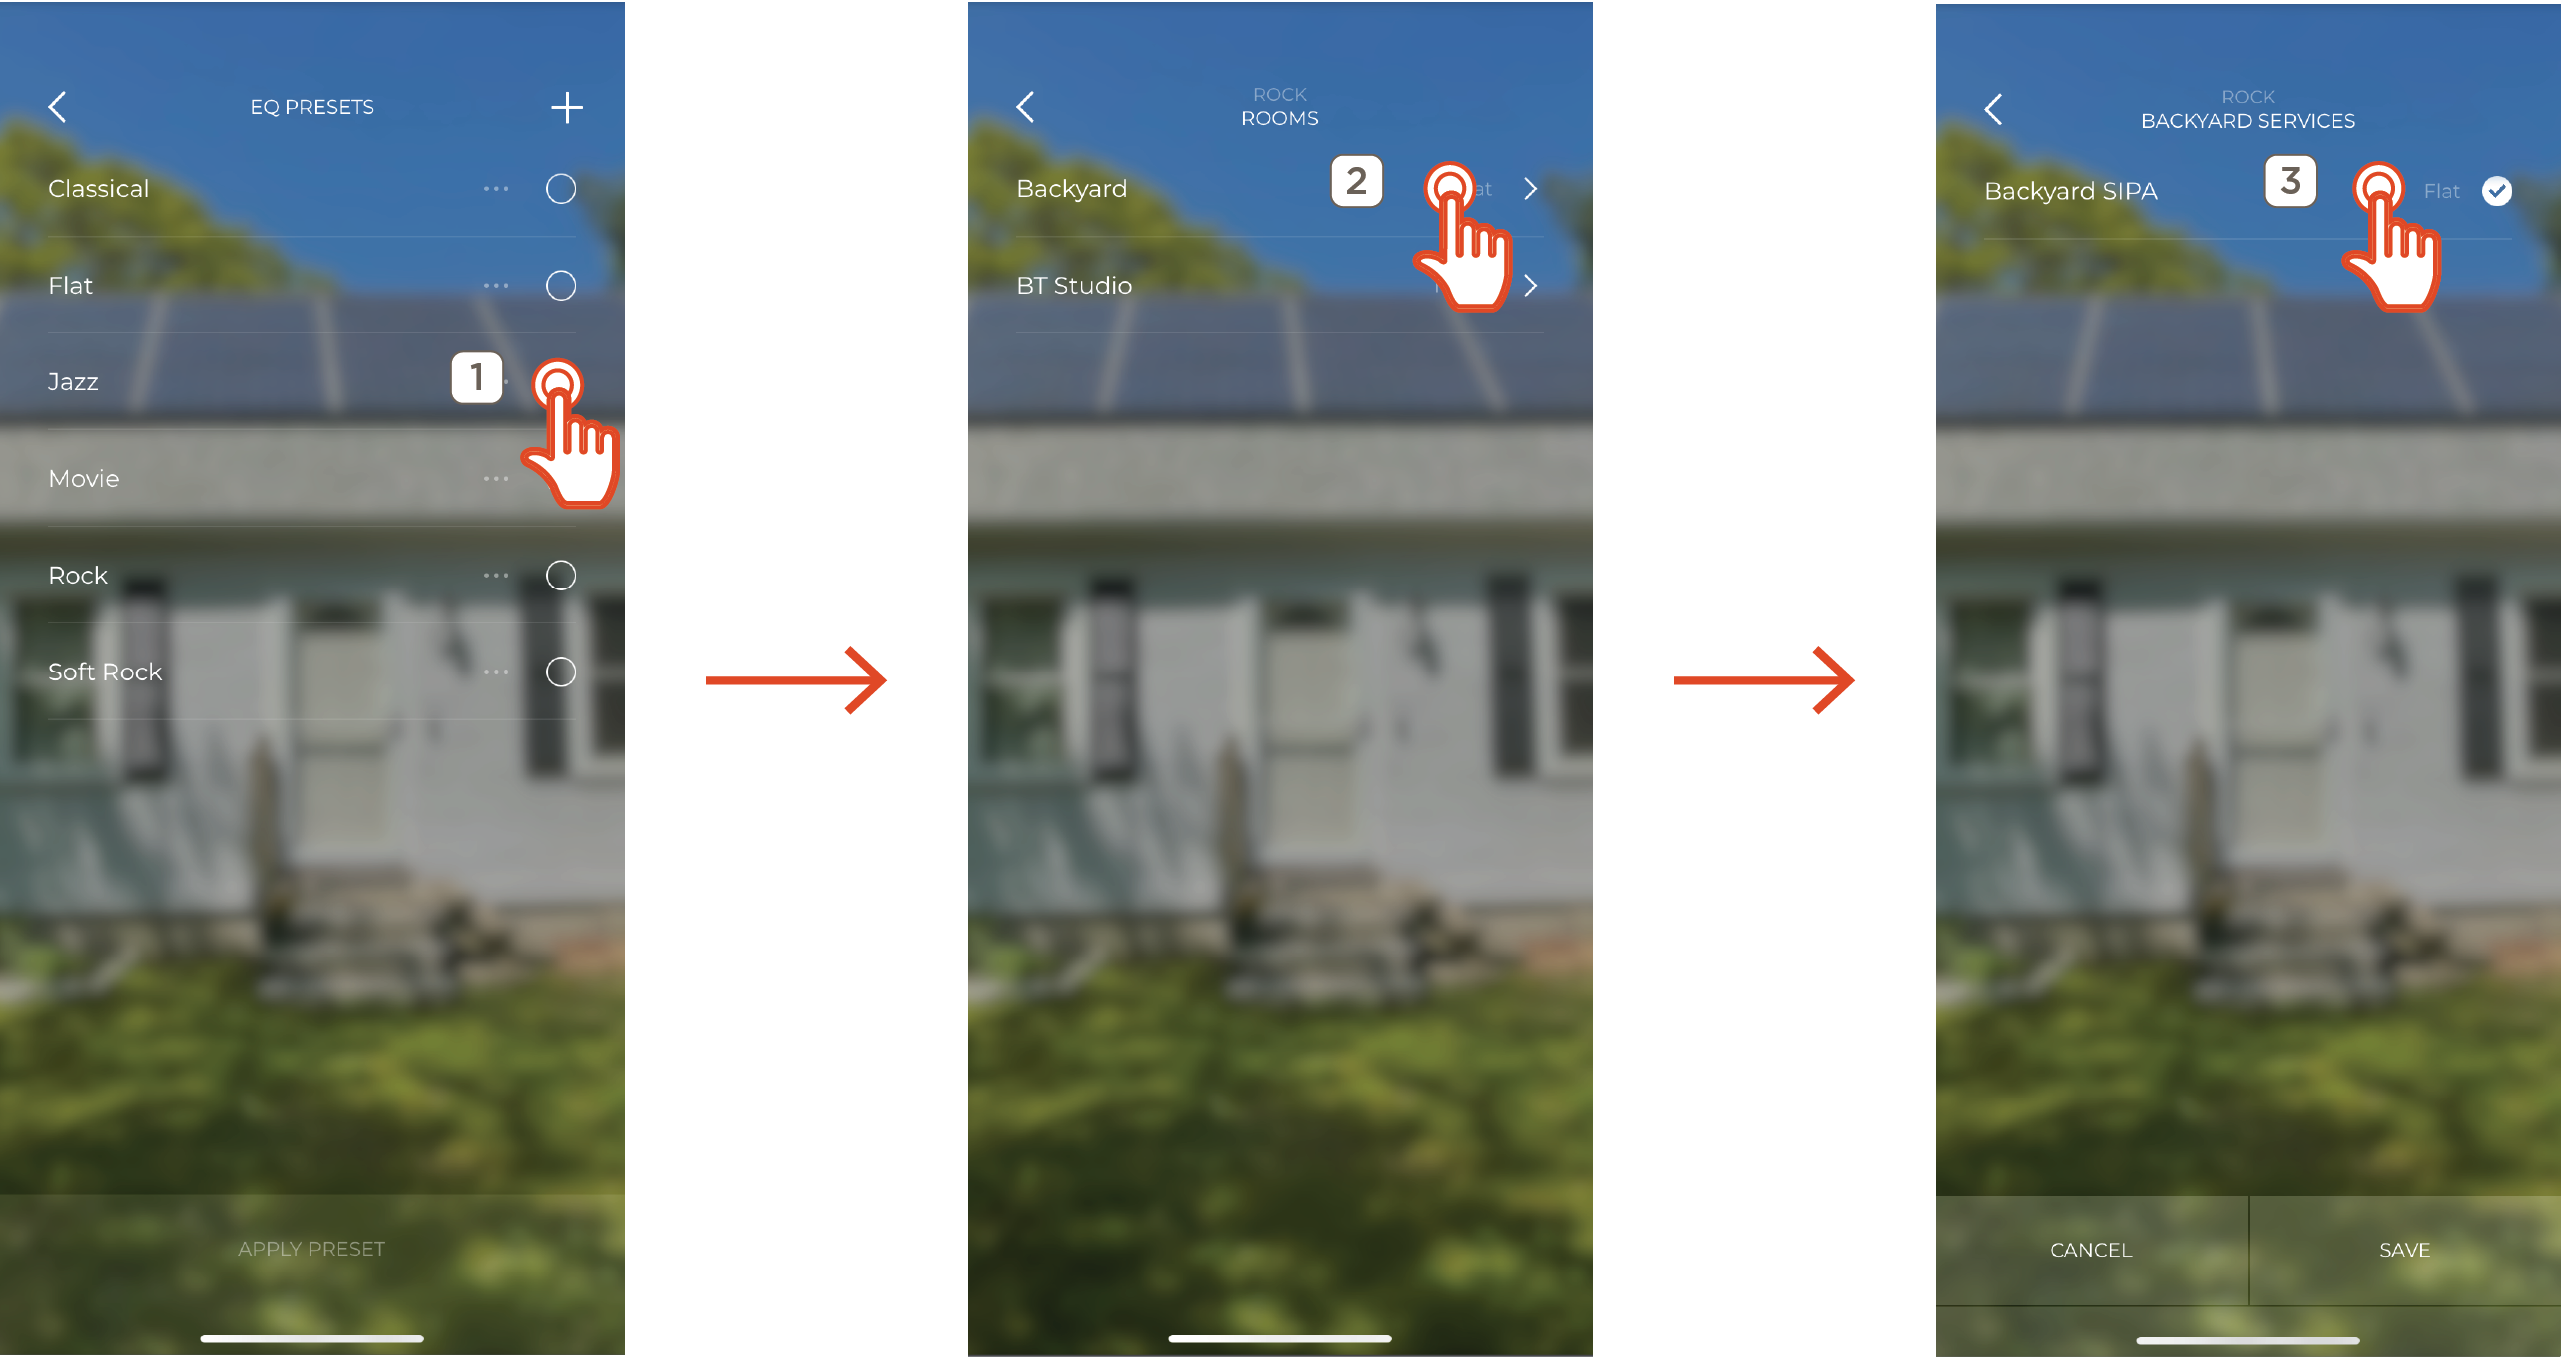
Apply Preset
- Tap the open circle for any preset to select, then choose Apply Preset at the bottom of the screen to open the Rooms list
- Tap any room to open its service list. The current preset is shown for any rooms with the same one applied to all services
- Select all target services from the list by tapping the open circle, then choose Save to apply the new preset
 IMPORTANT!: Only audio services including a component with a Savant controllable Equalizer Setting resource allows the Equalizer option to be displayed within the Savant app
Button Settings
The Savant app allows users to assign a Scene to a button on a Savant keypad, Pro Remote X2, and Button Remote buttons that have been installer-configured for Scene support. Pressing the selected button on the device activates the assigned Scene. To configure the function of a button, tap Button Settings in the Settings view and then complete the steps below:
- Choose the device to be configured
- All available buttons are displayed. Select a button to show a list of configured Scenes that can be assigned to the button
- Choose a Scene to assign it to the chosen button and tap Done
![]()
NOTES:
- Some buttons may be locked. Contact your integrator to edit locked buttons
- Tap the Information con to view configurable buttons on the device
HELPFUL TIP! The Info icon on the top right corner on the Device Location screen displays a representation of the layout of the configurable buttons on the device for button identification
My Savant Dealer
This screen displays the contact information of the Savant Dealer current assigned to the Savant Home and allows the user to view and change the dealers permissions.
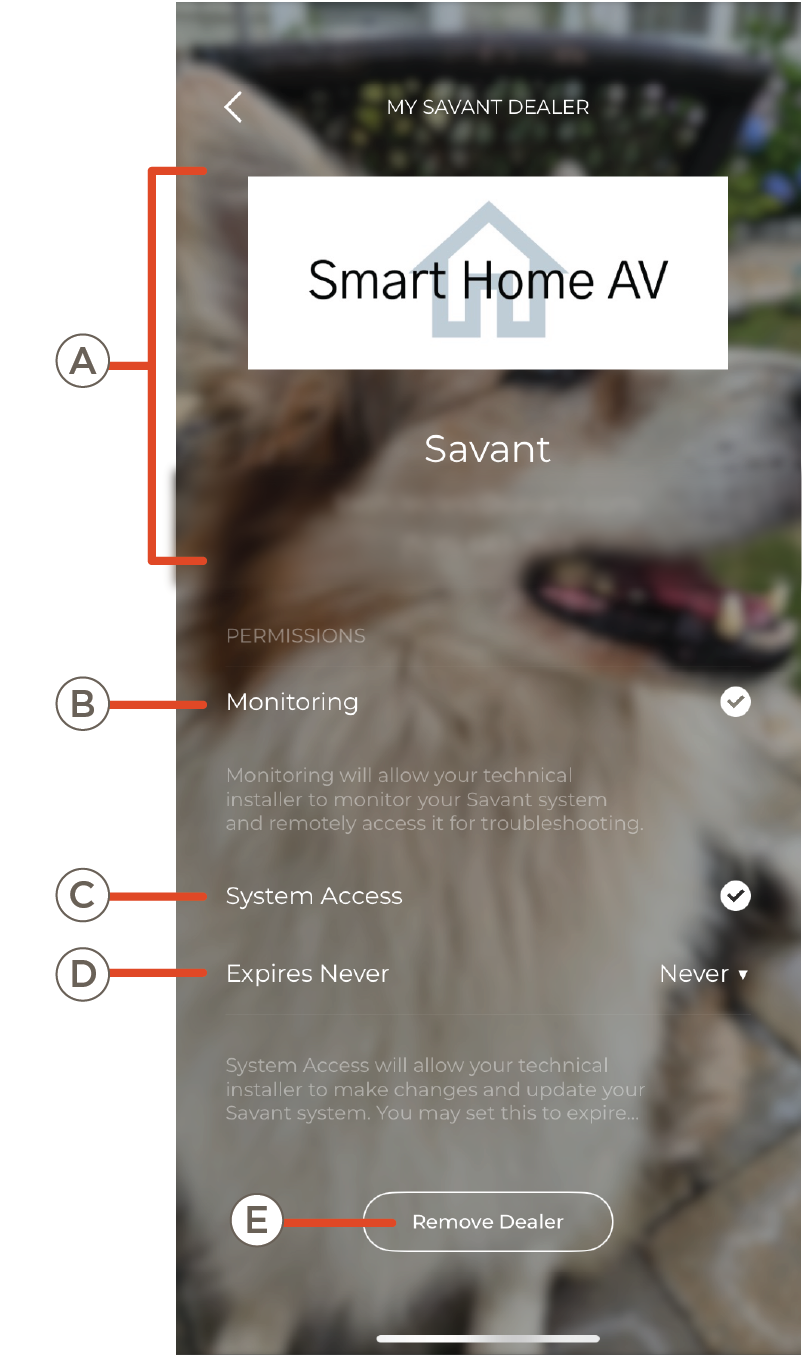
| A | Monitoring | System monitoring allows the dealer to view the status of the system and to retrieve diagnostic information from the system Host remotely. This does not give any access to the services or cloud storage |
| B | System Access | Enabling grants the dealer the access the system to make changes to the system including but not limited to configuration changes and system updates |
| C | Options | Configure installer account access period (1 Day, 2 Days, 3 Days, or Never) after recieving system access
NOTE: When system access to granted to a dealer, it defaults to expiring in 1 day |
| D | Remove Dealer | Removes dealers access to the Savant Home. This also will stop Essentials renewal that is pending. If Savant Smart Networking is in use this process will cause a short network outage. The process cannot be undone without action from a Savant dealer. |
| E | Claim Code | A Claim Code can be given to an integrator to allow remote access to the Savant Home
NOTE: If the end user sees dealer information on this screen, the System has already been claimed |
Users
The Users section allows users to manage their own profile and Admin users can edit permissions, add new users, and remove other users from the system. For more information on user management see Savant App User Guide - Account Management.
