Savant App Lighting Service User Guide - TrueImage
Document Date: April 2026
Overview
TrueImage is color-accurate fixture dimming technology used by supported fixtures to communicate with the Savant app and display color accurate realtime dimming by controlling the light color and brightness of the fixture image assigned. This document describes the TrueImage section of the Lighting Rooms within the Savant app. To access the TrueImage view of the Savant app, tap the  icon.
icon.
NOTE: For a list of TrueImage-supported fixtures, see your Savant dealer.
Capture Fixture Image
To capture the image of a particular fixture, complete the following steps. The fixture must be previously installed and configured by a Savant authorized dealer to be visible for configuration:
- Within the Lighting Service of the Savant app, swipe left on the fixture
- Tap the camera icon
- The Savant app prompts the user with a basic tutorial. Tap Next
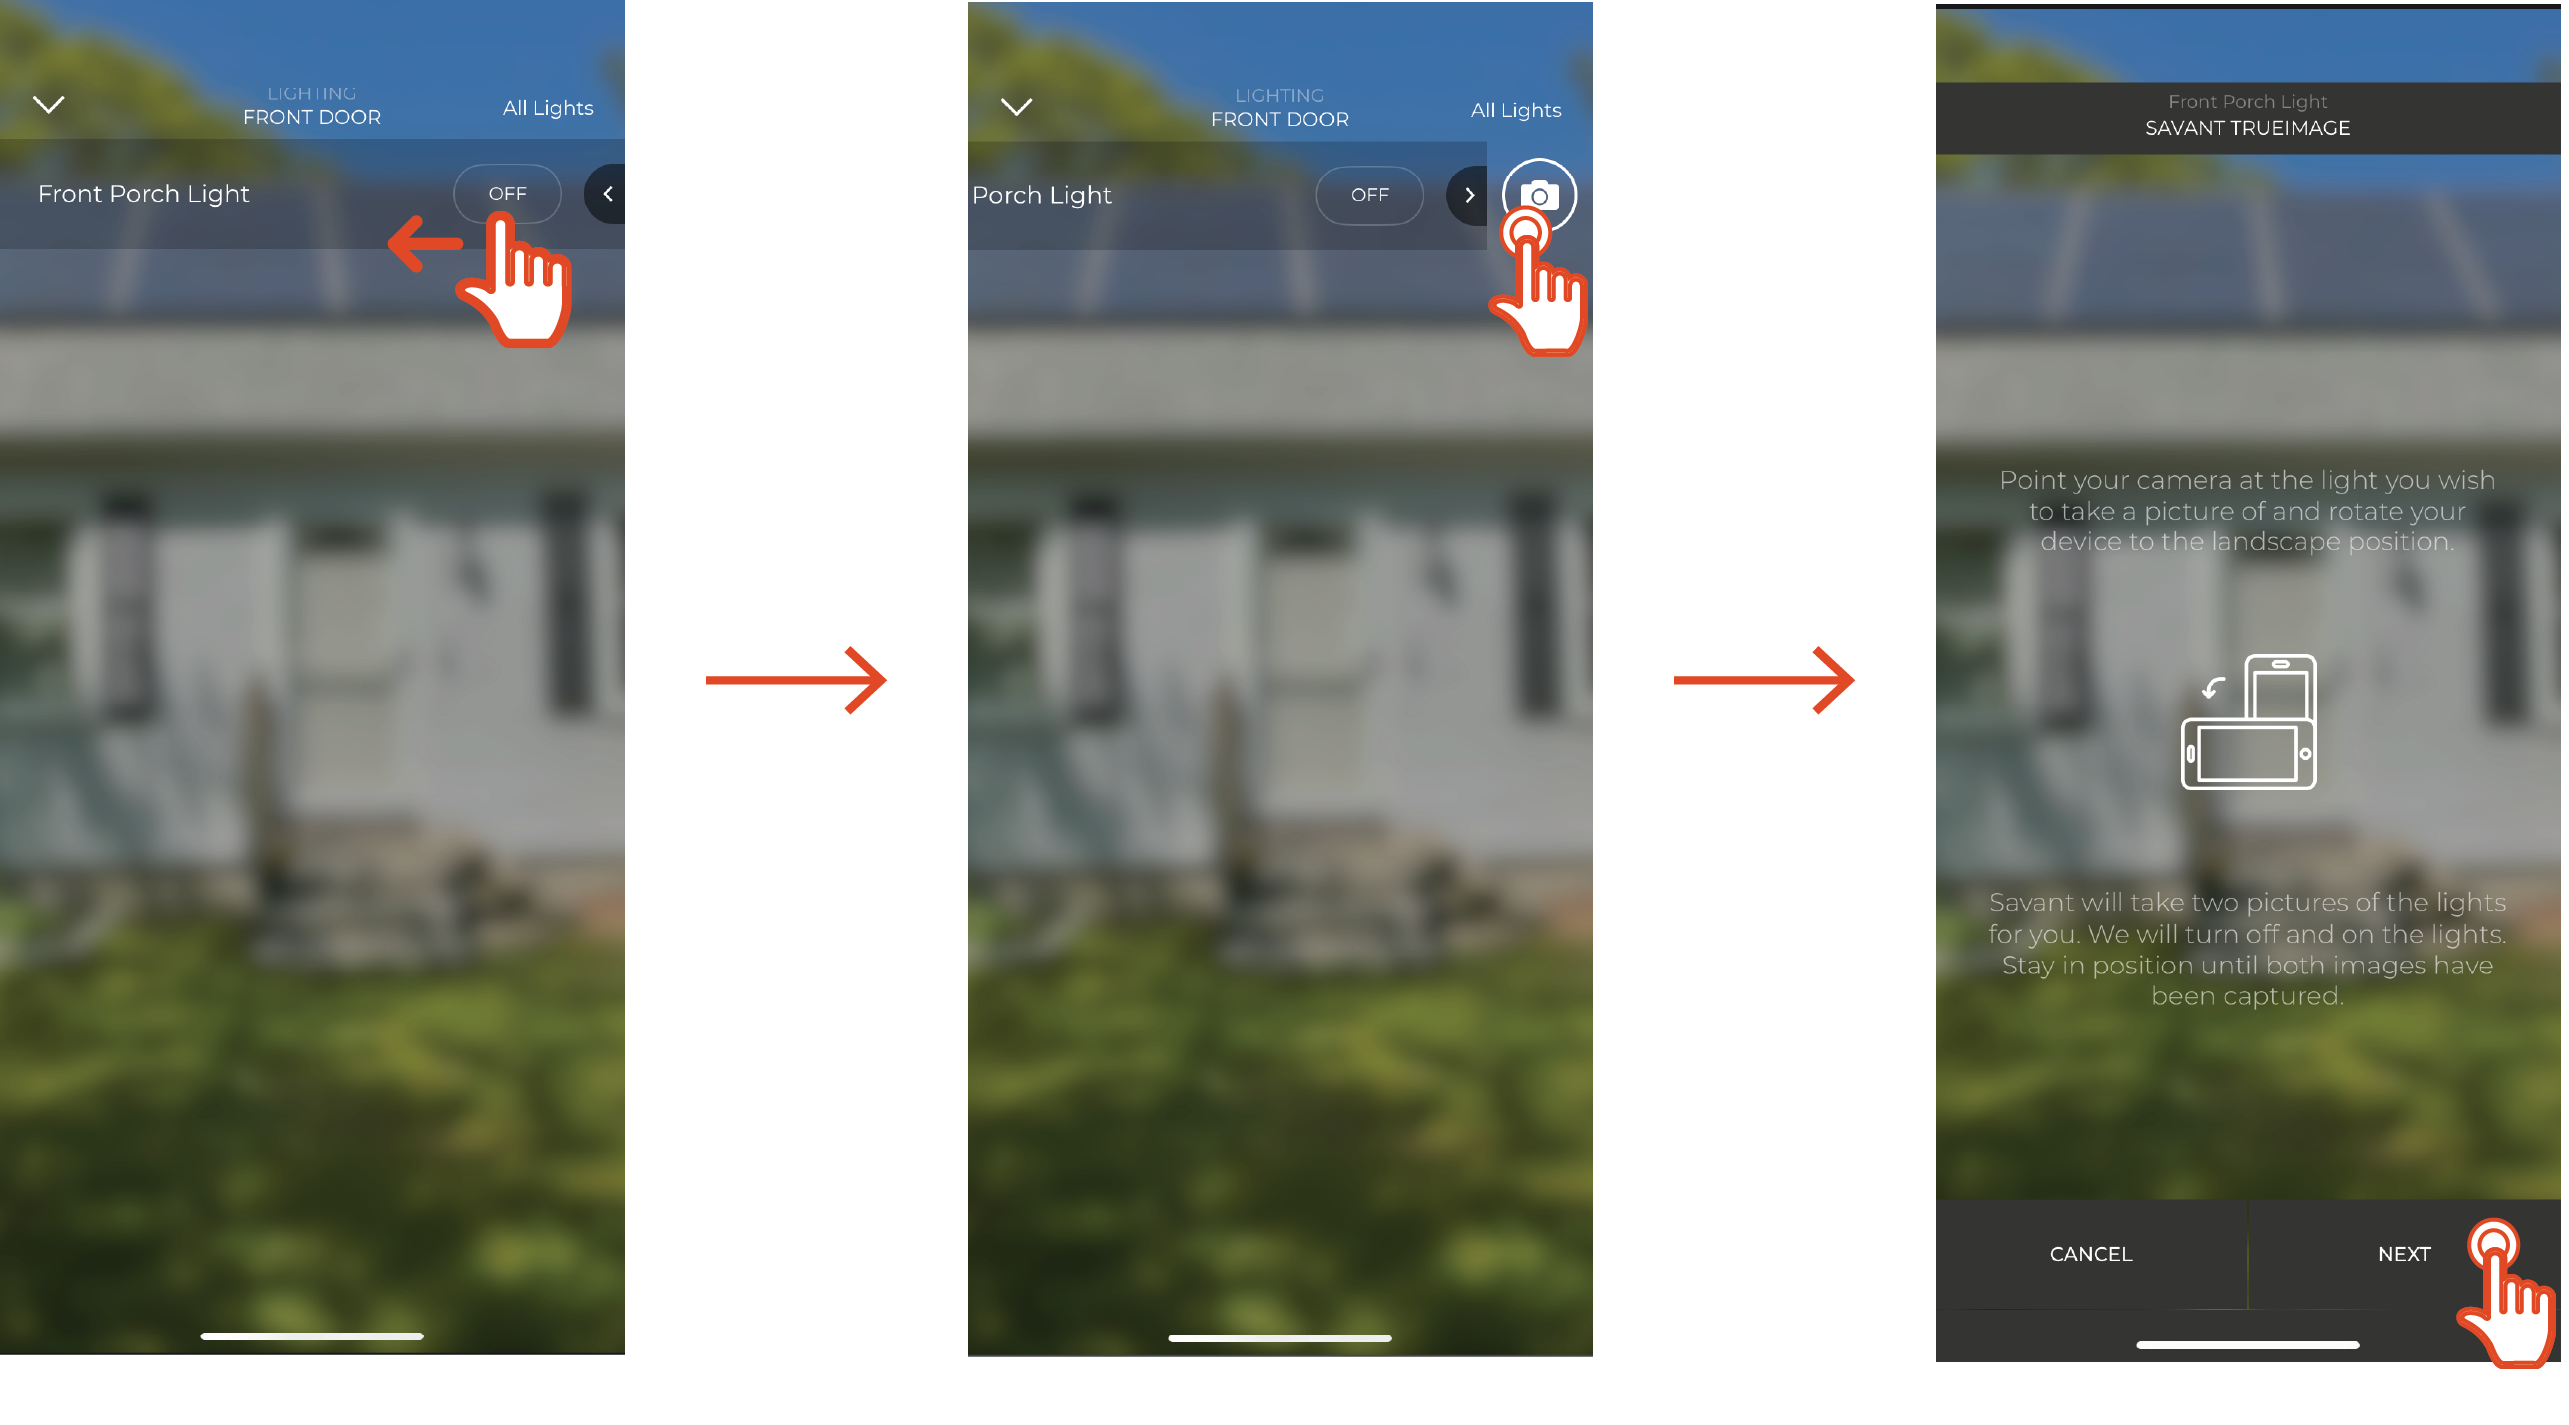
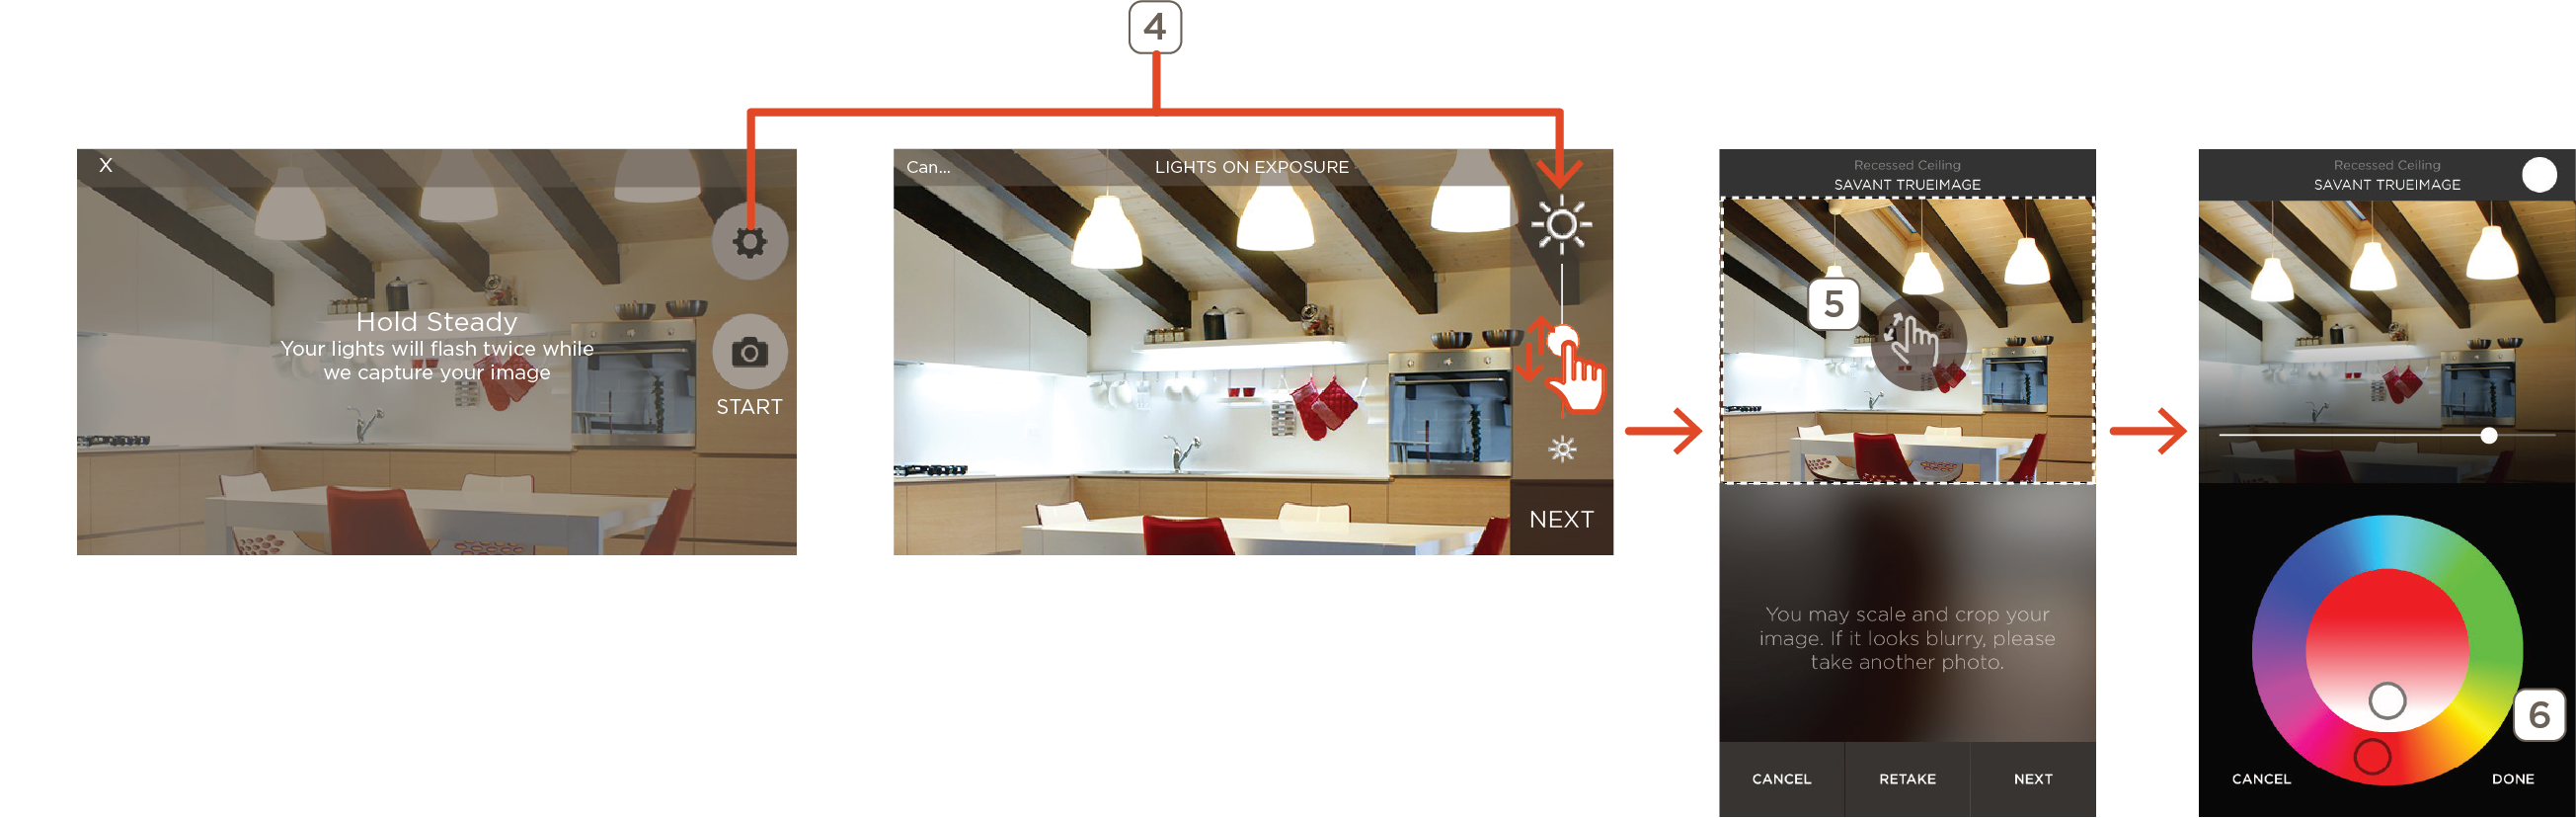
- Frame the shot of the selected light as desired and hold device steady.
- Tap the camera icon labeled Start to capture images. The light should blink twice. Once images have been captured, the App will display a sample of the Lights On and Lights Off photos overlaid.
 HELPFUL!: To crop the image, pinch and scroll until the desired frame is achieved
 - Once a satisfactory image is achieved, tap Next to continue.
The Savant app will display a demo version of the Full Spectrum Color Picker screen with supported lights. The dimming and color selection can be tested here, and the image retaken if needed. Tap DONE to save the image and return to the Lighting Slider Screen
Photography Tips
Achieving a high quality TrueImage picture can take some experimentation, particularly in certain environments that present specific difficulties. Below are some tips and tricks for getting great, professional looking photos.
Contrast & Exposure
- If there is a TV, monitor, or other screen in the shot, it’s best to power it off. Active displays can distort the image and cause issues with exposure.
- Positioning the camera and framing images so as to avoid having a direct view of any bare bulbs or LEDs in the image can improve quality and help avoid overly high light/dark contrast.
- When taking TrueImage photos for a light group which functions as a single light for control purposes, positioning the camera to capture all lights in the group can be difficult. Consider choosing one or two to represent the group visually
- If the lights being shot are the only light sources in the area, or if lighting conditions otherwise make for high contrast between light and dark regions of the frame, image quality can suffer
- In cases where setting the exposure high enough to avoid losing detail in darker areas causes the lighter regions to look washed out or overexposed, and vice versa, consider trying some of the following:
- Reposition to capture the shot from another location or angle. Shooting from a different angle, or moving closer or further away from the lights can make a difference in the results
- Adjust the level of ambient light in the shot by turning other nearby light sources on or off, or re-taking the image at a different time of day to take advantage of natural lighting
Lights On to Lights Off Range
When adjusting exposure settings, be sure to consider that the contrast between the Lights On and Lights Off images will determine the range that TrueImage will cover for the light. The greater the difference between the Lights On and Lights Off images, the greater the visible change will be as the dimmer level slider for the light moves from 0% to 100%.
A Lights On image with the Exposure turned down too far combined with a Lights Off image with the exposure set too high will make for a TrueImage slider that doesn’t show much of a range between Lights On and Lights Off.
To access individual Lights On and Lights Off exposure settings, tap the gear icon. This allows the exposure level for the Lights On and Lights Off photos to be individually preset, which can help to improve image quality in settings where capturing a good shot may difficult
Move the exposure slider up or down to adjust for Lights On, then tap Next to proceed to Lights Off. The preview image will respond in real time to show how changing the exposure will affect each image
Tap Done to return to Camera Mode after setting Lights Off exposure. The Settings Icon will be check-marked
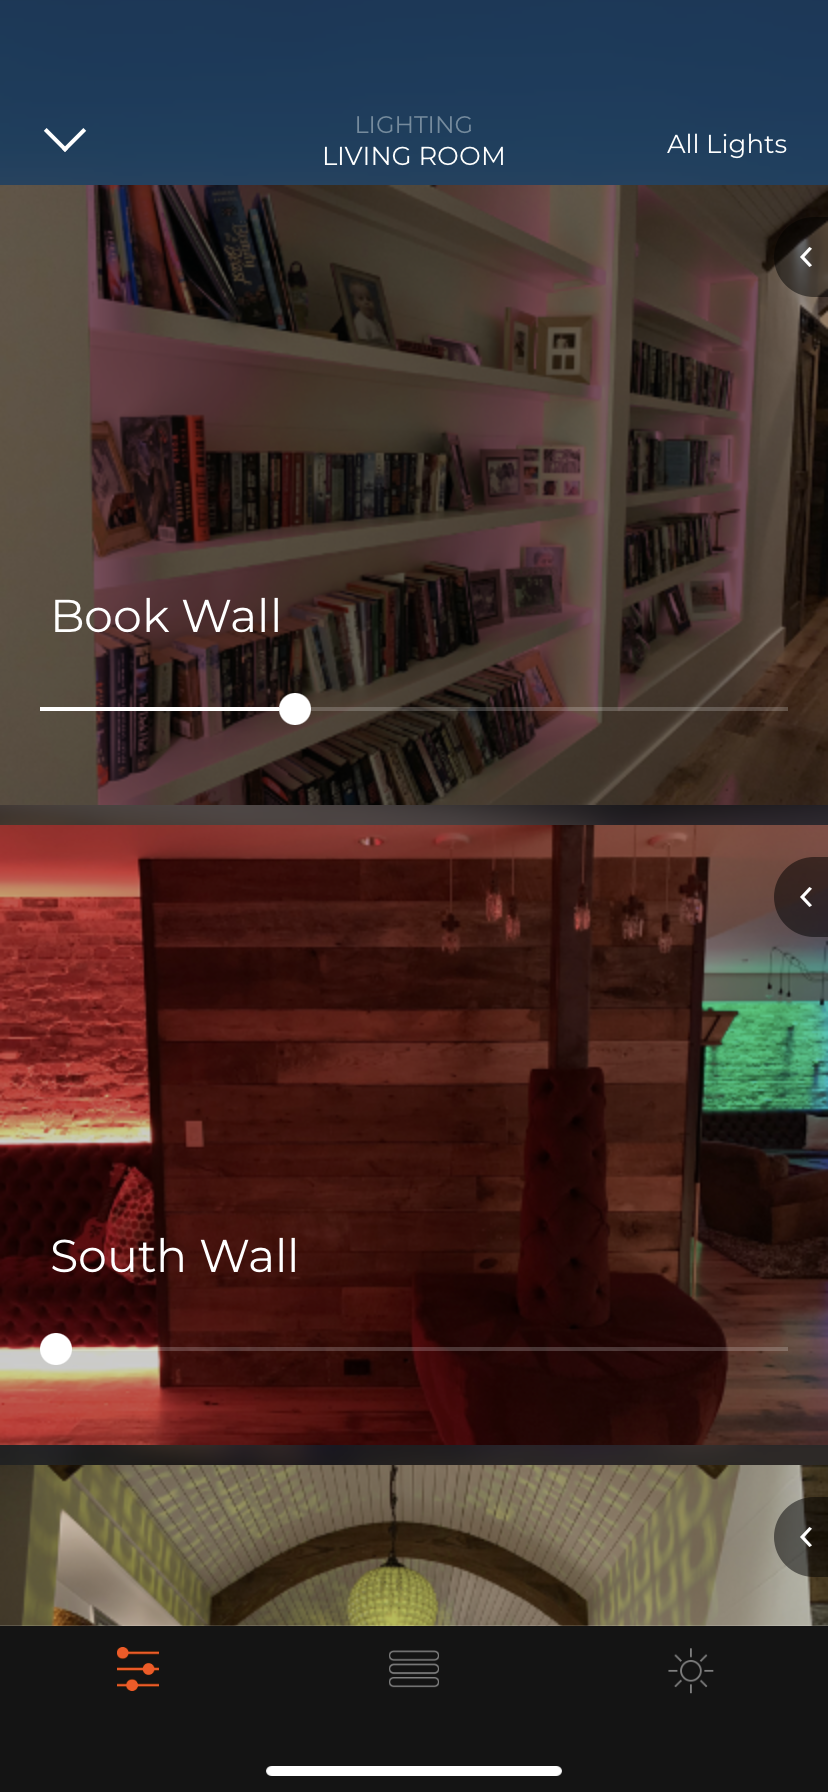
TrueImage Slider
The TrueImage Slider allows for quick dimming without particular color control. Slide the slider left and right to control dimming. TrueImage adjusts the associated fixture image to simulate the area as it will appear under the lighting of the fixture.
HELPFUL!: Touch anywhere on the fixture image to toggle the fixture ON or OFF

Color Selector
To access available options for TrueImage, as well as supported Savant Lighting Color options, navigate to the Slider screen and tap the disclosure triangle at the right side of the card for the fixture or swipe left.
 IMPORTANT!: Only the options supported/configured for the individual lighting fixture or load will display. For further information on supported features for available Savant Lighting products, as well as available feature support, control and configuration options for existing third-party lighting, contact a Savant Integrator or Savant Sales Representative

| A | Full Spectrum Color Picker | Touch to open the full spectrum color picker |
| B | Color Temperature Selector | Adjust color temperature from a range of simulated natural lighting conditions |
| C | Warm Glow Selector | Open the warm glow selector to adjust color temperature and dimmer level simultaneously, simulating the desired color but with traditional incandescent lighting |
Color Selector Dock
The Color Selector Dock is present regardless of which type of color selector is selected:
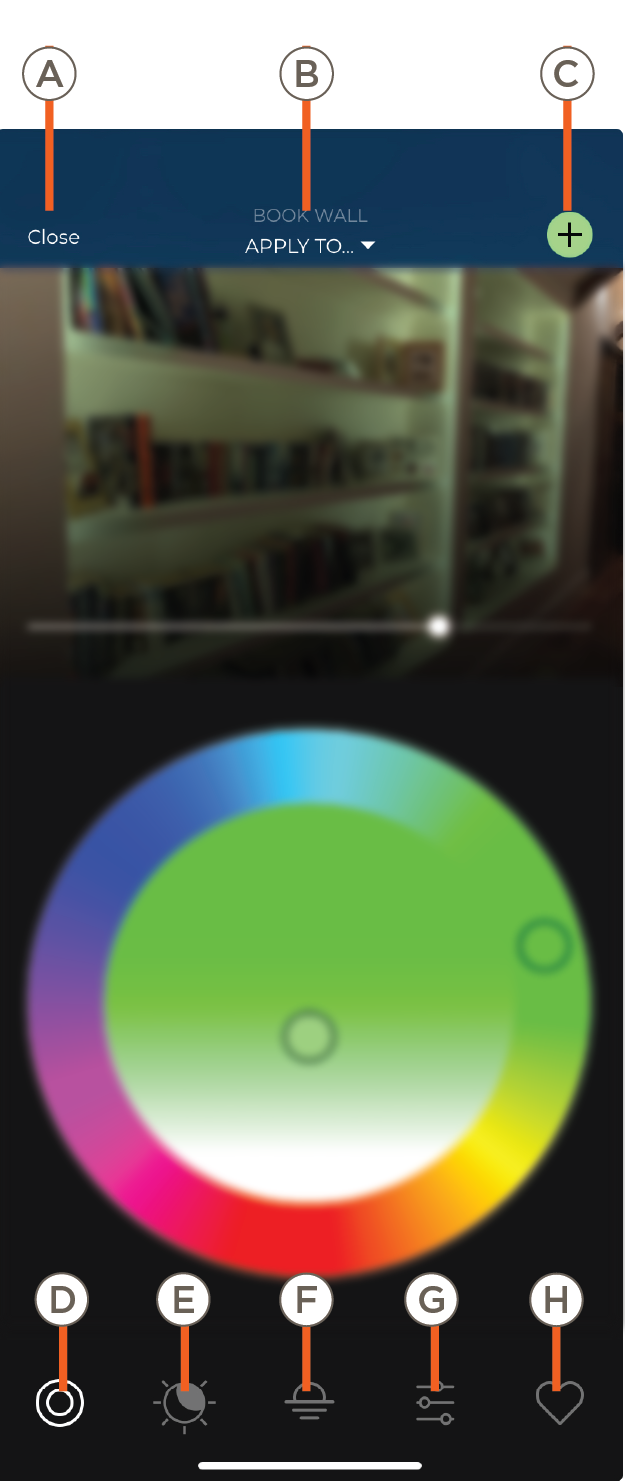
| A | Close | Tap to close the Color Selector and return to the Lighting Rooms view |
| B | Apply To ... | Touch to apply the color to the currently selected and additional fixtures |
| C | Add To Favorite | Add the color as a favorite, to be reused later |
| D | Full Spectrum Color Picker | Open the Full Spectrum Color Picker to control color and hue |
| E | Color Temperature Selector | Allows color temperature of supported lights to be adjusted based on a range of simulated natural lighting conditions |
| F | Warm Glow Selector | Touch to access the Warm Glow Selector. The Warm Glow Selector controls both dimmer level and color temperature at the same time, on a scale that simulates the dimming behavior of traditional incandescent lighting |
| G | RGBW Color Picker | Allows adjustment of the color settings for the selected fixture based on Red, Green, Blue, and White values, each represented by a slider. The hue of each slider will change based on the current settings, to reflect how moving each individual slider will affect the overall color relative to the other values. |
| H | Favorites | Access saved lighting favorites |
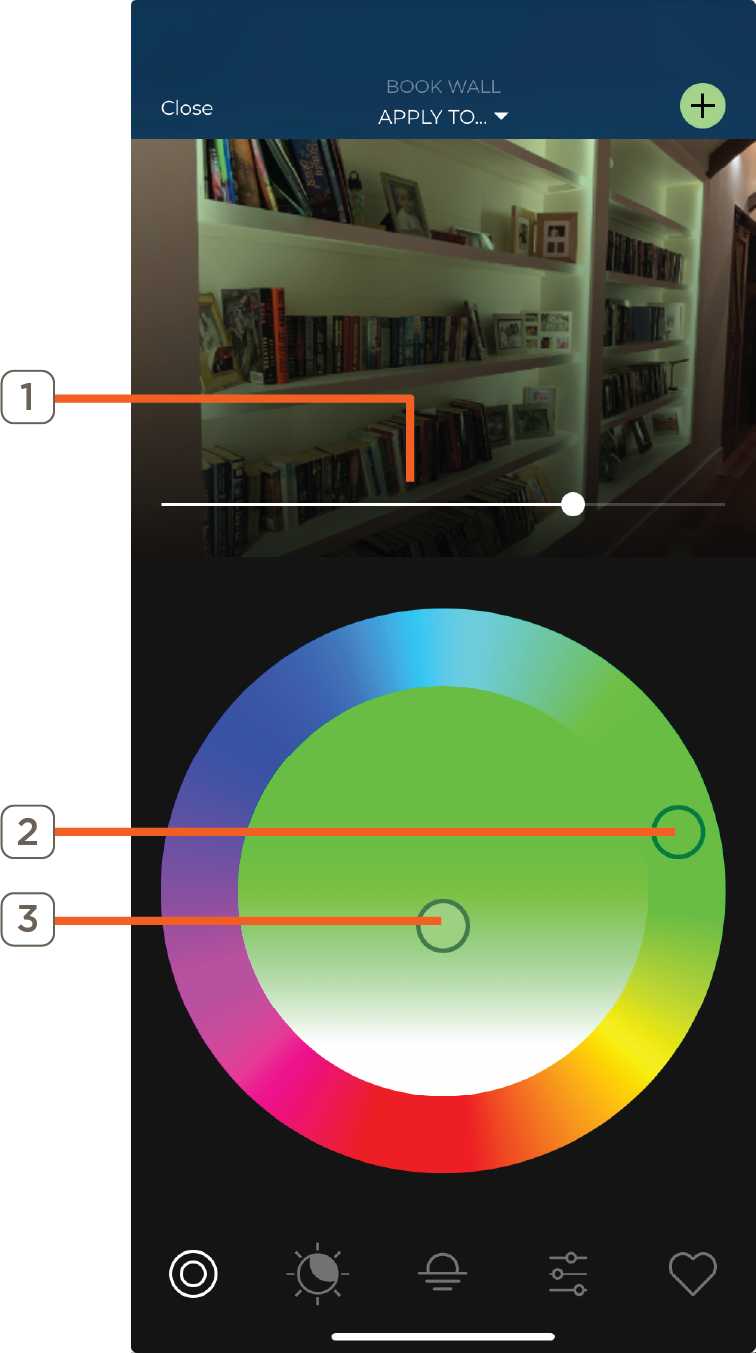
Full Spectrum Color Picker
Swipe left on the fixture and tap the  icon to open the Full Spectrum Color Picker view. Choose the desired color from the full spectrum color picker by following the steps below:
- Drag the horizontal slider to control fixture dimming
- Drag the circle around the color circle to control the hue
- Drag the vertical circle up and down to control color saturation
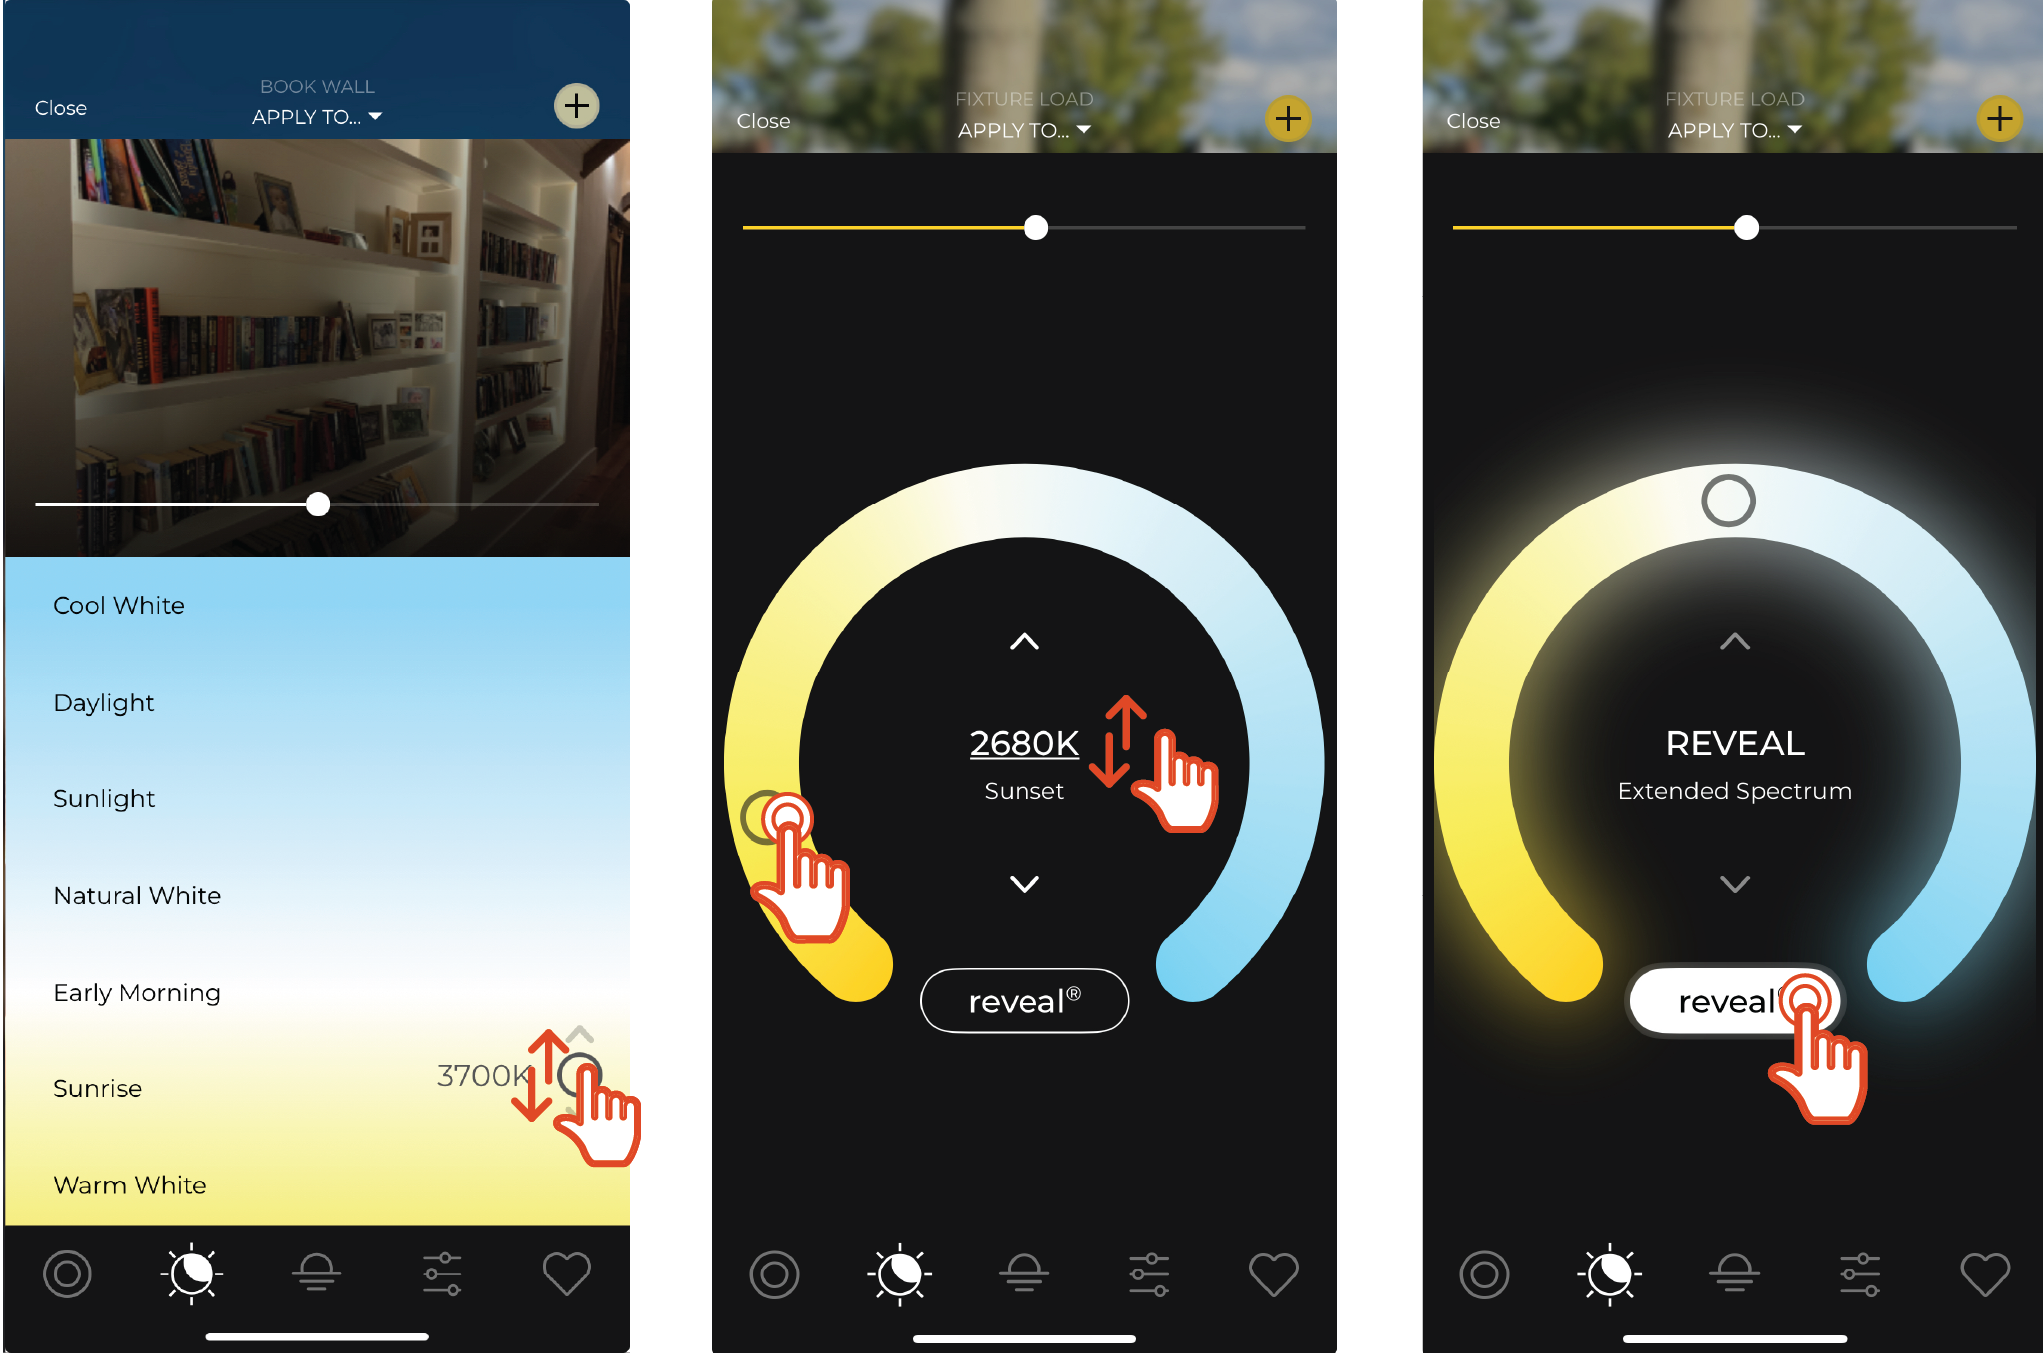
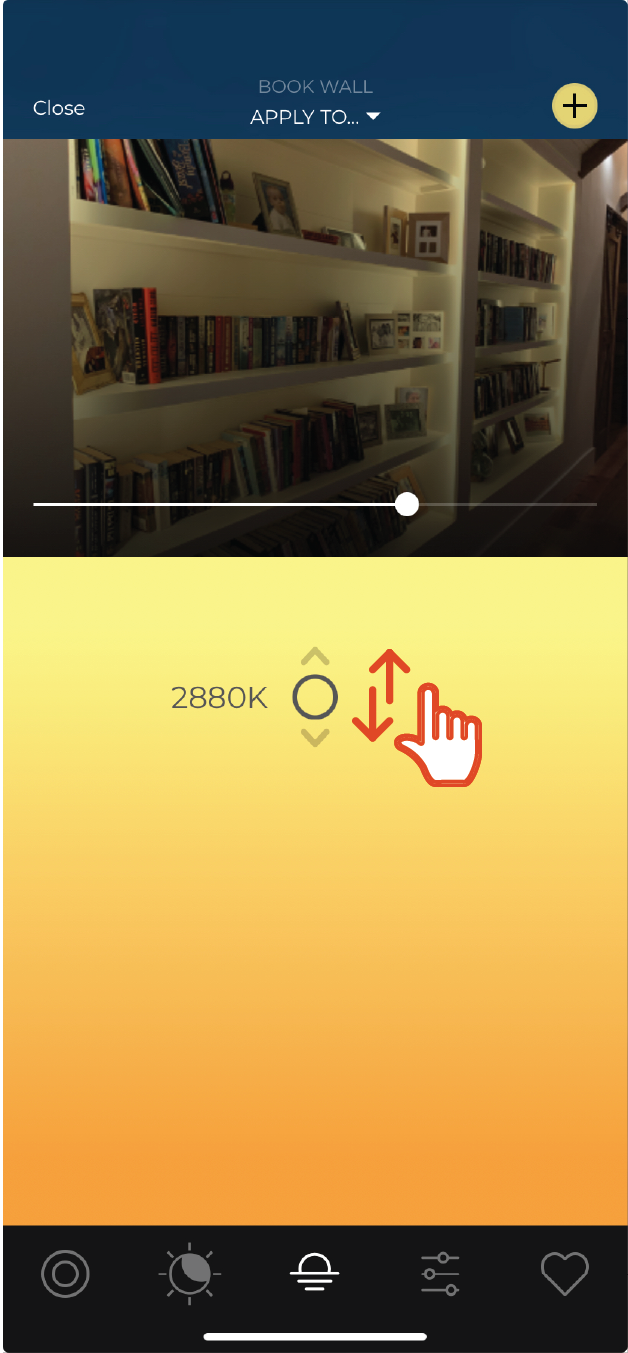
Color Temperature Selector
Tap the  icon to open the Color Temperature Selector screen. This screen allows color temperature of supported lights to be adjusted based on a range of simulated natural lighting conditions.
- Touch and drag indicator up or down, or tap the up or down arrows above and below to adjust the color temperature in degrees Kelvin. Higher values are more pure white to blue-white, lower values are more yellow to orange
- Swipe up or down to scroll through the available range
NOTE: For Reveal supported devices, the color temperature selector screen will display the Reveal color temperature picker shown in the two imaages of the threee shown below instead. Tap the reveal button to enable allowing for a more fine tuned color temperature experience. For more information, see Supported Reveal Fixtures on the Savant Knowledgebase
Warm Glow Selector
Select the  icon to open the Warm Glow Selector. Drag the Warm Glow Selector slider up and down to control the glow of the fixture.
NOTE: The dimming slider and the Warm Glow indicator are tied together so that moving one will automatically move the other
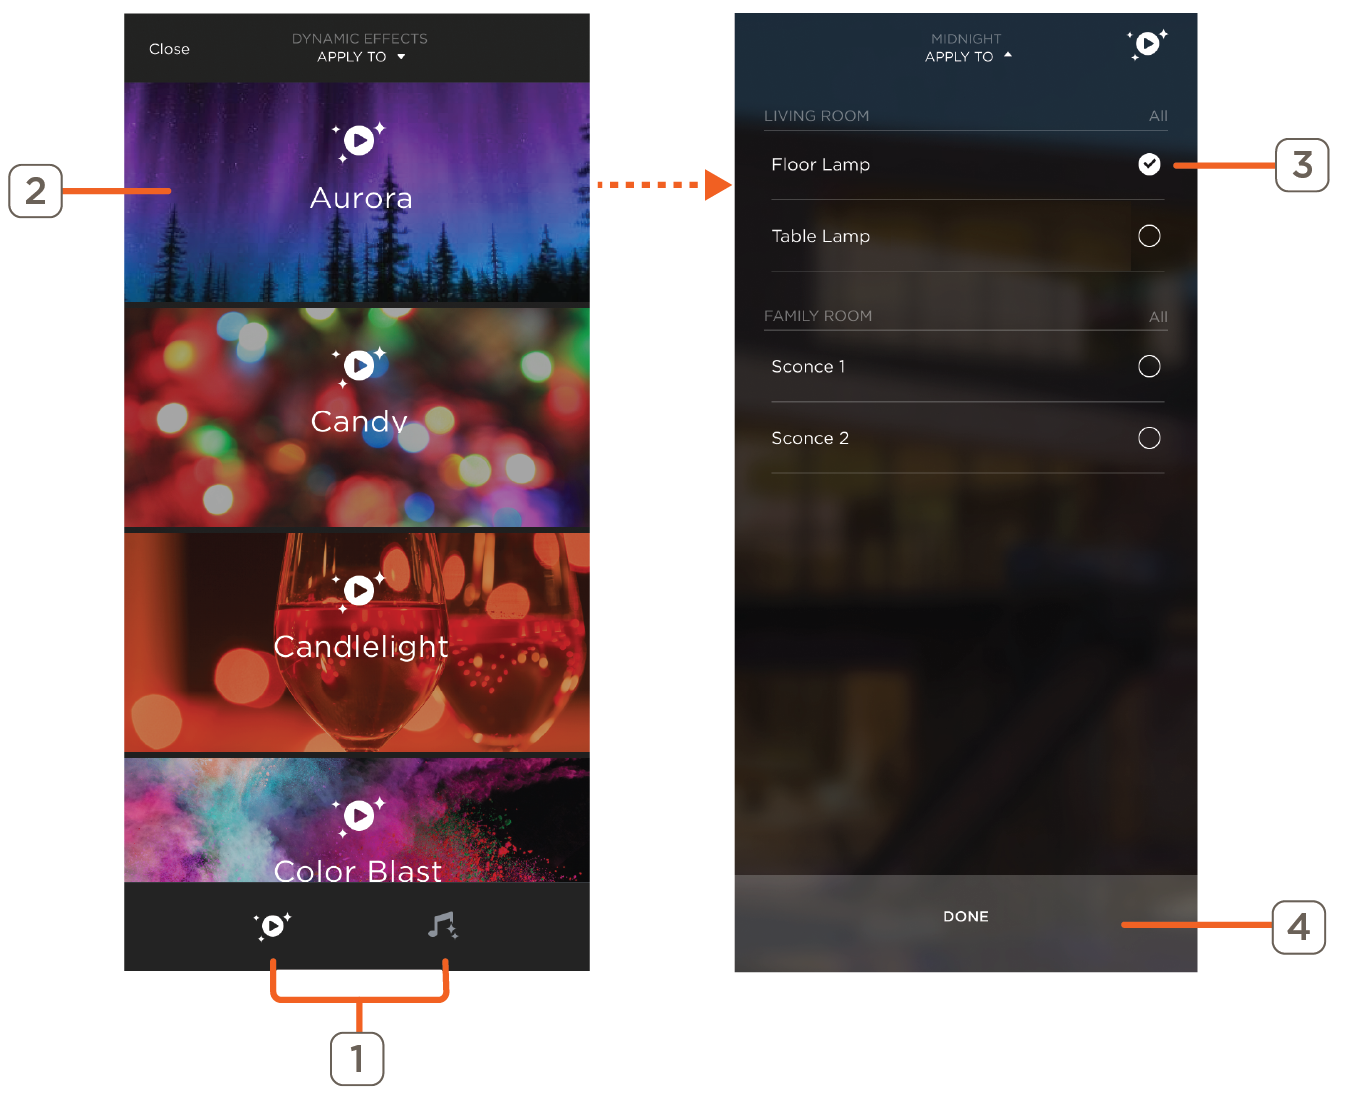
Dynamic Effects (Works with Savant devices ONLY)
Swipe left on the fixture image and tap the  icon to access Dynamic Effects. Dynamic Effects are available for Works with Savant devices and consist of two types of effects; Light Shows and Music Sync. Light Shows can be applied to both light strip and bulb devices. Music Sync is only available for light strip devices. These effects cannot be modified in the Savant app.
- Tap an icon from the bottom dock to move between the Light Shows and Music Sync pages. The current screen’s icon is illuminated in white
- Select the effect to apply to the Works with Savant device
- Touch to apply the selected Dynamic Effect to the Works with Savant device
- Close Dynamic Effects dialog and return to the Lighting Slider screen for the current Room. Saves any changes made
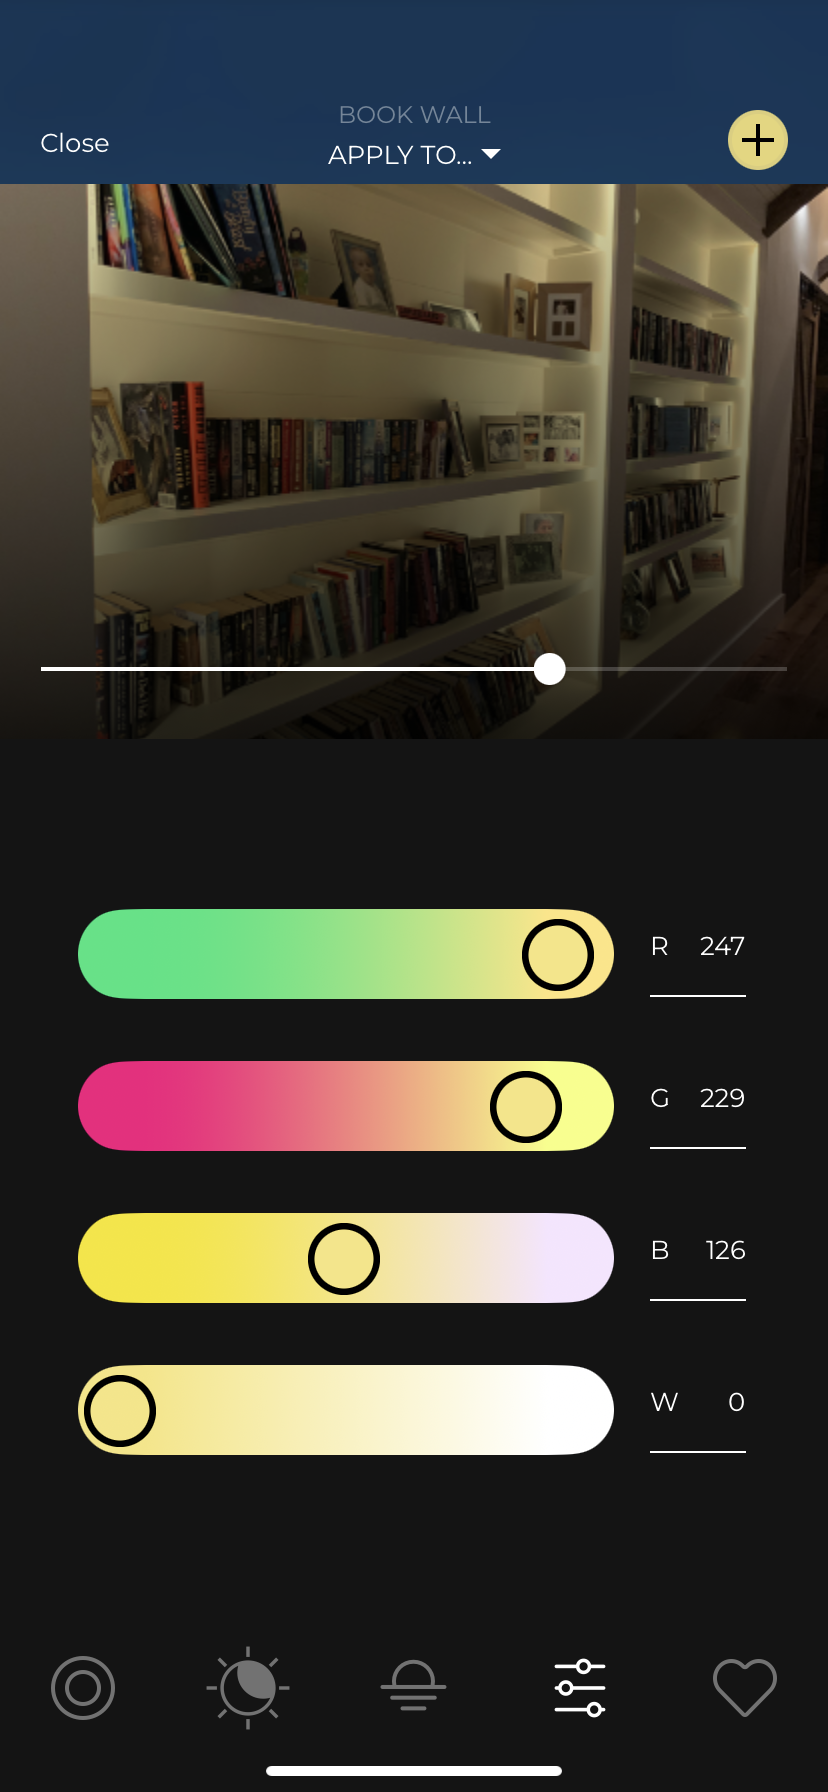
RGBW Color Picker
Tap the  icon to open the RGBW Color Picker screen. This screen allows adjustment of the color settings for the selected light based on Red, Green, Blue, and White values, each represented by a slider. As shown in the image below, the hue of each slider will change based on the current settings, to reflect how moving each individual slider will affect the overall color relative to the other values.
HELPFUL!: Double-tap on any of the numeric values shown in item D above to manually edit color value
Apply Color
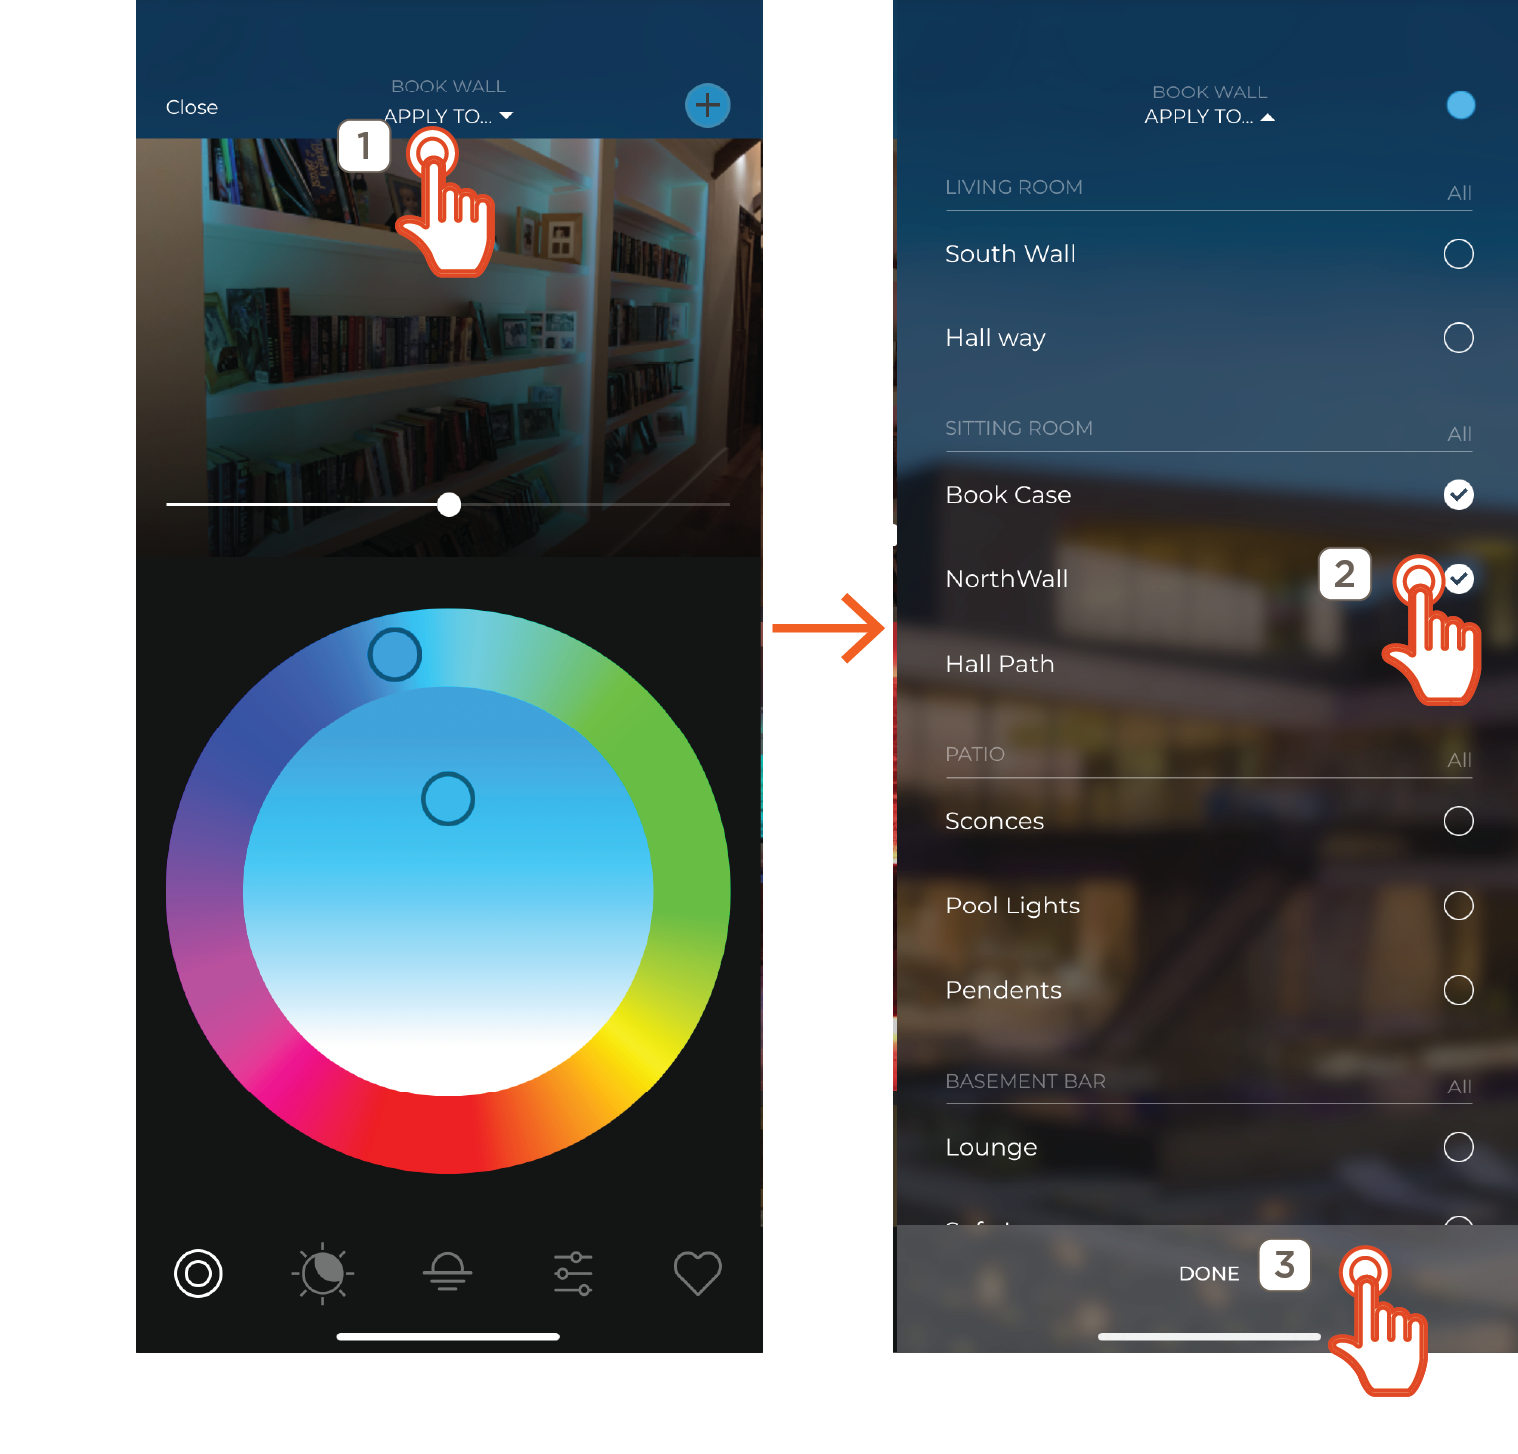
For any system which includes multiple lighting elements that support Color Selector functionality (Infinite Color, Tunable White, or Warm Glow), the top header of any Color Selector sub-screen that can be applied to two or more lights will show an option for distribution. This allows any settings applied to one light to be quickly and easily duplicated to other supported lights. To distribute the same color settings to multiple lights, follow the steps below:
- Tap Apply To... in the top header of any Color Selector screen to open the Lighting Distribution screen. A list of all lighting that supports the current settings will be displayed, grouped by room
- Select the lights to copy the current color settings to by tapping the circle at the right of each one, or tapping All next to the Room name to include all supported lights in the Room. All lights marked with a check will be included in the distribution
- Tap Done to apply the distribution settings to the selected lights, or tap Apply To... at the top of the screen to back out to the previous screen
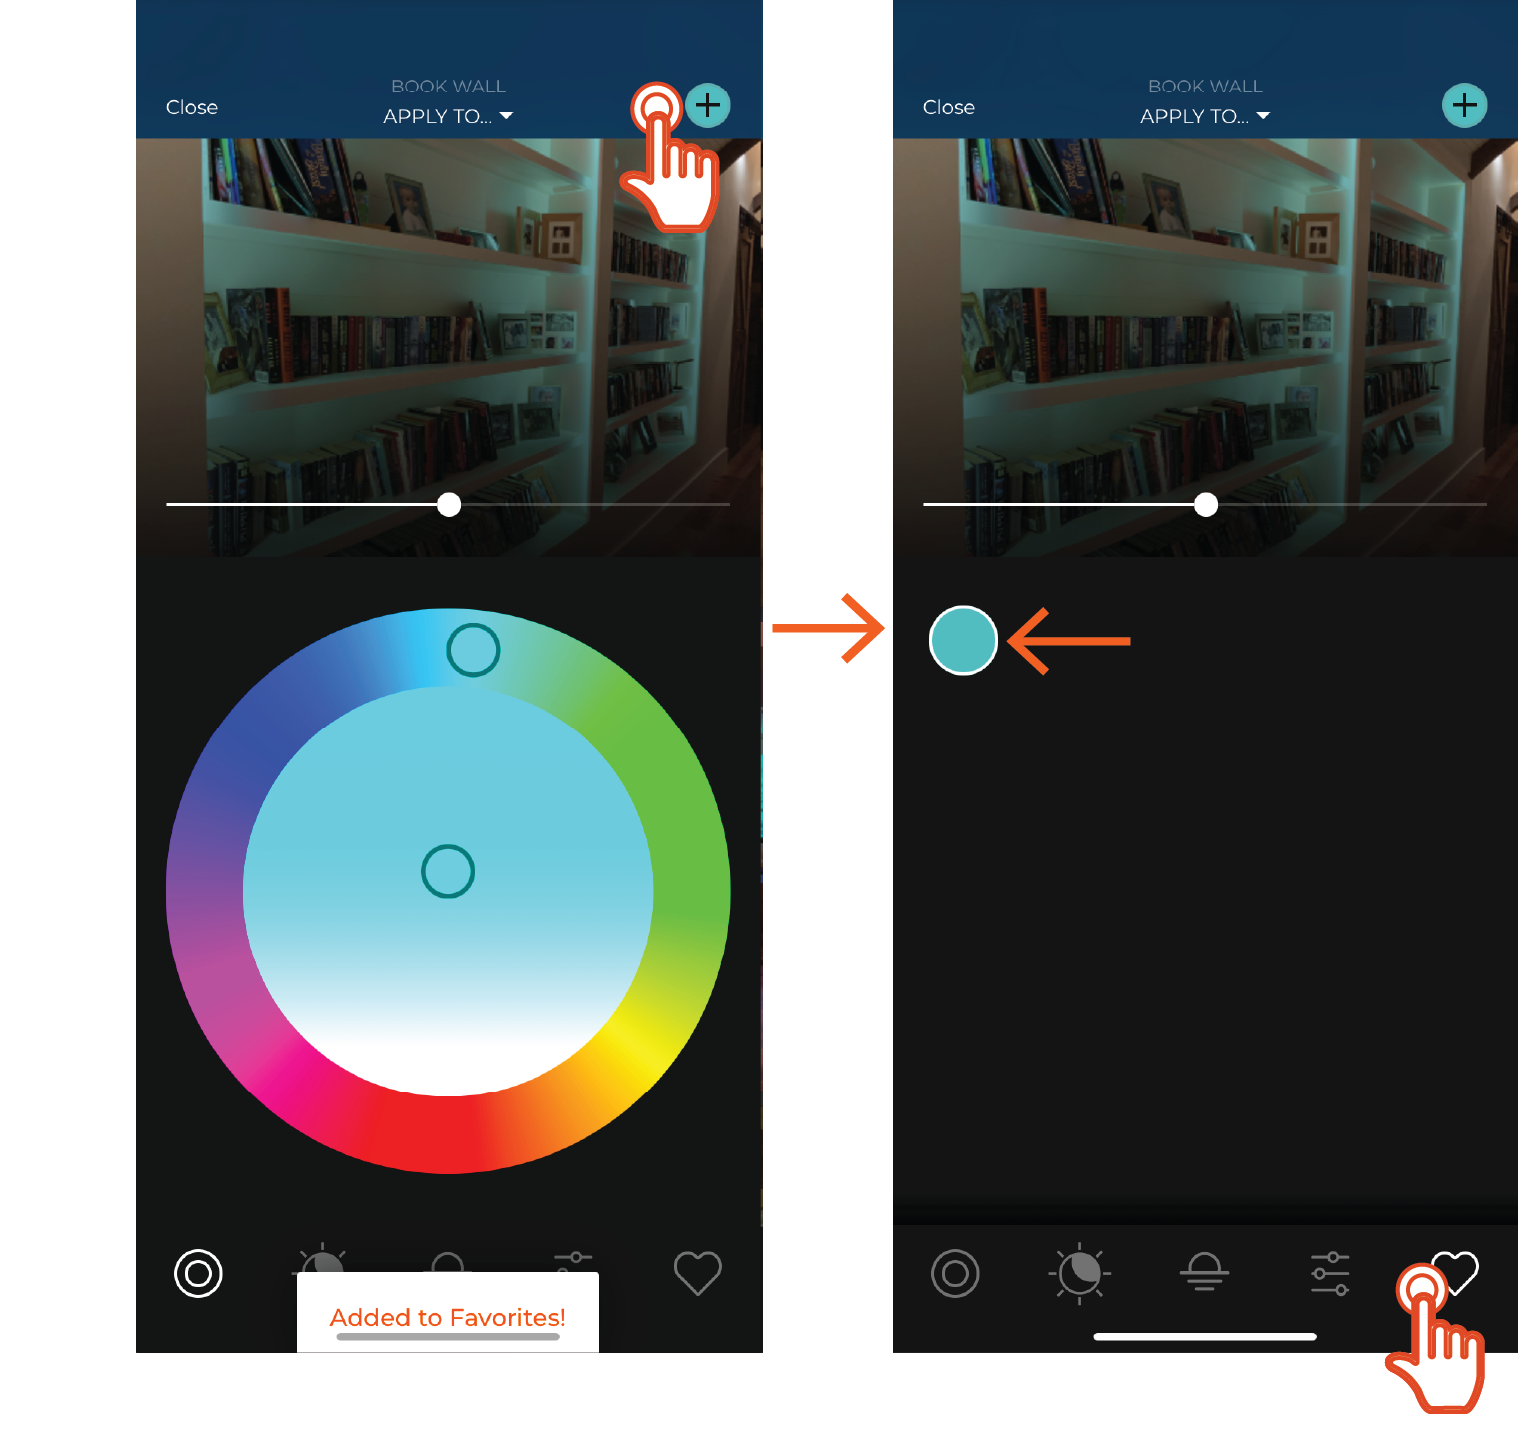
Save Lighting Favorite
Select the  icon to view the Lighting Favorites screen. This presents all color settings saved by the current Savant app user in the form of colored circles.
- To save a Lighting Favorite, tap the plus sign icon filled with the applicable color in the Color Selector Dock
- Tap the any one of the Favorites to apply its settings to the currently selected light
- Press and Hold any Favorite to reveal deletion options:
- Delete Color - Remove the specific Favorite
- Delete All Favorites - Removes all currently saved Favorites for the current Savant app user
HELPFUL!: Lighting Favorites are saved and managed at the Savant app user level, so favorites are not shared between Users. To copy a favorite to another user, have user 1 apply the favorited settings to a fixture, then have user 2 access any color selector sub-screen for the same light and save the favorite