Savant App User Guide - Scenes
Documentation Date: August 2025
Overview
Scenes are user-defined combinations of device settings and services that can be activated either with a single tap, button press, or automatically on a schedule. This document describes Scene creation, configuration, and useage within the Savant app. This document assumes the reader has an account with access to the the rooms and supported services desired. For information
Supported Services
All Services within the Savant app, barring the ones listed in this section, are eligible for use within Scenes. Unsupported services are not eligible for inclusion in Scenes, and are notcaptured during Scene creation nor selectable for manual inclusion at any point during the Scene creation or editing process. This may be due to lack of feedback or an intentional development decision to avoid potential security risks.
Unsupported Services
Services NOT supported for inclusion in Scenes include, but may not be limited to:
- Non-Variable Shades, including shades with Up/Down/Stop control only
- Pool and Spa
- Entry
- Door Lock
- Relay or GPIO controlled services, including gate and garage door controllers
For further information on service support for Scenes, contact a Savant Dealer or Sales Representative
Scenes View
From the Home screen, swipe left or tap SCENES to open the Scenes view.
| A | Scene Name | Name of the Scene |
| B | Shared with Users | Globe indicates the Scene is available to all users |
| C | If Conditions | Abbreviated conditions that must occur to cause the Scene to activate |
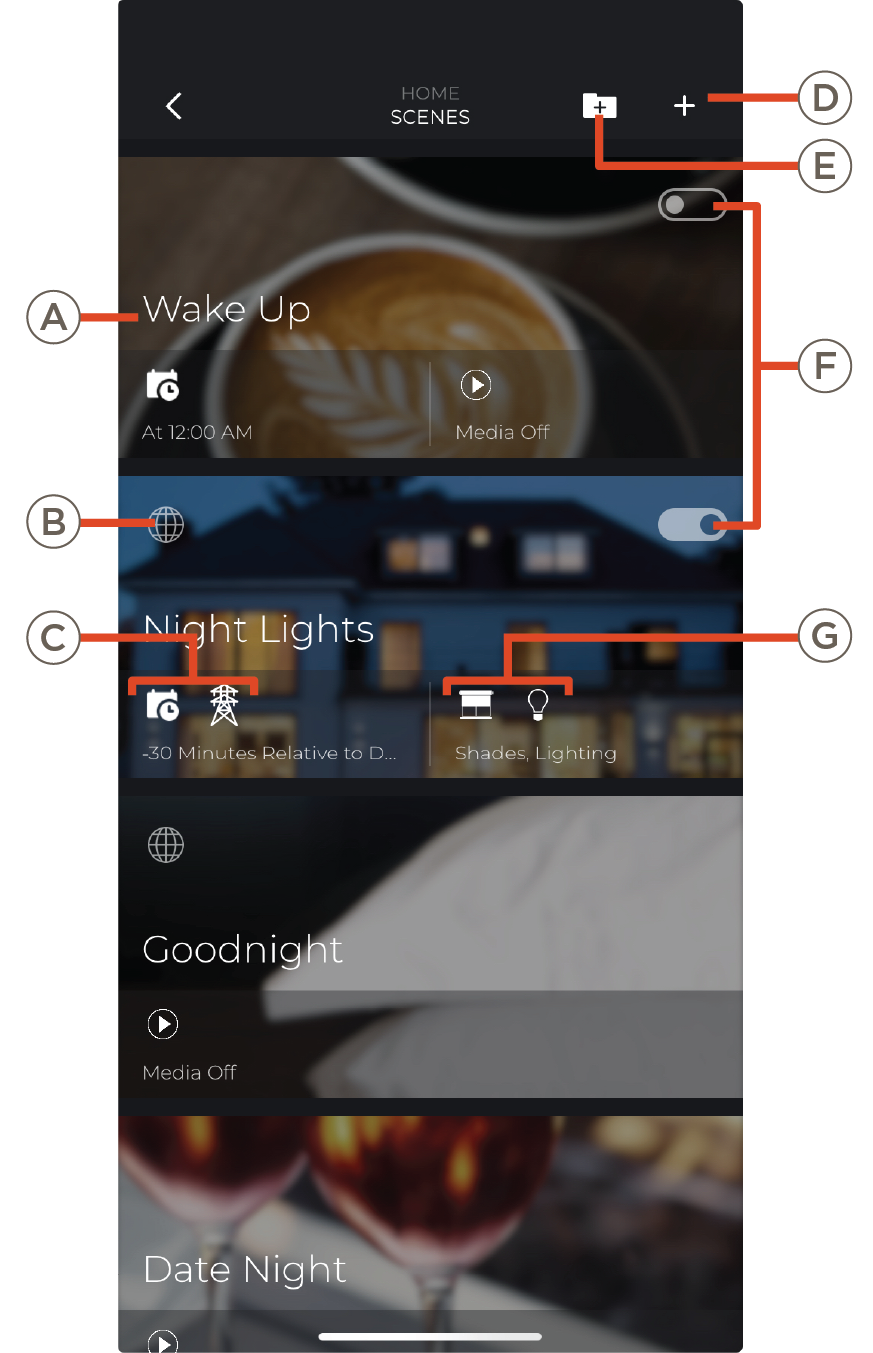
| D | Create Scene | Press to create a new Scene |
| E | Create Scene Folder | Create a Scene Folder to organize Scenes |
| F | Automation Status |
- Enabled (White background, Black dot) - Automation active
- Disabled (Black background, white dot) - Automation inactive
|
| G | Services | Services controlled when the Scene is active |
Create Scene
Tap the plus sign in the Scenes menu to create a new Scene. There are multiple types of Scene creation methods, available according to the type of Savant Home. Each method organizes the steps of configuring the settings of the Scene according to its functionality:
- Capture Scene - Capture a virtual snapshot of the current service settings for selected rooms and include them in the Scene. Services and settings can be added, removed, or edited during the creation process.
- Tap to Run - Create a Scene that will only occur when the scene is manually activated by the user
- Schedule A Scene - Create a Scene that runs according to a daily, monthly, or weekly schedule
- Utility Events - Scene creation that focuses around energy management, controlling services based on grid availability and battery level
- Custom Automations - A Scene that is triggered using feedback from monitored variables such as motion sensing, date/time, or power grid state

Capture Scene
- Choose the room(s) to be captured
- Select the Service to be captured
- Click the ... next to the room to edit service specific settings, such as which channel to activate and tap DONE when finished
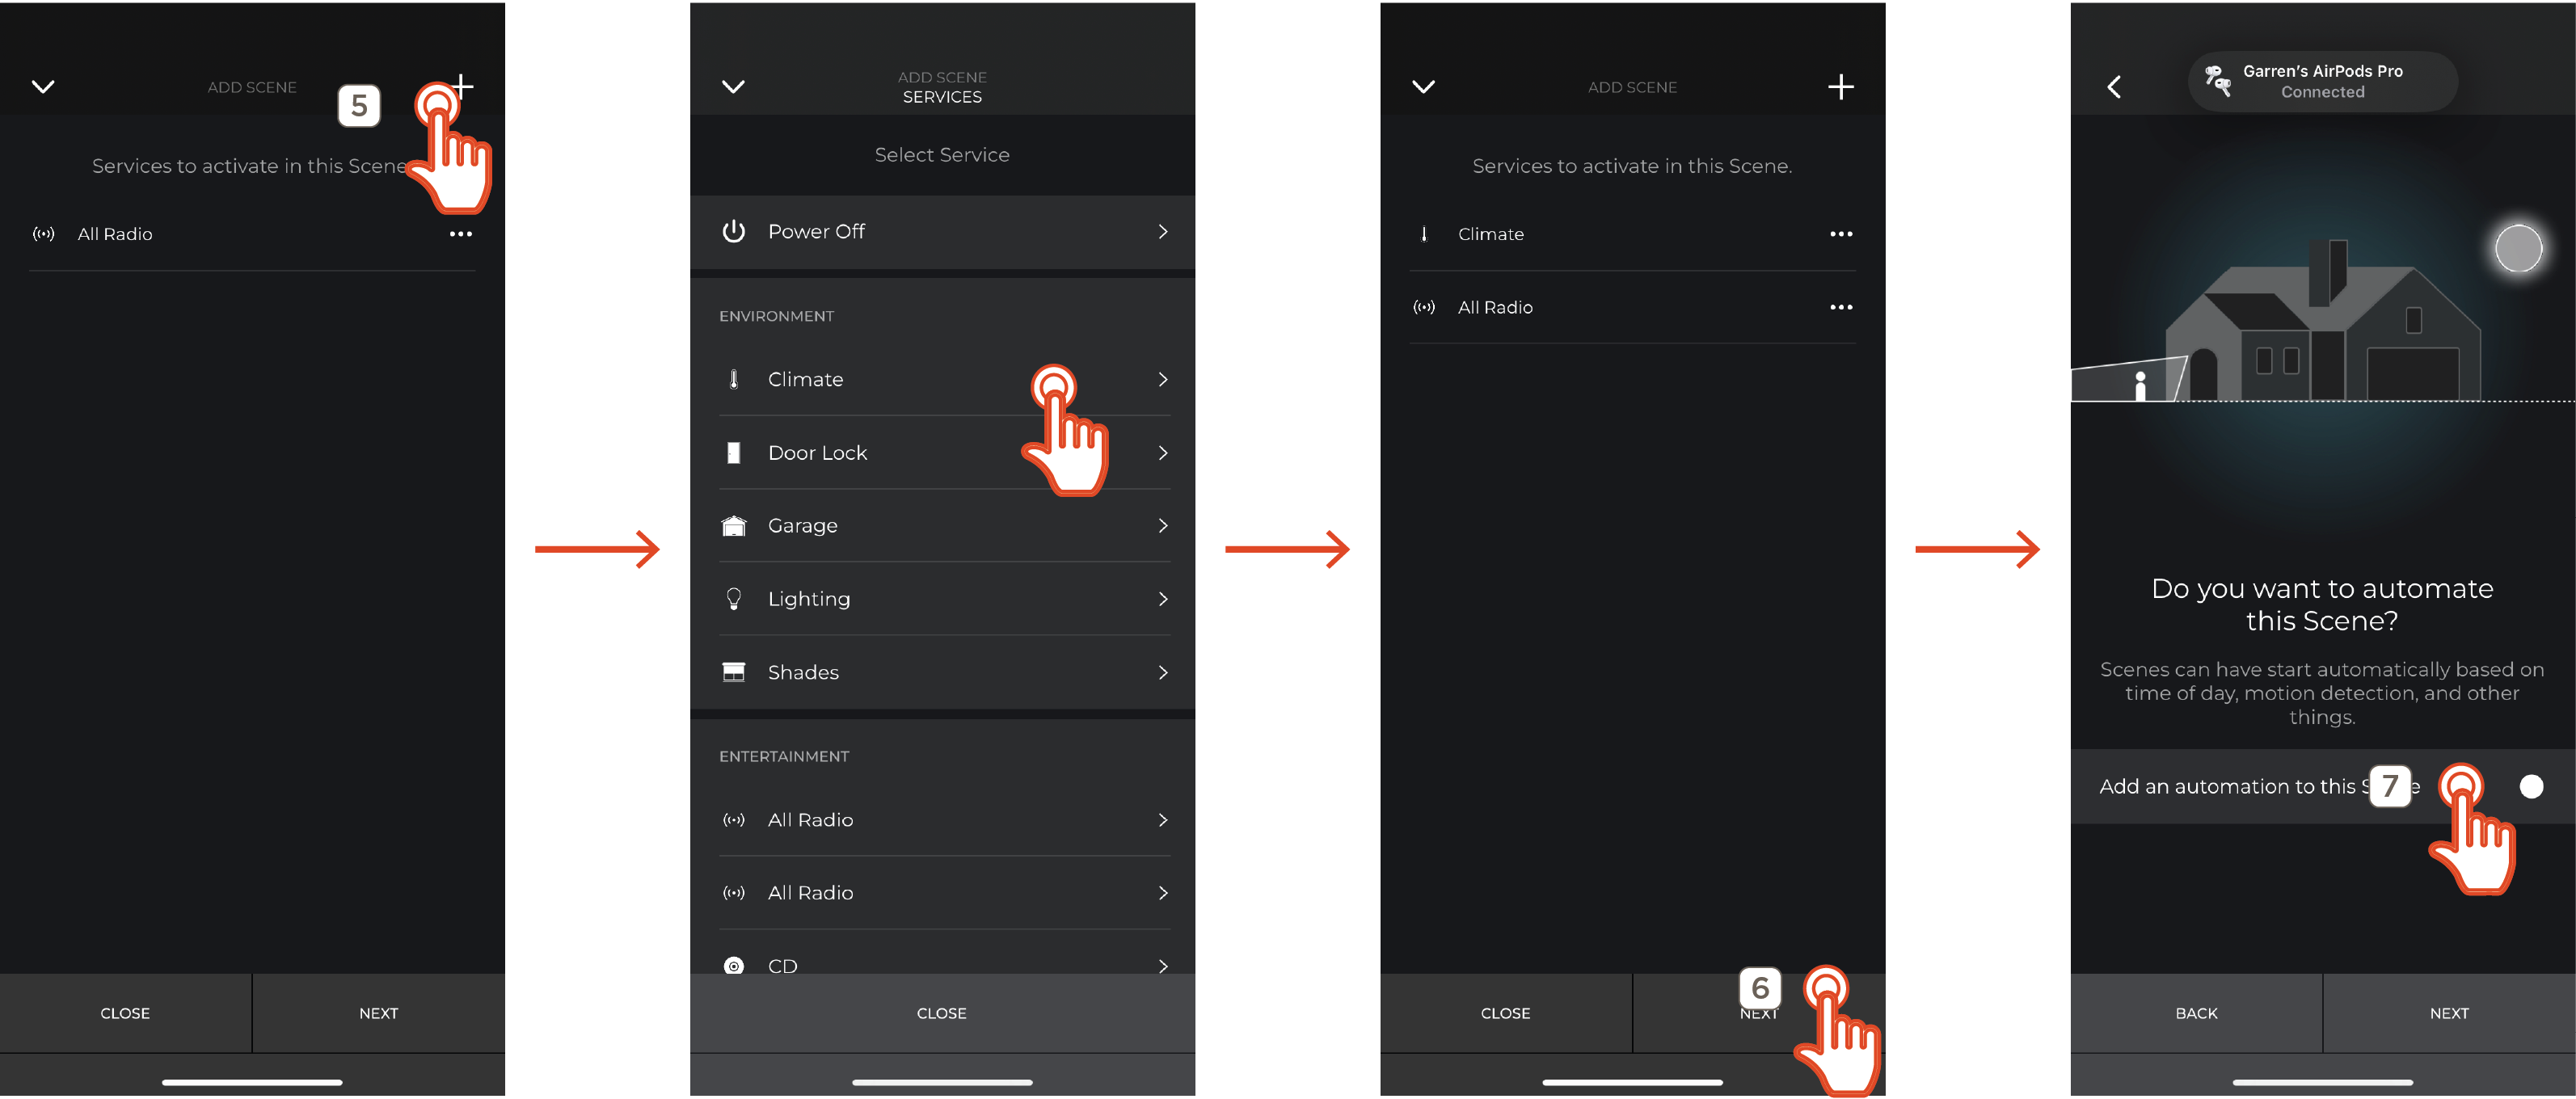
- (OPTIONAL): Click the plus sign to add additional Services to the Scene
- Once all Services have been added, tap Next
- (OPTIONAL): Enable Add an automation to this Scene to allow a series of events to control when the Scene is activated or leave it disabled for manual activation. Tap next.
NOTE: For information on automating a Scene, see Automations
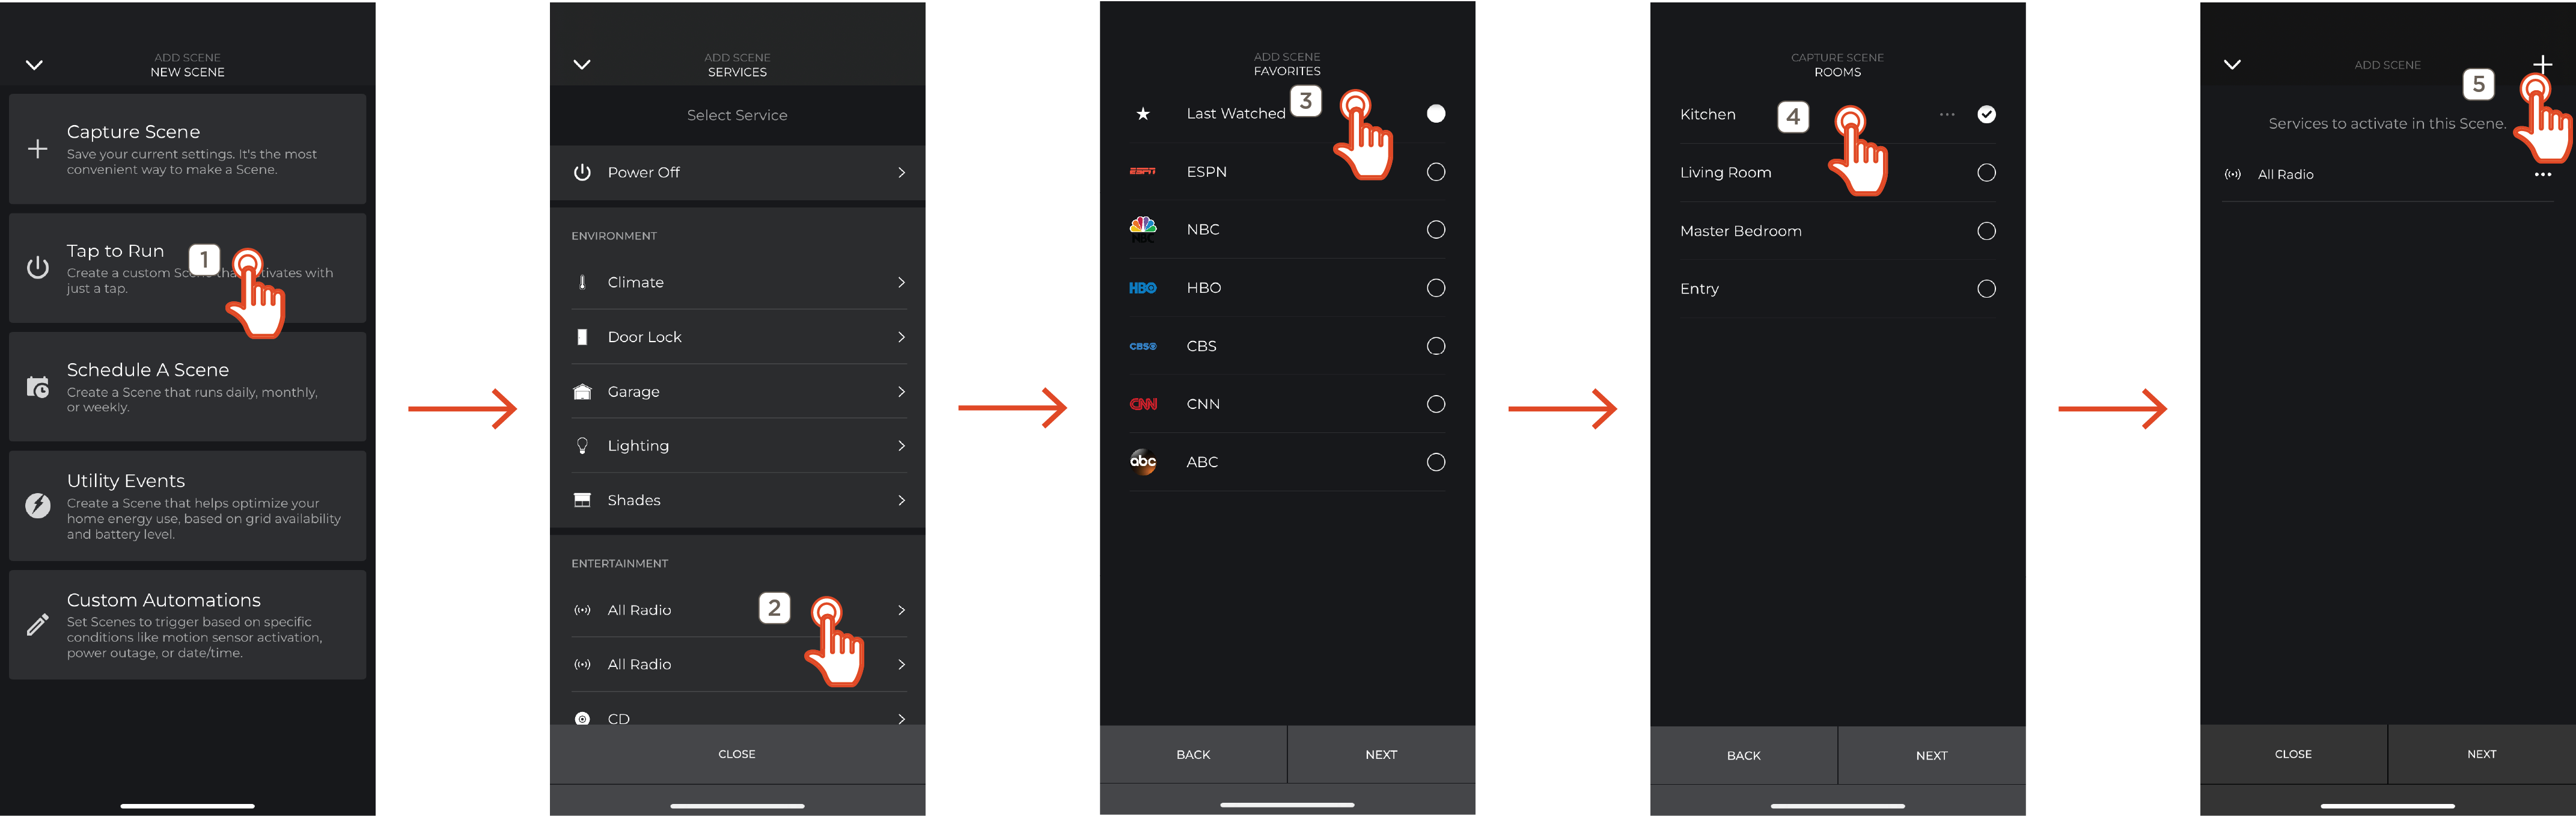
Tap to Run
- Select Tap to Run
- Select the first controlled service
- Configure any settings associated with the service
- Select the room the service out of the ones the service is available within
- Click the plus sign to add additional services, or next. Then see
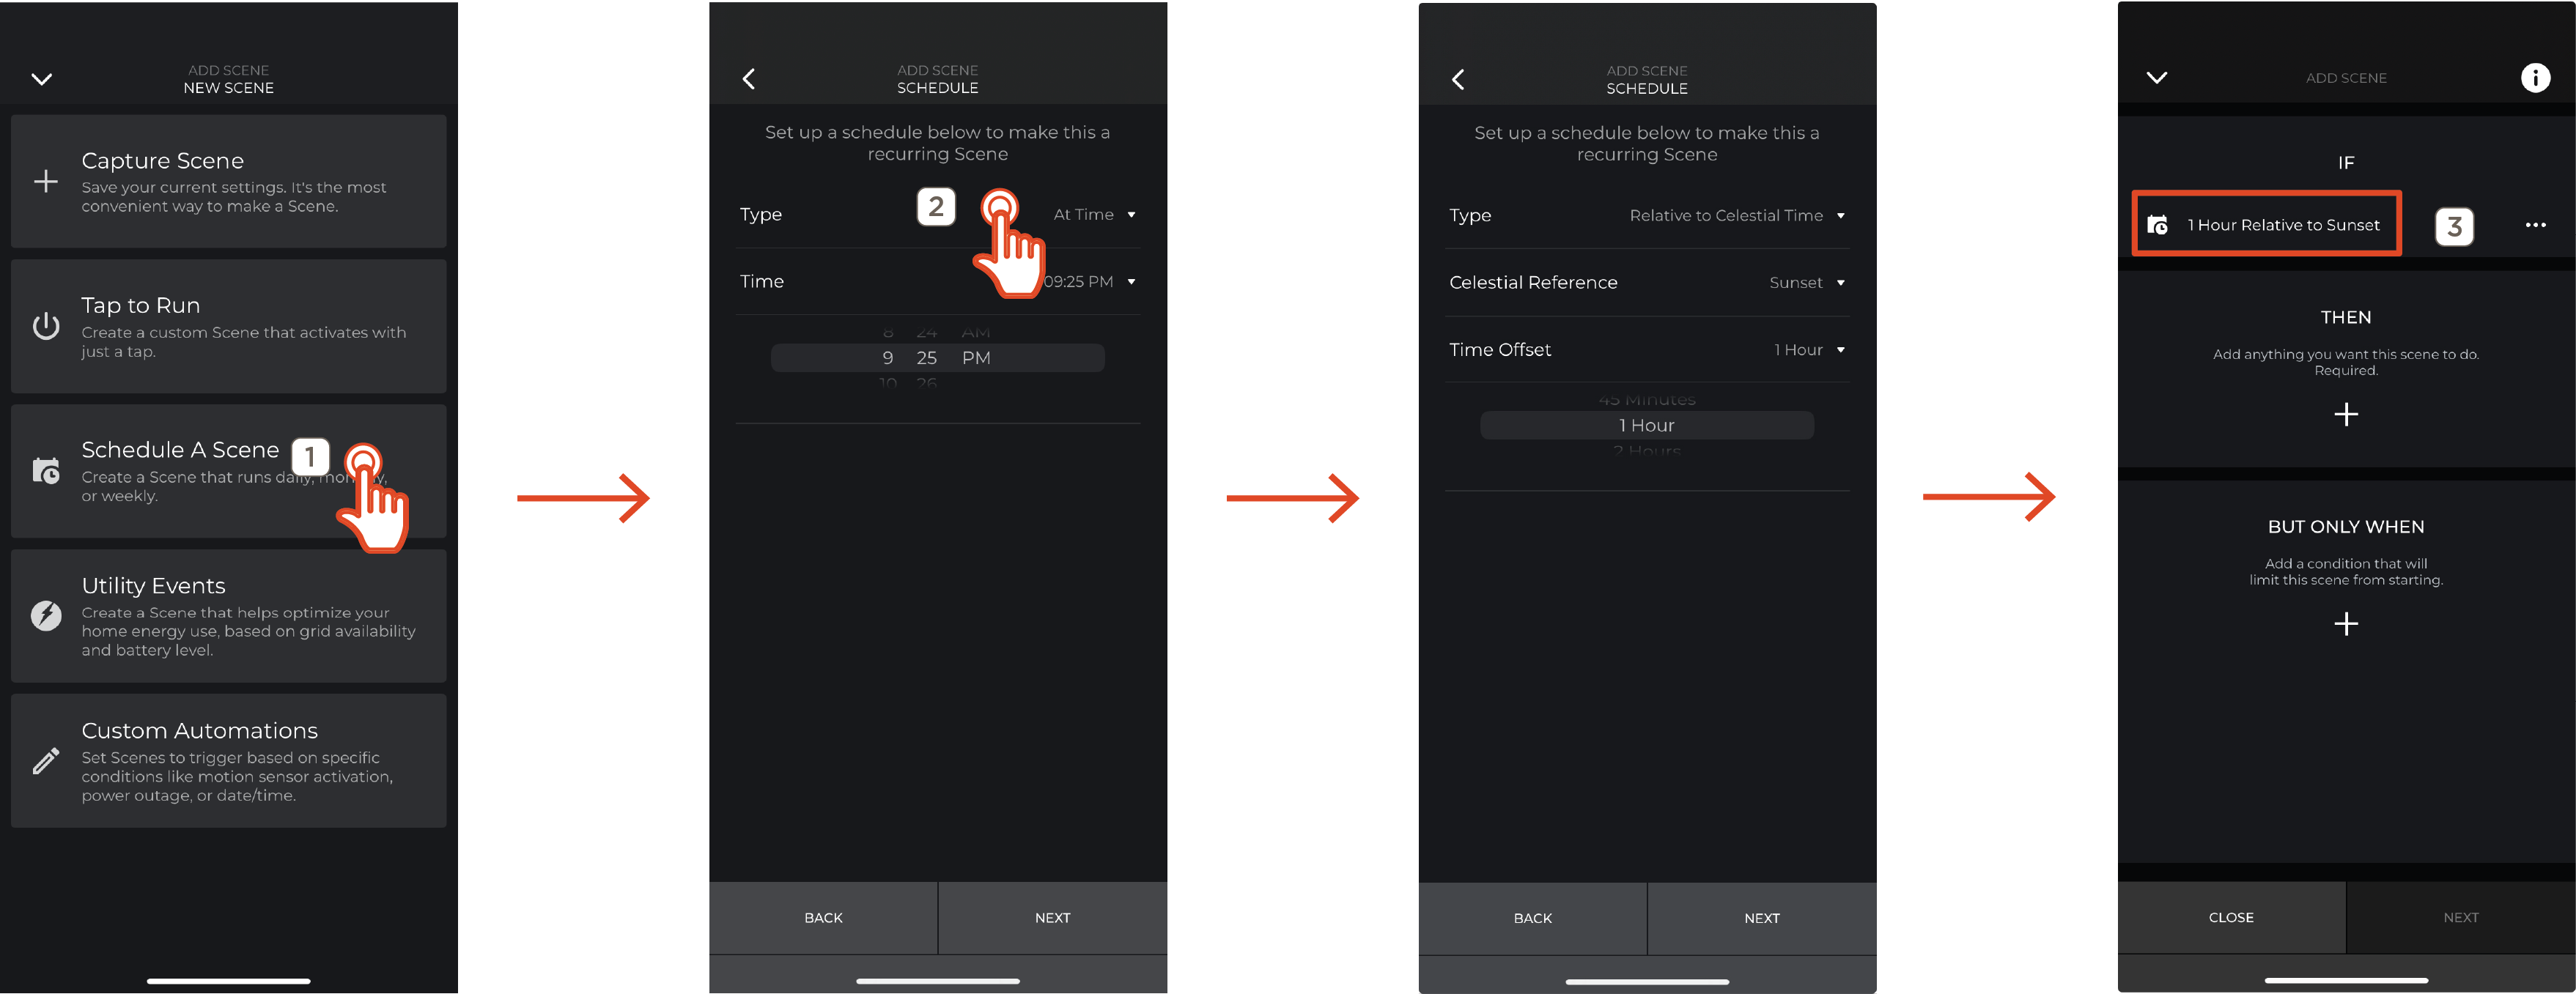
Schedule a Scene
- Tap Schedule A Scene
- Select schedule type and time for the scene to occur at:
- At Time - Occurs at the selected time in the Savant Home time zone
- Relative to Celestial Time - Occurs when the celestial reference happens, modified by the chosen time offset
- The Conditions screen displays the chosen time. Continue to the Conditions section for further Scene configuration
Utility Events
- Select Utility Events
- Choose the power source event that triggers the Scene to occur:
- Battery Drops to Level - Activates the Scene when the battery reaches the entered percentage
- Grid Goes Down - Activates the Scene when the Savant Home detects a grid outage
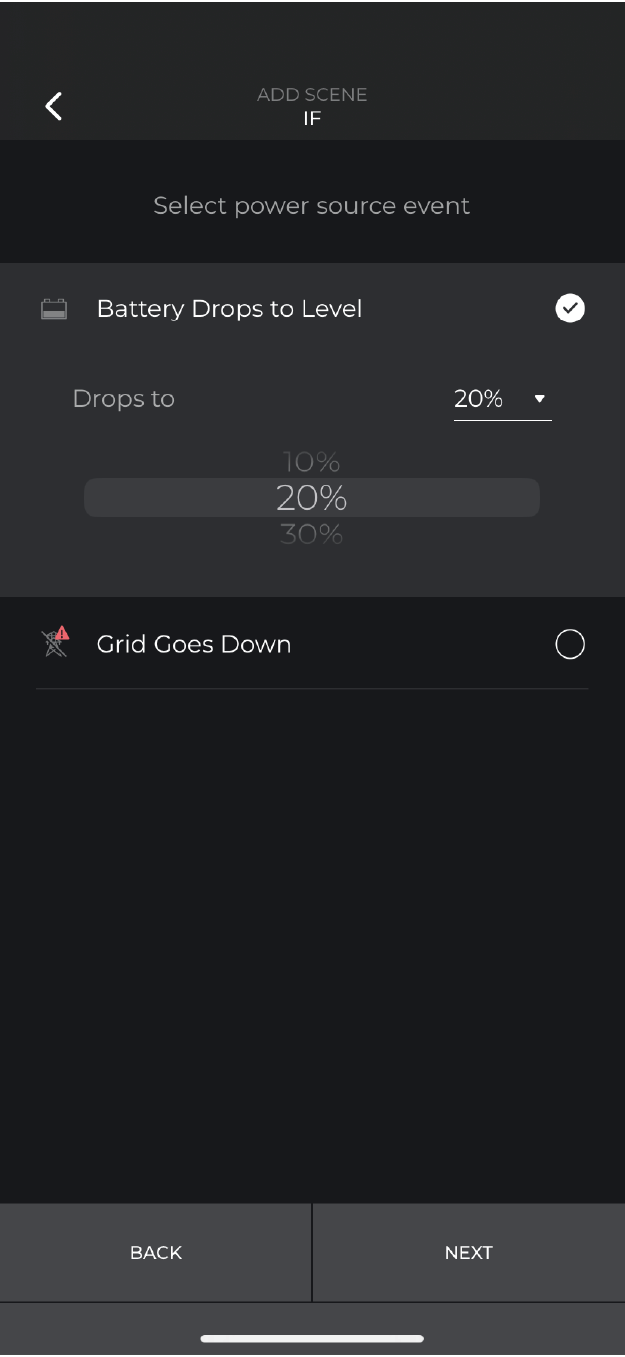
- The Conditions screen displays the chosen time. Continue to the Conditions section for further Scene configuration
Custom Automations
- Select Custom Automations
- (OPTIONAL): Add IF condition for automatic Scene activation and configure IF condition settings
- Choose the first Service or setting to be controlled and select Next
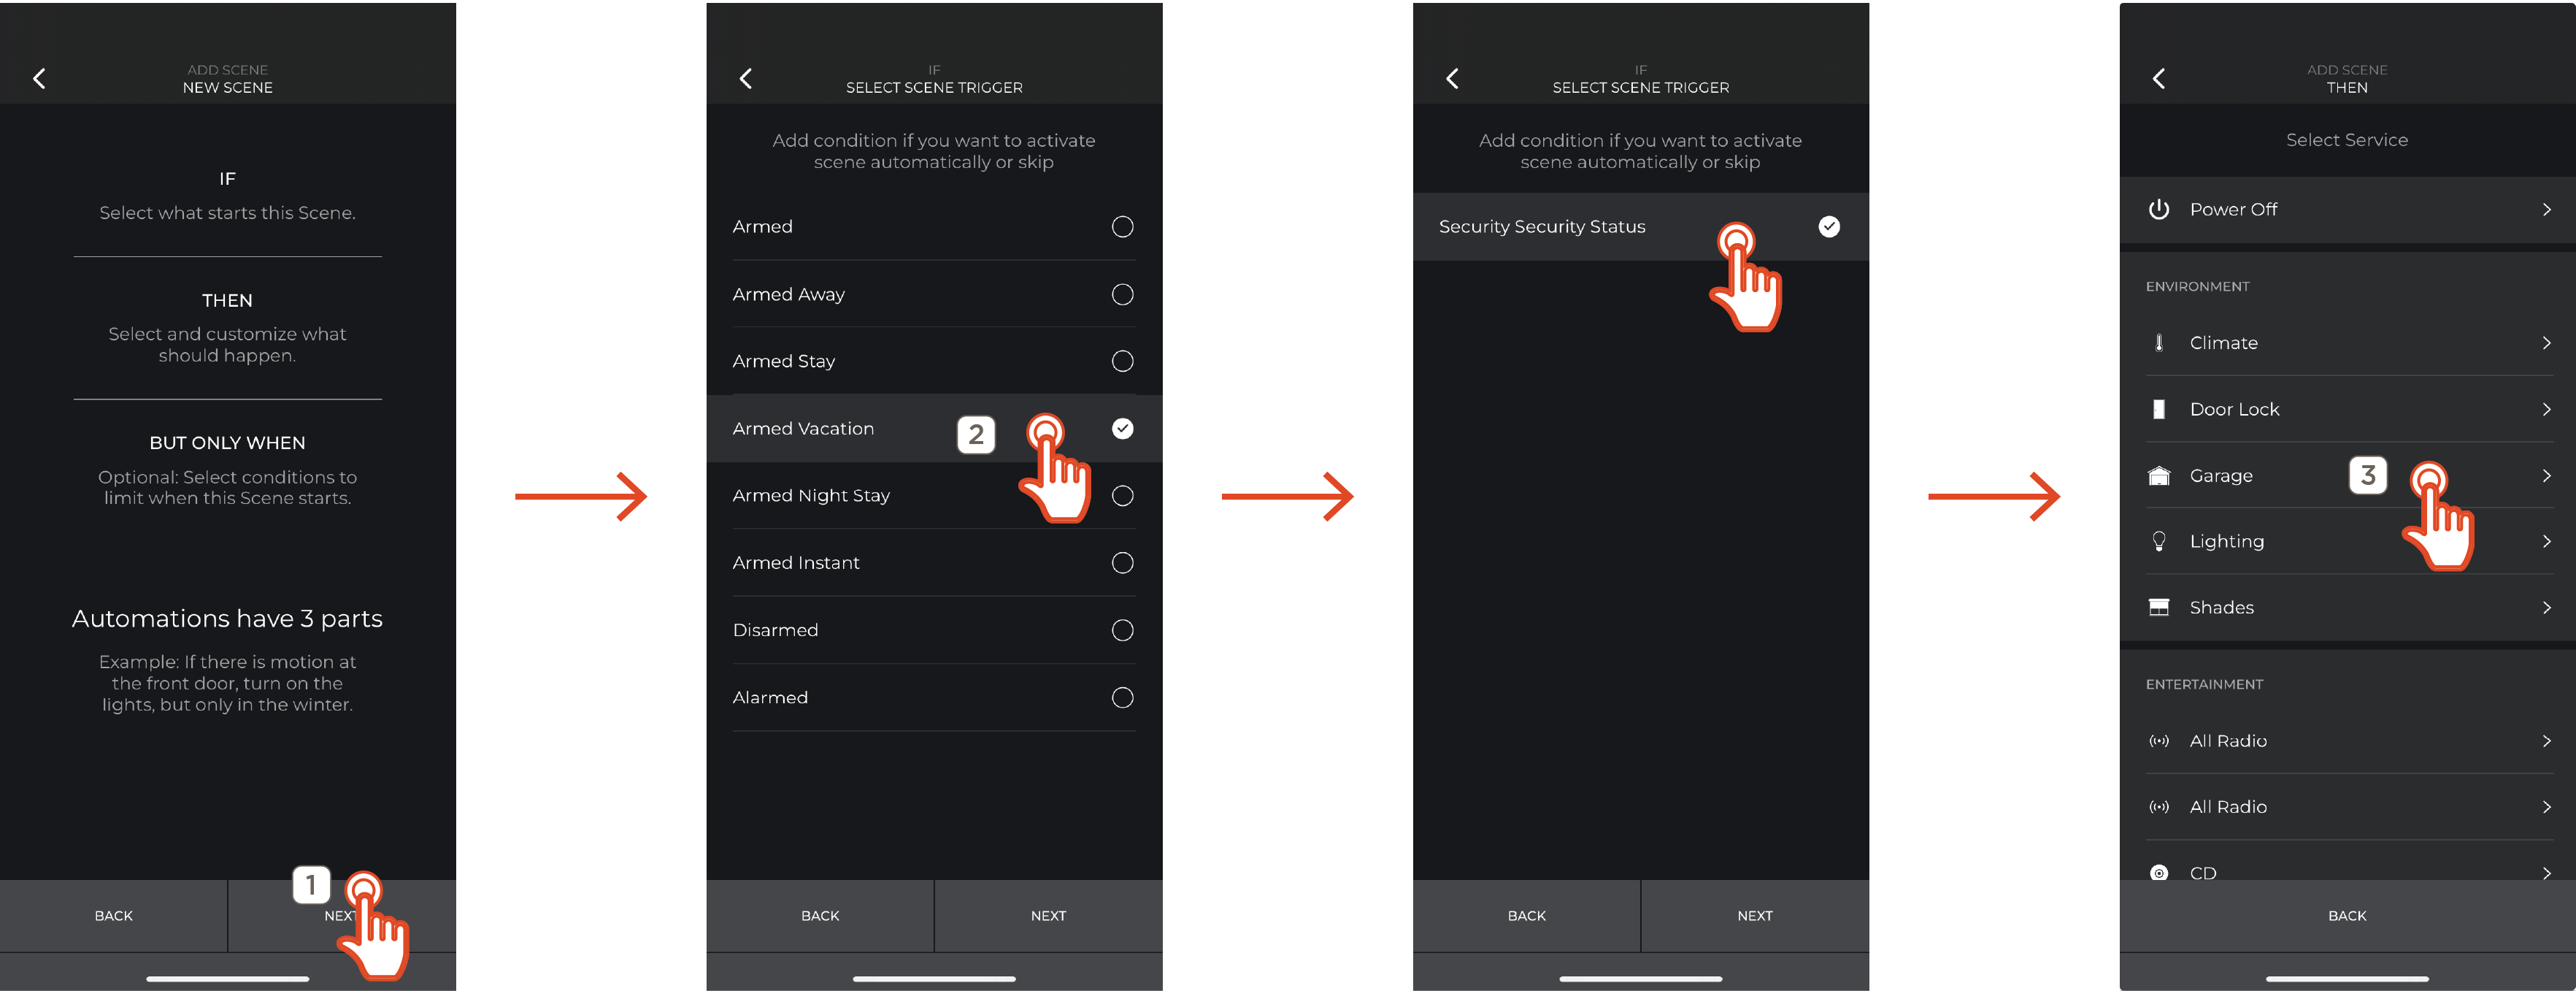
Automations
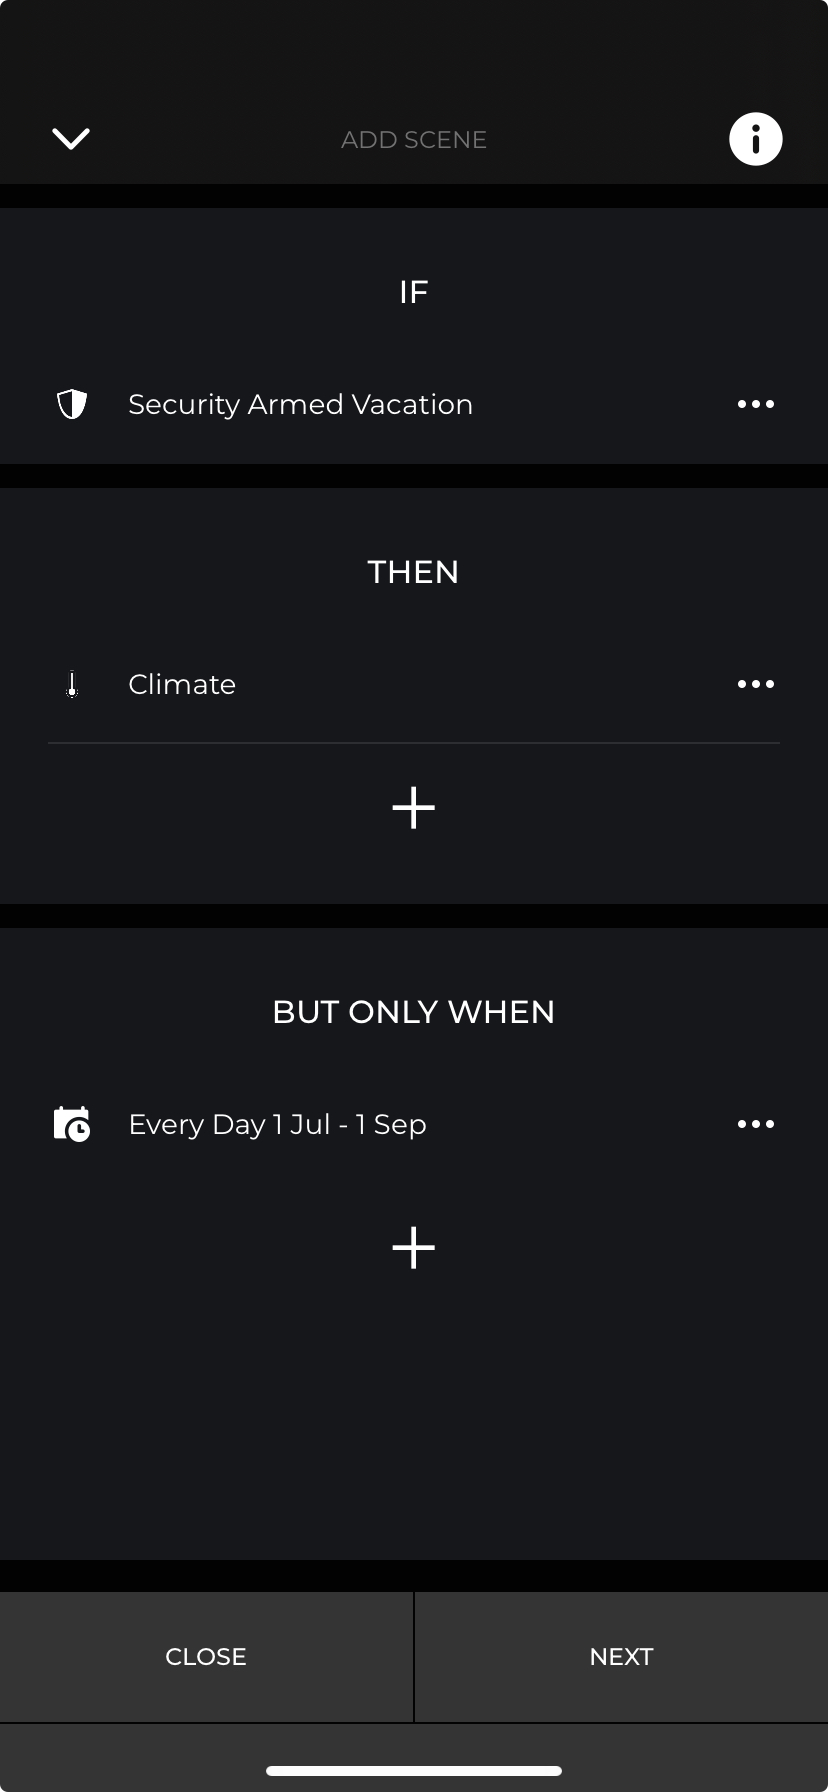
Once any Scene creation method has been chosen and the above settings configured, the user will be presented with the Automations screen. An automation repeats the occurance of a scene dependent on one or more conditions. Automations consist of three parts:
- IF - The condition that causes the Scene to occur
- THEN - The settings and Services that are activated when the Scene is occuring
- BUT ONLY WHEN - Overriding factors that prevent the Scene from occurring
Add and configure these three settings as desired per scene. Once complete, tap Next
Scene Details
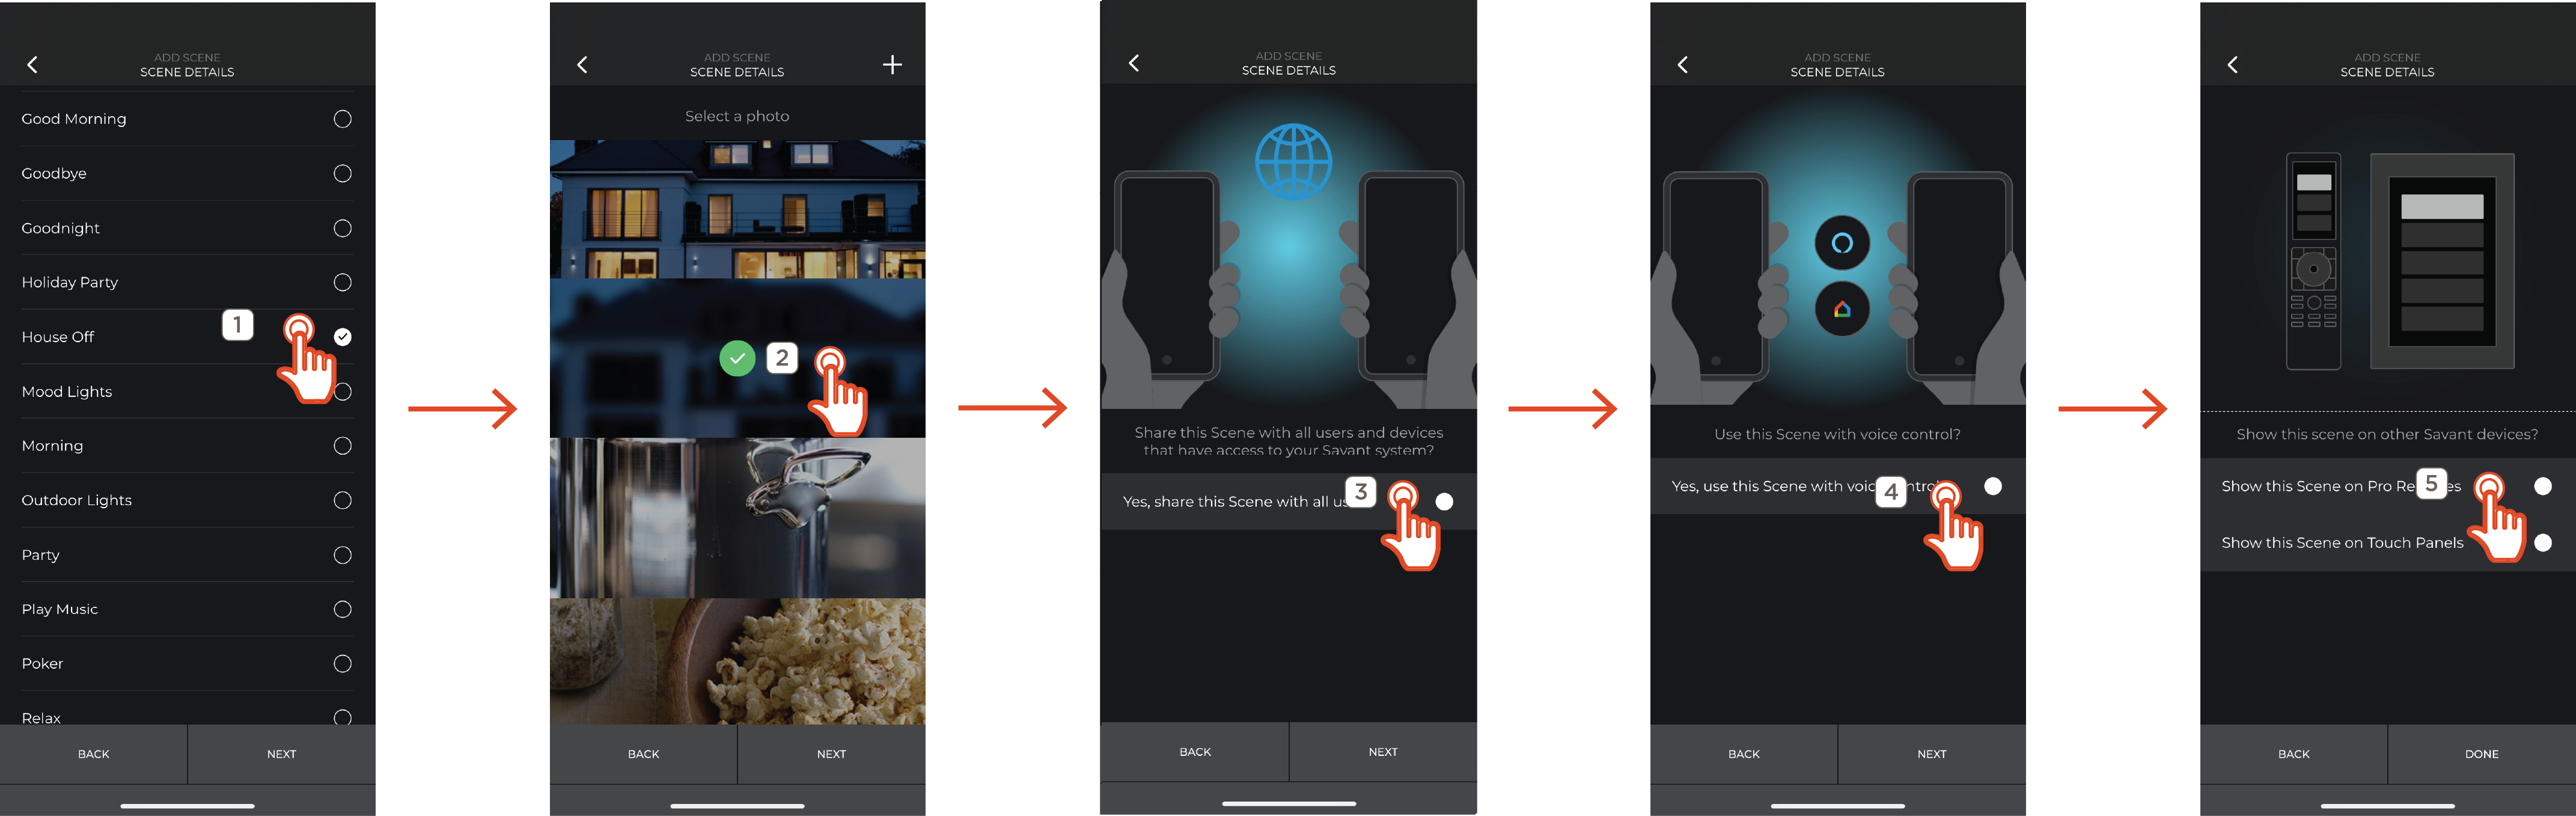
- Enter a custom name for the Scene or choose one of the provided example Scene names and tap Next
- Click the plus sign to upload a photo or scroll down to choose from the provided Scene photos and select Next
- Enable Yes, share this Scene with all users to allow all users with access to the Savant Home to view and control this Scene, or leave disabled for the Scene to only be available for the user that created this Scene
- Enable Yes, use this Scene with all voice control to allow this Scene to be activated by name when controlling the Savant Home using voice control
- Toggle Show this Scene on Pro Remotes or Show this Scene on Touch Panels to control whether the Scene appears on either device and tap DONE
The newly created Scene appears at the bottom of the list of all Scenes, if any other Scenes have been created.
Scene Info
Controlling and viewing the status of a Scene is done through the Scenes menu. Tap a Scene to activate it, or identify what the Scene does at a glance using the information below:
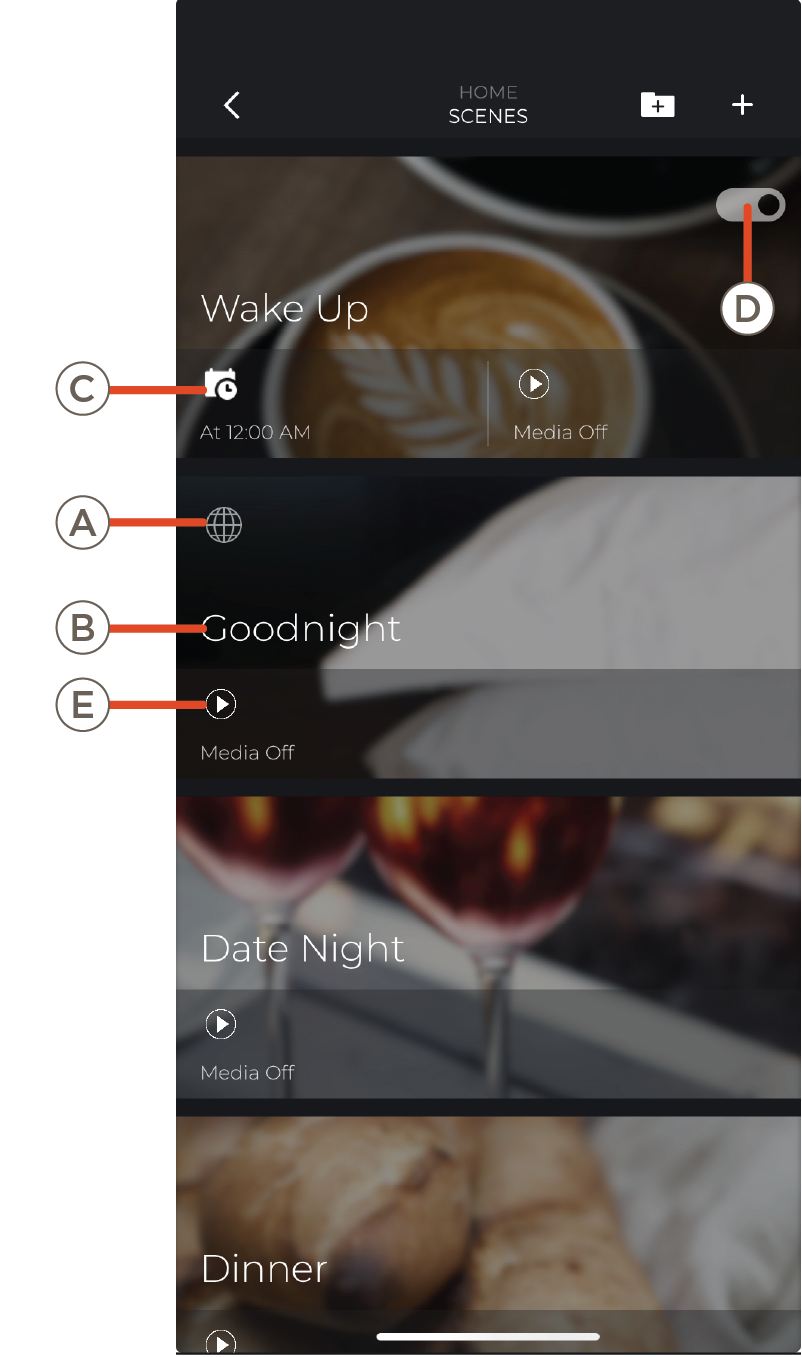
| A | Shared with all users | Displays a globe to indicate the Scene is available to all users with access to the Savant Home |
| B | Scene Name | Name of the Scene |
| C | Scene Conditions | The conditions required for the Scene to automatically activate |
| D | Toggle Recurring Schedule | Enable (White background, black dot) or Disable (black background, white dot) scene recursion according to the Scene scheduler |
| E | Affected Services | Services icons for services chosen within the Scene |
Edit Scene
Swipe left on the Scene within the to Scenes view edit the Scene after creation
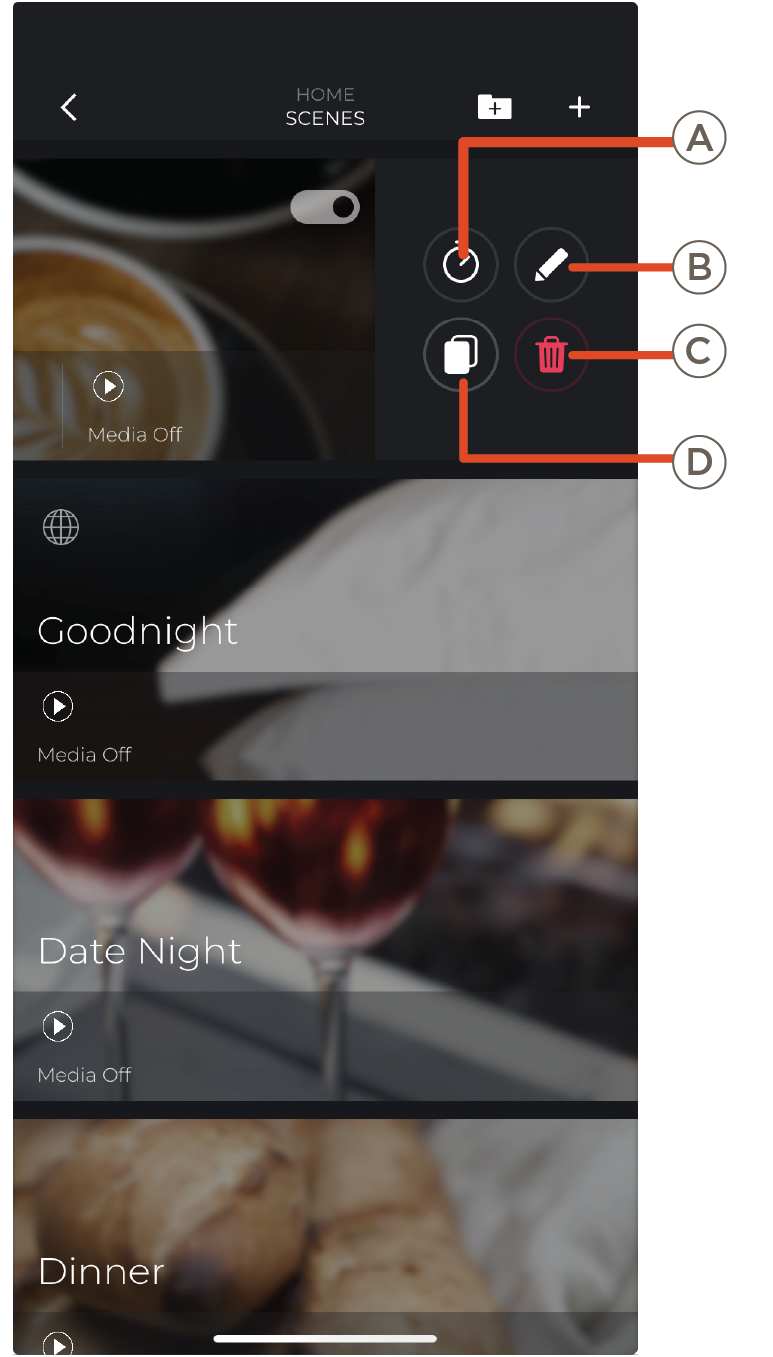
| F | Timer | Activate the Scene with a delay between 5 seconds and 5 hours |
|
G
| Edit Scene | Edit all settings of the Scene |
| H | Copy | Create a new Scene as a copy of the selected scene, then edit settings |
| I | Delete Scene | Delete Scene permanently |
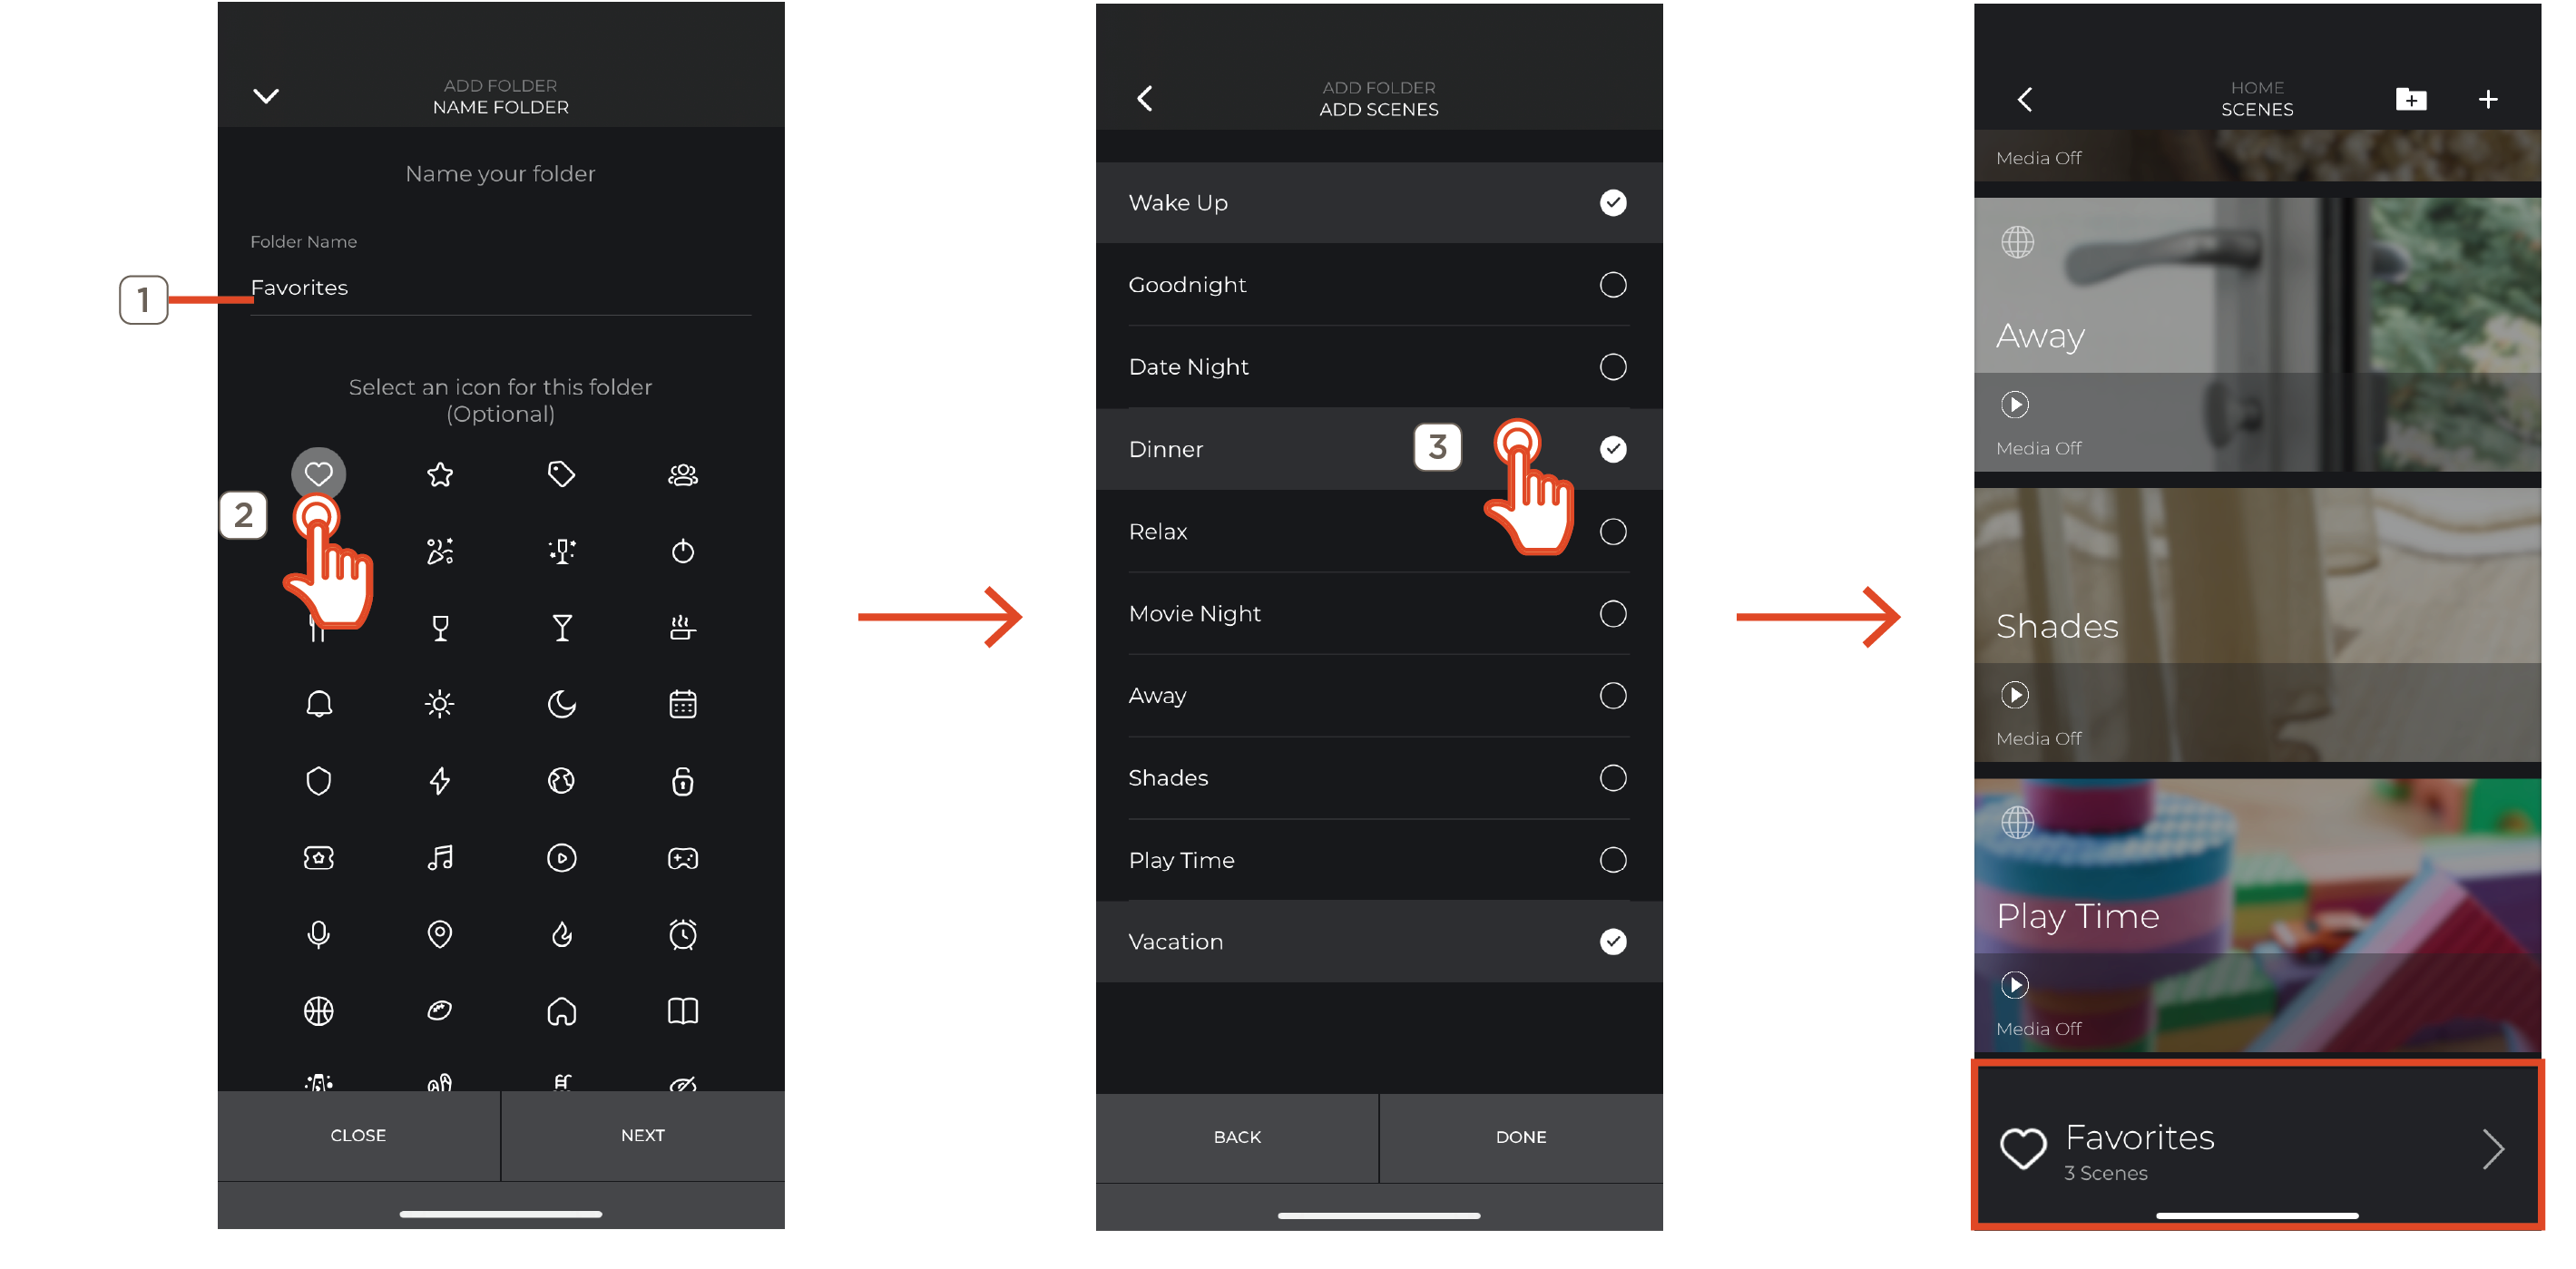
Scene Folder
Select the folder icon to create a Scene folder. Scene Folders are groups used to organize selected Scenes into one place within the Scenes menu.
Name the Scene Folder and give it an icon associate with it.
Tap the folder to view all Scenes within it.
- Tap the plus sign within a Scene Folder to create a new Scene within the folder
- Tap Add an Existing Scene to move an existing Scene into the Scene Folder
- Swipe left and tap the pencil to edit the folder name and icon
- Swipe left and select the trash can to delete the folder. This moves all contained Scenes to the Folder above or, if there is no folder, the main Scenes view