| Full Description |
Guide to Savant Lighting TrueImage App Scenes: Fast Capture, Build New, Activate, Edit, and Delete
Introduction
The Savant Lighting TrueImage application’s Scenes feature makes it easy to control one or more of your smart lights with a single button press. This document will walk through the steps for creating or editing a Scene in the App, which can then be used to recall saved settings for your Savant Smart Lights at any time.
Before you get started with using Savant Lighting Scenes, you will need to have completed initial onboarding of at least one Savant Smart Light, assigned your lights to a room and group in the Savant Lighting App, and configured your TrueImage for all Smart Lights in your configuration.
Creating a Scene
There are two possible methods for adding a Scene to your Savant Lighting TrueImage App configuration, Fast Capture and Build New. The Fast Capture method, which is described below, captures a snapshot of all the lights in your system as they are set at the time the Fast Capture process is started (Capture button pressed). Once the initial Scene has been captured, you can choose which Smart Lights you would like to include in the Scene.
 |
Capture the Current Smart Light Levels
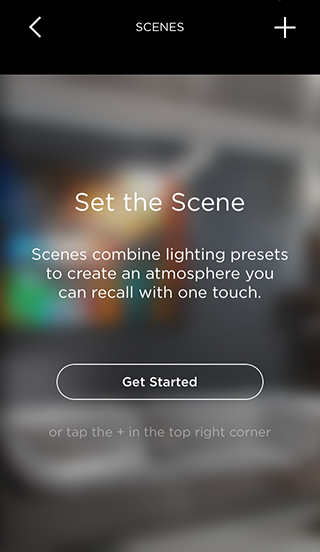
- From the Home page, tap the SCENES icon at the top right hand side to get to the Scenes page (pictured left)
- If this is the first Scene you have created, select the Get Started button to begin the Scene creation process. If you’ve already set up at least one other Scene, tap the + icon at the upper right hand side
| | | 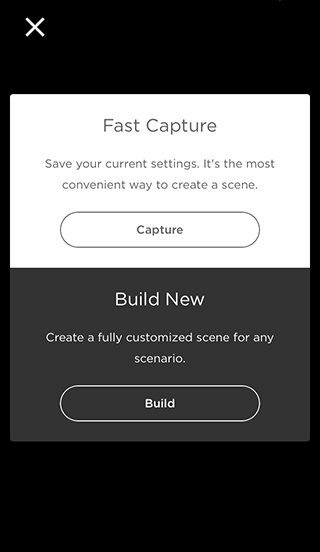 |
Choose a Scene creation method
Tapping the Capture button will take a snapshot of the current settings for all of your currently configured lights.
Tapping the Build button will allow you to manually choose the lights, colors and dimmer settings for the scene. | | | 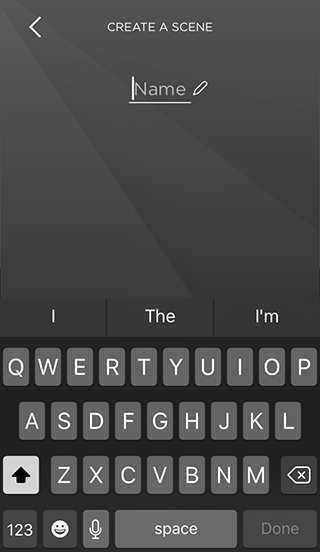 |
Name Your Scene
Once you have tapped either the Capture or Build button, the App will ask you to name your Scene. Input any name you’d like and tap Done | | |
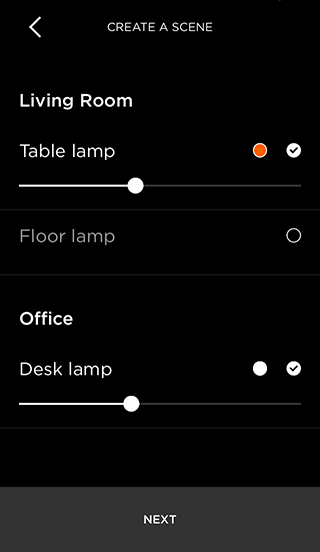 |
Select Lights to Include and Make Any Needed Adjustments
Once your Scene has been Captured, the App will bring you to the Scene Creation page, where you will see all configured Smart Lights, along with their captured dimmer level values and colors. Settings for each light, along with whether or not they will be controlled by your Scene, can be adjusted from this screen.
Uncheck any lights you’d prefer not to control with this Scene by tapping the checkmark to the far right of the light group’s name to remove them. Any unchecked lights will be ignored by this Scene, and left in the state they are in when the Scene is turned on.
Tap the circular icon just to the left of the checkmark to open the TrueImage display, where you can select the light group’s color and dimmer level.
Use the slider bar just below each light or group to fine tune the dimmer level your Scene will apply.
TIP: To turn a light off using a Scene, mark it with a check to include it, then adjust the slider to set the dimmer level to 0%. If a light is left unchecked during Scene creation, the Scene will simply leave that light in whatever state it is in rather than turning it off.
Once you have selected the lights or groups to include in your Scene, and adjusted their settings and color to the desired values, tap Next at the bottom of the screen to continue.
| | | | 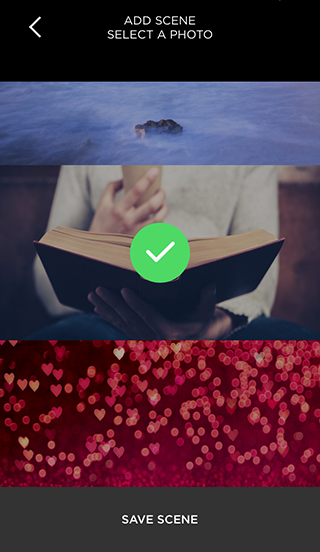 |
Select Scene Image
For the final step, you’ll be asked to choose an image for your Scene.
If you decide you’d like to make further changes to your Scene’s settings, tap the arrow at the top left corner of the screen to go back to the Scene Creation page.
Select the image you would like to use as this Scene's background on the main Scenes page, then tap the Save Scene button at the bottom of the screen. The App will return you to the main Scenes Page, where all of the Scenes you have configured will be listed.
- Tap on any Scene from the main Scenes page to activate it and apply its settings to all included Smart Lights.
- Touch a Scene and swipe left to reveal options to Edit or Delete that Scene. Selecting Edit will bring you back to the Scene Creation Page, where you can adjust your settings for the selected Scene.
|
|
|
|---|
